
Recently I was back with friends in the studio to take a portrait for what was to be a new image in my ongoing Warrior series …
So in this post I thought I’d share some of the Behind the Scenes including the inspiration, sourcing the clothing and props, lighting and background …
inspiration
The inspiration for this image came purely by fluke when posting on social media and seeing the below motivational digital art poster having been shared …
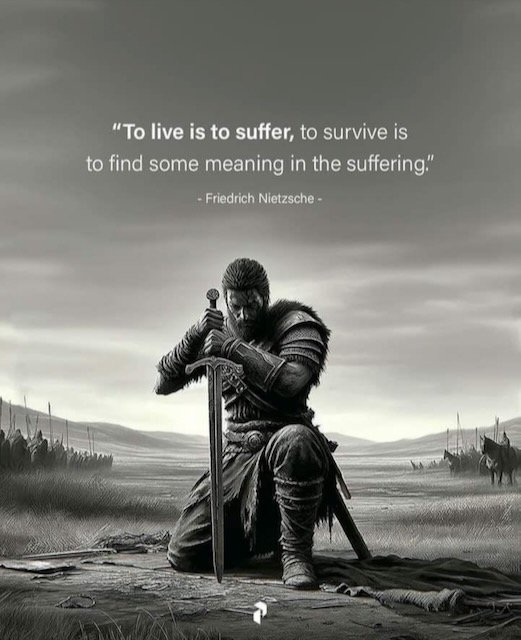
Whenever I see images online that I like and inspire me I always take a screen shot and save them in a Private “Inspiration” Album in my iPhoto Library for reference later on just incase I plan on a photo shoot.
clothing and props
For clothing, a few days beforehand we headed to Maroigold Costumes in Cardiff who provide clothing to the TV and Film Industry. I’ve used clothing and props from here several times in the past; more recently for the Viking pictures of my friend Simon ‘Foxy’ Fowler and before then when I took portraits of my friend Anthony and Make Up Artist Sarah in 1940’s attire … to mention just a couple.


With our friend Gerwyn set to be the model for this Warrior photo shoot, we all ( Ian, Anthony, Gerwyn and myself ) met up at Marigold, and in a short space of time managed to find eveything that was needed …

As for the props ( the sword ) this was intentionally not sourced as I wanted to combine the Photo Shoot and Retouching with the use of AI ( more about that in a moment ) but with everything sorted it was then studio time …
photo shoot in the studio
Lighting for this was kept clean and simple with one light high up behind Gerwyn to provide light on top of his head and shoulders and an additional light in front and slightly off camera axis to create a little bit of shape to the light ( highlights and shadows ) rather than being square on to him lighting him evenly.
Also on the floor in front of Gerwyn i placed a silver reflector to bounce a little fill light into the shadow areas to reveal a little more detail.

As I was using constant ( LED ) light for this shoot, setting up was really simple because of the WYSIWYG ( What You See Is What You Get ).

To know that the reflector was positoned correctly to bounce light into Gerwyn’s face, he just needed to look at it and if he was seeing a bright spot on the reflector we were good to go.
kit used
Camera: Sony A7RIV
Lens: Sony 24-105mm G f/4
Lighting: 2 x Westcott L60-B LED Constant Lights
Modifiers: 2 x Westcott Rapid Box Switch Medium Octa
Reflector: Westcott 2-in-1 Silver / White Reflector

I was also tethering into CaptureOne on my iPad Pro 12.9” which I had set into ‘Calibrated’ mode to give me a more accurate look at the files captured with regards to light levels and colour.
If you don’t know how to calibrate your iPad, check out this short video that I put together …
CAMERA settings
Focal Length: 70mm
Shutter Speed: 1/40 sec
Aperture: f/5.6
ISO: 3200
The L60-B LED directly behind Gerwyn on the boom arm was at 80% Power ; the L60-B LED directly in front of Gerwyn on the boom arm was at 50% Power.
results
Here’s a look at what was captured during the photo shoot; all very simple with just a few tweaks to the angle of wooden ‘stand-in’ sword and Gerwyn’s positioning …

the background
For the background I was recommended a location called Triscombe Stone near Bridgewater in Somerset, UK so in the week since the shoot I dropped the postcode in my SatNav and headed off …

When photographing the background I set the tripod to the exact same height that it was when I photographed Gerwyn in the studio. This was made very easy to remember because it just meant opening out the 3 legs but not extending them …

I set the same focal length on the lens and focused on the ground at a point that was approximately the same distance from the camera as Gerwyn was during the studio shoot.
The aperture when photographing the backgrounds wasn’t the same as in the studio; I went for f/9 - f/11 so that there was much more depth of field unlike the original f/5.6 … which is what Gerwyn was photographed at in the studio.
building the background
The background in the final image is made from 2 images that I combined together in Photoshop. The final merged background was then made wider using the Content Aware Scale function. Generative Expand and Content Aware Fill were not used because for this image they didn’t produce a desirable result.

Using adobe’s AI to create the sword
I used the Selection Brush Tool in Photoshop to select the stand-in wooden sword with a little bit extra added so that when the sword was generated, by typing a simple “Medievil Sword” prompt into the Contextual Task Bar, it gave extra space for additional elements to be added such as the dome shaped decorative element on the handle …


The final composite image
Anyway I hope that’s useful / interesting to you, but also to let you know … all of the retouching steps creating the composite I’m going through in one of the classes I’m presenting at FREE the upcoming Photoshop Creativty Virtual Summit …

If you Register for a FREE PASS you’ll have access to this class for 48 hours from when it goes LIVE during the Summit Week. Also if you grab a VIP Pass you get to keep ALL of the content from all of the instructors PLUS I’ll be creating an additional video taking you through all of the Behind the Scenes showing the studio set up, lighting etc when capturing the photographs of Gerwyn.

With friends ( L to R ) … Ian Munro, Gerwyn Williams, Yours Truly and Anthony Crothers

Of course I couldn’t resist doing a print …
This one from my Canon Pro 300 using Black & White Mode onto Portrait White 285 Fine Art Paper from Permajet …

As always if you do have any questions, please make use of the comments section below and I’ll reply to you there.
Thanks for looking in,
Glyn