
On the 29th September Adobe released Lightroom 9.6 and Lightroom Classic 15.6, and one of the things in the update was a set of improvements to reflection removal. Adobe's wording talks about cleaner results on complex surfaces, with fewer smudges and ghosting artefacts when you're removing reflections from windows, glass and water, which sounds great, but I think it's fair to say my experience of it up until now has been a little bit hit and miss. When it works it works incredibly well, but there are pictures where you'd think it should do the job and it just doesn't.
So I wanted to see how the update copes, and then show you something else that's now in Lightroom which could be a workaround for the times it doesn't. I haven't tried it on water yet; I wanted to see how it got on with ordinary reflections in windows first.
Where it works
The first picture I tried is one where the window is the dominant part of the scene, with me clearly reflected in the glass. In the Remove section on the right-hand side you've got Reflections, so I ticked Apply, using Preview so I wasn't waiting around too long, and after a few seconds it had done a really good job. Drag the Amount slider all the way to the left and you can see the reflection, drag it all the way to the right and it's gone completely.
That's the version of this tool people get excited about, and rightly so.
Where it doesn't
The next picture is me standing outside a gallery photographing it, and again I'm very clearly visible in the window along with plenty of other things being reflected. Same steps, same few seconds' wait, and nothing really happened, which is odd, because the window is still the main part of the picture.
The third was outside my friend Nicola Catherine's fashion knitwear and art studio, with me reflected in the window again. This time it looked really good at first, until you start looking properly; around the picture frame and up towards the top you can still see the reflection, and with the Amount slider dragged across I could still make out my teeth, my beard and my glasses.
That's where the tool is right now, and I'd fully expect it to keep getting better. The question is what you do in the meantime when it won't play ball.
Prompt to Edit
I've previously done this in Photoshop with a selection and Generative Fill, but there's another new addition in Lightroom which I think works as a workaround for now. Down at the bottom of the right-hand panel there's a small icon for Prompt to Edit. My first thought when I saw it was that I didn't really want that kind of thing in Lightroom, but Lightroom has a lot of users with different wants and needs, and it'll suit plenty of them. It's early access at the moment, so this isn't the finished version.
It works the way prompting does in any generative AI tool. There are presets for things like fixing dust and scratches, colour restoration and black and white colourisation, plus effects such as adding dense fog or replacing the sky, and you can type your own prompt and pick earlier ones from a history list underneath. The important part is the note at the top saying the result is saved as a new DNG, because what it's actually doing is regenerating the entire image to make whatever change you've asked for.
Right now the only models on offer are Nano Banana 2 at 2K, which uses 20 credits, or Nano Banana 2 at 4K, which uses 30, and there's no preview, so you don't get to see whether it's going to work before the credits are spent. I'd really hope more models appear once it's out of early access, because there are others that are better at working on just part of an image while holding on to the original.
Trying it on three windows
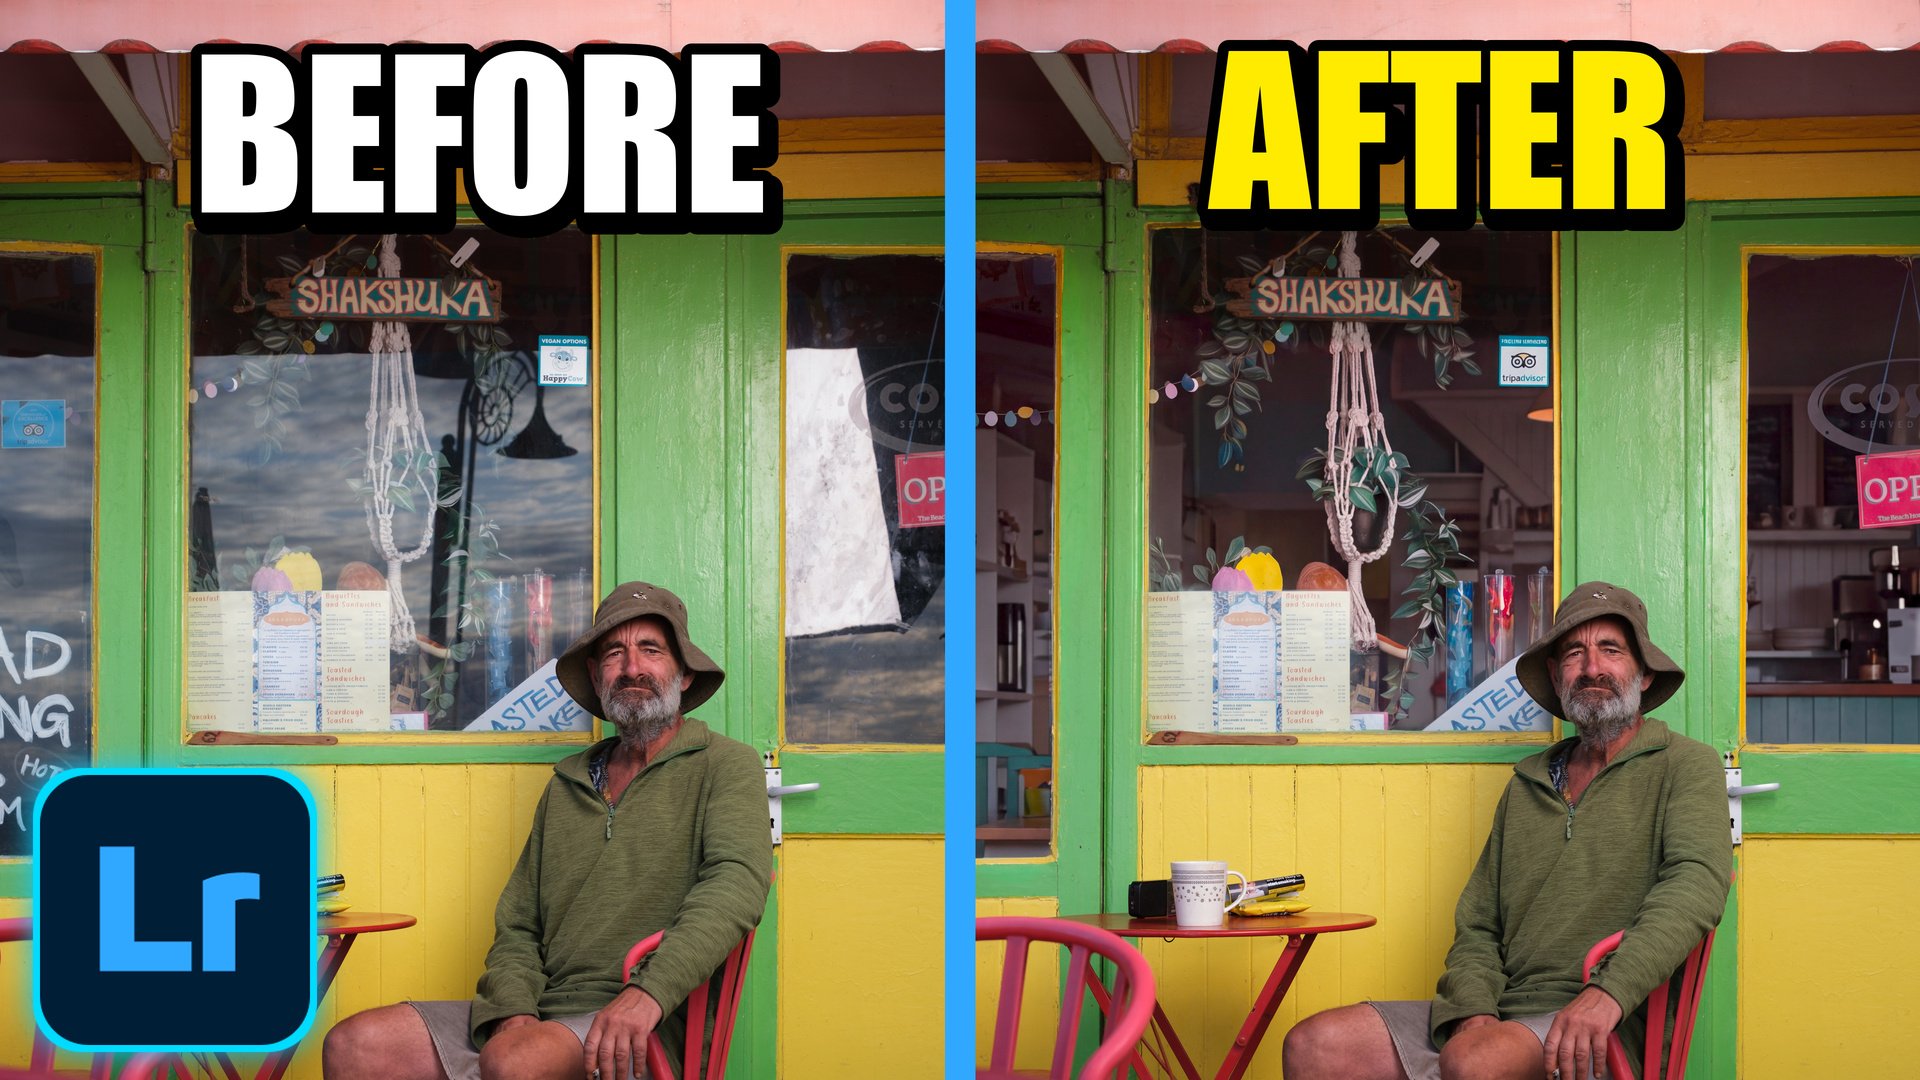
The picture I used has three windows with some pretty severe reflections, and the big white patch in the right-hand one is my softbox from when I lit the portrait. I typed "remove the reflections from each of the three windows", hit Generate, and after a short wait a second file appeared next to the original Fuji raw file, with "-prompt" added to the file name.
The reflections were gone, but flicking between the two with the arrow keys the saturation had clearly gone up, and in the right-hand window, where you couldn't see anything at all through the softbox, it had simply made something up. For your own pictures that might be fine, but if you're trying to keep any integrity in the image I don't imagine a client would be too keen.
So I deleted that one and tried again, adding "do not change the colour, do not increase the contrast, keep the original contents exactly the same" to the prompt and choosing 4K this time. The windows came out really well, but the saturation was still up, and zooming in showed the bigger issue; even at 4K it's a much lower resolution than the original photograph, and a lot of the lettering had changed. The menu was nonsense and the Costa sign now said "burned", which isn't the best advert if you're selling coffee.
Bringing it into Photoshop
However, all is not lost, because you only need the generated file for the glass. I selected the original and the new DNG in Lightroom, holding Shift to get both, then went to File, Edit In, Open as Layers in Photoshop.
In the Layers panel the difference in size between the two thumbnails is obvious straight away, which is a very visual way of seeing how much resolution you lose. With the generated layer on top, I selected both layers and went to Edit, Auto-Align Layers, left it on Auto and clicked OK, and it lined the two up really well. A quick crop took care of the edges, along with a little bit of the softbox showing in the top right corner.
Then I held Option (Alt on Windows) and clicked the layer mask icon, which adds a black mask and hides the generated layer completely, and painted the windows back in with a white brush. I nudged the brush hardness up so it stayed tidy against the window frames, because a very soft brush spills over them.
This is where you get to choose what you keep. One sign had changed colour, so I left the original there. The wording at the top of the TripAdvisor sign had gone a bit odd, so I painted that back with black. The menu had turned into a strange made-up language, so I kept the original there too; there's still a touch of reflection on it, but it's not dominant. In the left-hand window a chalkboard had vanished while a hanging decoration had been kept, which is pretty clever, but it's artistic licence, and the right-hand window is completely invented. That's usable for your own work, but for a client I very much doubt they'd want new things appearing behind the glass.
Fixing the Costa sign
The Costa sign was a different problem, because masking couldn't sort it without the colour shifting, so the wording itself needed changing. I added a new blank layer, drew a selection around the word with the Rectangular Marquee tool and used Generative Fill from the contextual taskbar with Firefly Image 5, which is the one to pick here; it's designed to edit while preserving detail. I typed "change to served", and it swapped the word over in what looks like the same font, which is really useful.
The finished picture is the full resolution original everywhere except the glass, which comes from the regenerated file, and flicking between before and after it's not bad at all. Ideally you'd do all of this with Reflection Removal inside Lightroom, and I'm sure that's where it's heading, but as things stand in October 2026, with Prompt to Edit in early access and reflection removal still a bit hit and miss, it's another good option to have for the pictures the built-in tool can't manage yet.