Almost every conversation I see about AI and photography is about generating things that were never in the frame in the first place, and that's never been the part that interests me. What I actually care about is getting time back. The small distractions that were out of my control on the day, the ones that used to cost me twenty minutes with the healing brush, can now be sorted cleanly in seconds with the texture still intact.
Wrinkled clothing and folded backdrops are the two that come up again and again. So here's how I deal with both.
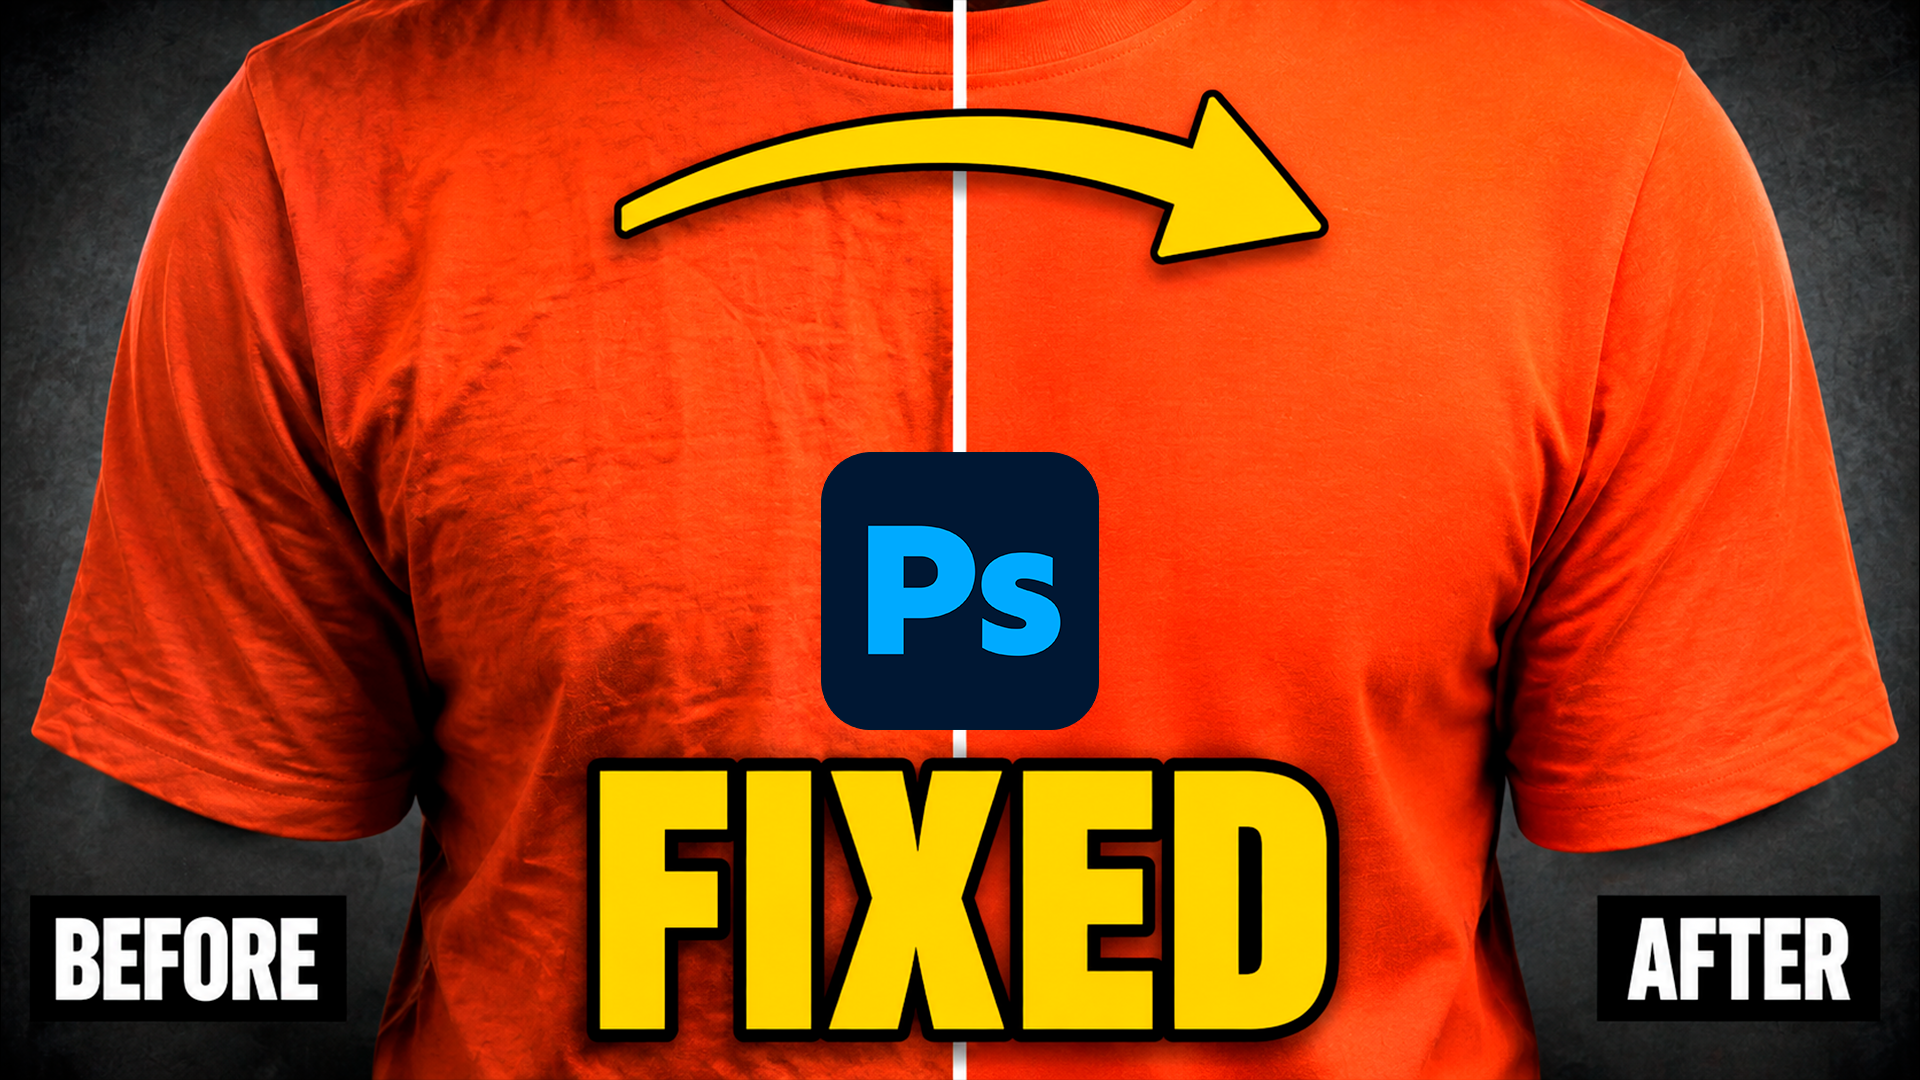
The orange t shirt
First job on this one was a distracting logo on the shirt, and for that I go straight to the Remove Tool. The setting worth knowing about is Auto, which lets Photoshop work out for itself whether it needs standard content aware fill or whether it needs to reach for generative AI. On a simple cleanup like a small logo it'll usually just handle it locally, which means you're not burning generative processing on something that didn't need it.
With the logo gone, the creases were the bigger problem, and that's a three step job.
Make a loose selection around the whole shirt with the standard Lasso Tool. Nothing precious about it, loose is fine. Then open Generative Fill from the contextual taskbar and pick the Firefly Image 5 model, which in my experience is much better at editing what's already there and preserving fine detail than it is at inventing things you didn't ask for. Then type a clear prompt: "remove the creases from off the orange t shirt".
That's it.
What comes back has the harsh creases gone but the natural drape still there, along with the shadows and the weave of the fabric. It still looks like a t shirt someone was actually wearing, which is the whole point.
That slightly crispy edge, and the Quick Mask fix
The second example was a branded white t shirt, and that's a bit more involved because you want a proper selection rather than a loose lasso.
The Object Selection Tool is quick here, and using Select People and then Upper Clothes gets you there in a couple of clicks. The catch is that it can leave a hard, slightly crispy edge, and you tend to notice it most around the neckline where the shirt meets skin.
In Adobe Camera Raw and in Lightroom there are dedicated Feather and Edge sliders for AI masks, which sort this out instantly. Photoshop doesn't have those in the main workspace at the moment, so you need a workaround, and the one I use is Quick Mask.
Make your selection with the Object Selection Tool, then tap Q to drop into Quick Mask Mode. Go to Filter, then Blur, then Gaussian Blur, and put in something small; I'm usually somewhere between 1 and 1.2 pixels. Tap Q again to come out.
That tiny bit of blur softens the boundary between the mask and the skin so the transition reads as natural rather than cut out.
Being specific is the whole game
This is the bit I'd underline if I were underlining anything.
Generative Fill still needs a clear instruction even when you've made a precise selection. If you type "remove the creases" and nothing else, more often than not you'll get nothing back at all, because the model hasn't been given enough to go on.
Prompt it with "remove the creases from off the white t shirt" instead and it knows exactly what it's looking at and what you want doing. The folds go, the printed typography stays where it was, and the grain of the fabric survives.
It feels fussy the first couple of times. It stops feeling fussy the moment you see the difference.
The same thing works on backdrops
Studio backgrounds are the other one, and the workflow is identical.
Select your subject with Select and then Subject, then invert it with Select and then Inverse so it's the background you're working on rather than the person. Soften that boundary with the same Quick Mask and Gaussian Blur trick, which matters more here than anywhere else because of hair and shoulders.
Then in Generative Fill, be even more specific than you think you need to be. Something like: "remove the creases from off the grey background. do not change the look of the grey background. keep the texture etc."
Those extra instructions are doing real work. Without them you can end up with a background that's been quietly smoothed into a flat, artificial gradient, and you've lost the character of the thing entirely. With them, the fold lines from a portable backdrop like the Westcott Vintage Grey X-Drop Pro disappear and the texture stays exactly as it was.
None of this is compulsory
I'm not telling anyone they have to work this way. If you enjoy retouching every fold by hand, and plenty of people genuinely do, there's nothing wrong with that at all and the results will be lovely.
But if you'd rather spend less of your life sat in front of an editing screen and more of it on the actual photography, using these tools deliberately, on the boring problems rather than to invent things that were never there, is a big win.