
How to QUICKLY and EASILY create the Coloured / Gel Lighting Effect in Lightroom using Masks …
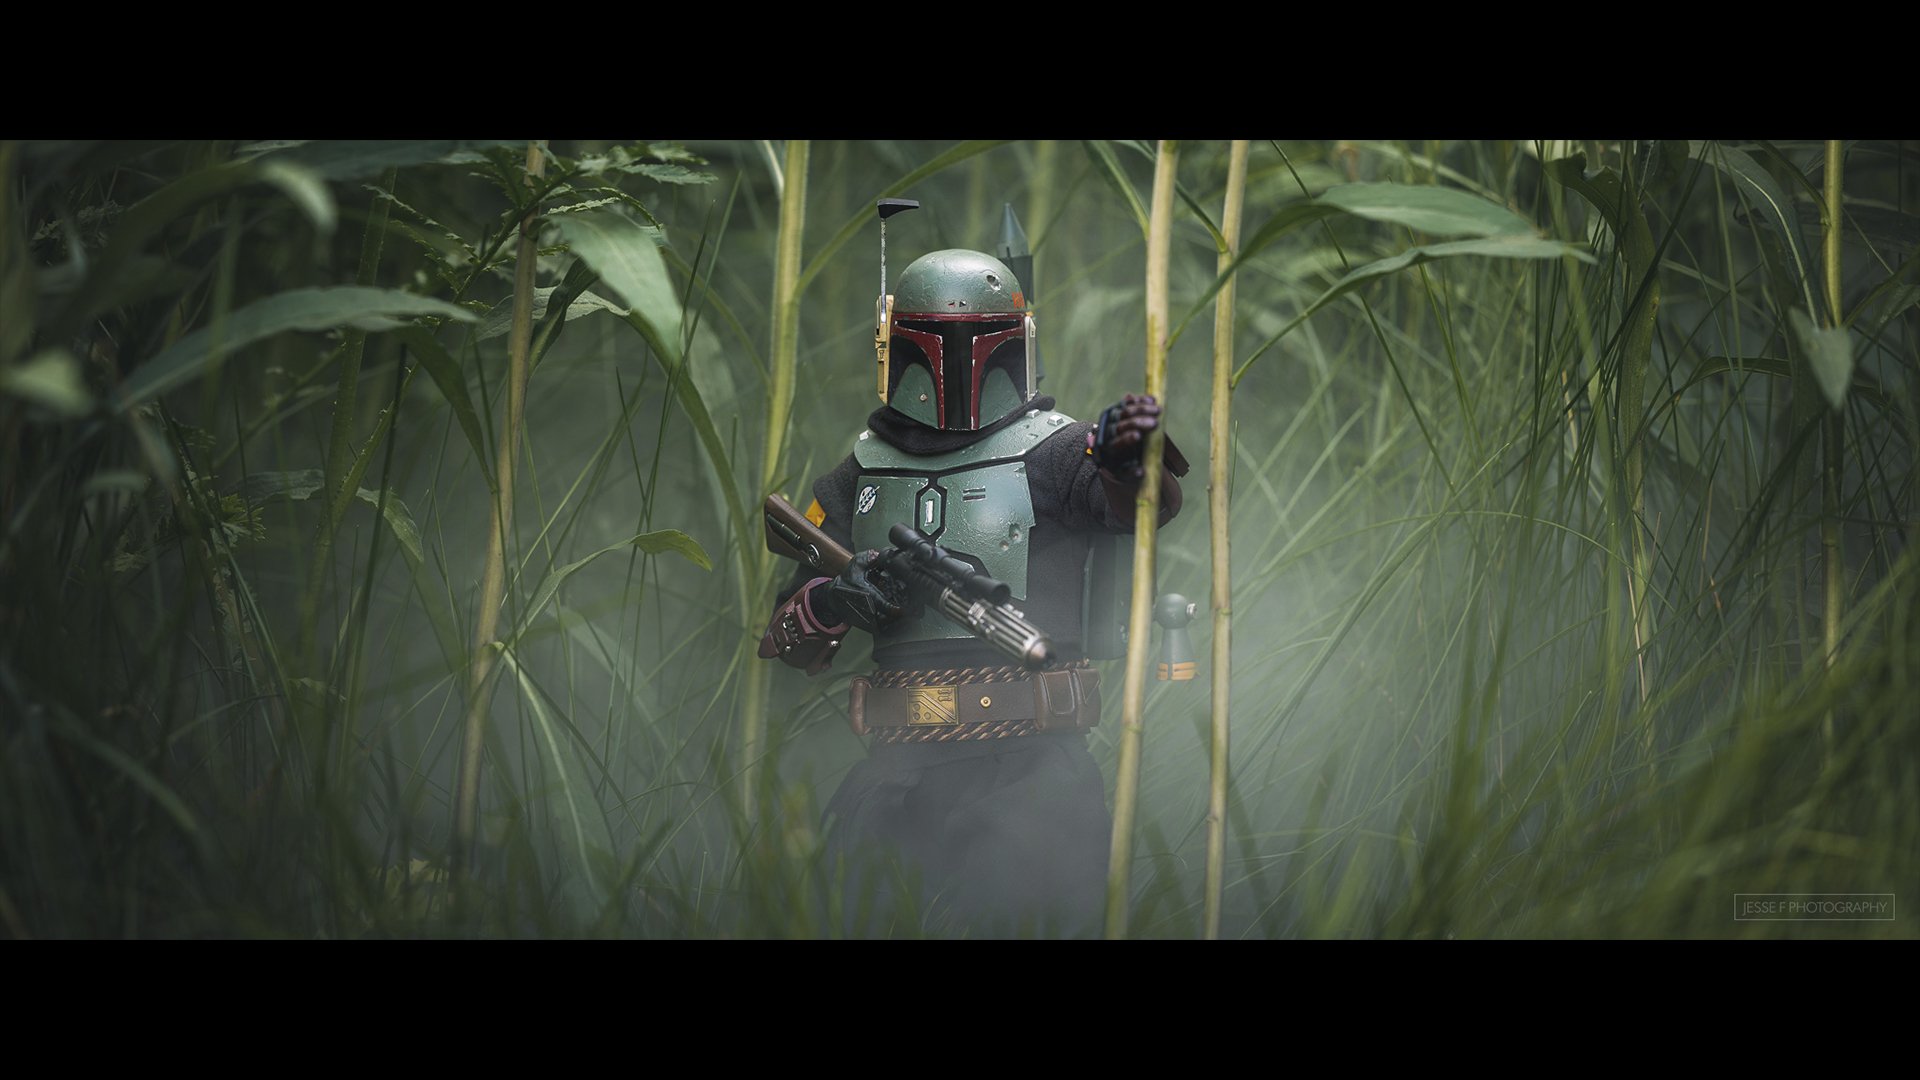
The Art of CINEMATIC TOY PHOTOGRAPHY | Jesse Feyereisen
Watch the recording of this LIVE Broadcast as I chat with the wonderful talent that is Jesse Feyereisen and go Behind the Scenes to discover how he lights, photographs and edits to create such incredible imagery of Toys and Action Figures …
Links mentioned in the video
Jesse Feyereisen Website: https://www.jessefphotography.com/
Instagram: @jessefeyereisen
Facebook: @jessefeyereisen


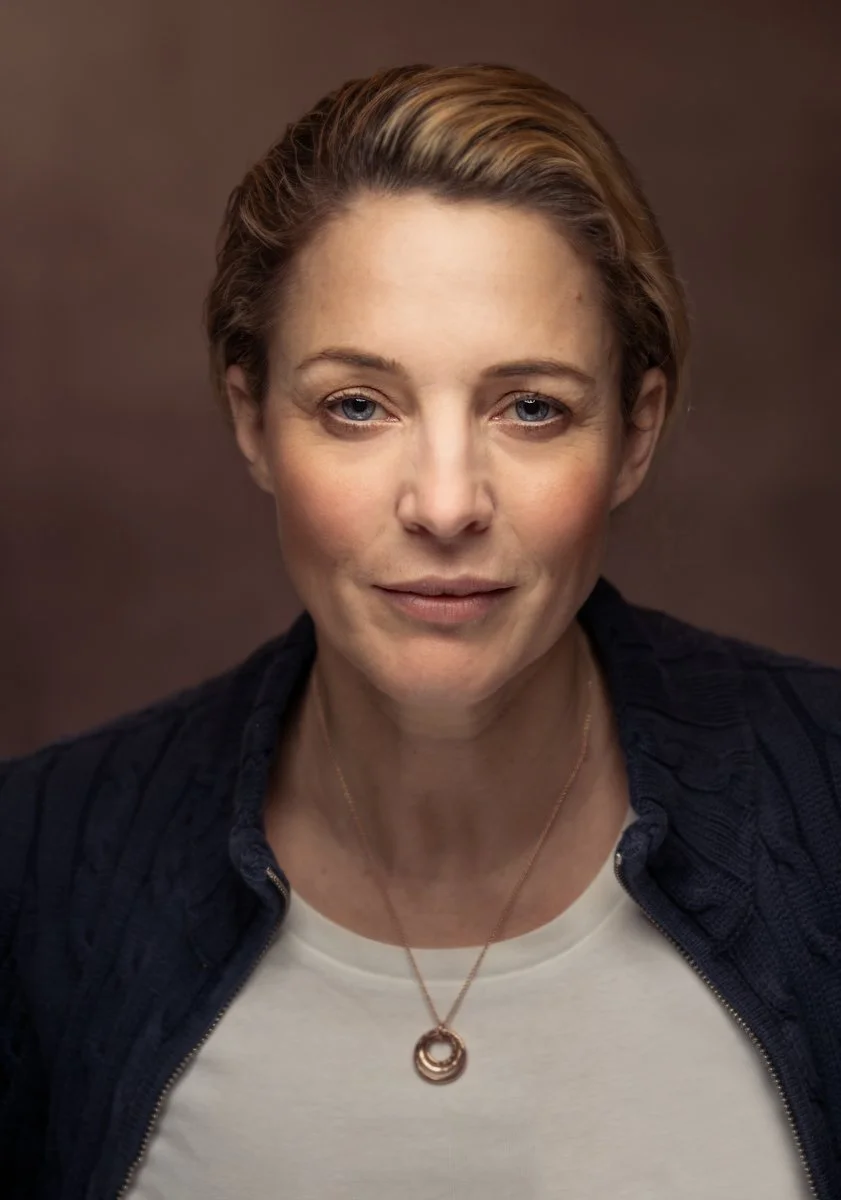
I've started using Constant LED Lighting when taking Portraits and LOVE IT!
Over the last few months I’ve been experimenting more and more with using Constant / LED Light when taking portraits as opposed to solely using a traditional strobe, and early thoughts are that I’m really liking it.

What I’m REALLY liking about using the LED Lighting is the WYSIWYG … What You See Is What You Get
Because of this, it’s so incredibly quick and easy to set up.
Controling the power output and temperature using the manual dials and touch screen on the L60-B is super easy with the non-fussy interfce, but I could even use the Westcott App on my iPhone; to do the same. this in turn means more focus on the subject and the matter at hand i.e. capturing a great portrait.
For the portrait above that I took of my friend Anthony Crothers, here’s a screen grab from some video that was taken to give you an idea of how the studio looked …

KIT USED
Camera: Sony A7RIV
Lens: Zeiss 55mm (FE 24-70mm F4 ZA OSS)
Light Source: Westcott L60-B Bi-Color COB LED (60W)
Modifier: Westcott Rapid Box Switch Oct (Large)
Westcott
Background: Westcott X-Drop Pro + Vintage Grey Canvas by Glyn Dewis


MODIFIERS
The L60-B can be used with all of the Westcott Modifiers I use which straight away is a HUGE bonus, but interestingly I spoke with friends at Westcott about the L60-B prior to this photo shoot and was advised to use it with the Westcott Rapid Box Switch Medium Octa as opposed to the Large as the light output “might” not fill it; however my experience was that in close as I was using it, the Large Octa worked out great.
The quality of thre light is VERY impressive … especially how easily it is to change the power output and temperature.
I genuinely love how you see exactly what you’re going to get; this alone made it such a different experience for me as a the Photographer (in a positive way) for a whole host of reasons, but interestingly this was also something Anthony commented on …
“Having a constant light source made for a far more relaxed, natural and anxiety free experience”
COLOUR CHECKER
To ensure colours (skin tone etc) were as accurate as possible, for this shoot I used a Colour Checker Passport from Calibrite.
Only needing to take one additional shot of Anthony holding the Colour Checker, the process then in Lightroom to create a profile from it was / is incredibly quick and easy. The new Colour Checker doesn’t seem to need a tighter crop to enable the softwre to generate a profile, so really seeing how seamless it was and how little time it took, I can’t justify NOT using it, and to add to that, this is the happiest I’ve been with resulting skin tones in a LONG time!

TIMELESS COURSE
Taking this portrait, using the Colour Checker and more is for part of a BIG update I’m adding into my TIMELESS Photography & Retouching Course which will also include an update the to the Retouching Workflow taking advantage of updates in both Lightroom and Photoshop have been added since the course was first released.
Anyone that has enrolled in my TIMELESS Course receives Lifetime Updates so will be getting all this new content added into the curriculum once it’s ready (expected very early March).
*Note:
Once the update has been added, the price of enrolling in the course will be increasing for new Students …
Current Price: $32.40 / £27.60 / €32.35
New Price: $45 / £35.40 / €41.50
I’ll be sharing more from using the L60-B over the coming weeks as I do intend to invest in a 2nd unit (invest sounds so much better than buy) so that I can create a different look to the lighting and will give more options.
I’ll be testing out different enviorments, both indoors and outdoors and will make sure to share all the experience with you here and in videos that I’ll likely post up on my YouTube Channel.
100 MEGA PIXEL Female Portrait PLUS Retouching in Lightroom and Photoshop (Hasselblad X2D)
Here’s the recording of a recent LIVE Broadcast I hosted over on my YouTube Channel where I went through the lighting and retouchingsteps of a female portrait PLUS likes and dislikes of the cameraa I used … the Hasselbald X2D.
🎬 𝐂𝐎𝐍𝐓𝐄𝐍𝐓𝐒 𝐎𝐅 𝐓𝐇𝐈𝐒 𝐕𝐈𝐃𝐄𝐎
00:00 - Introduction
01:21 - Hasselbald X2D
05:29 - Things I didn't like
11:11 - Lighting the Portrait
15:18 - Lightroom
20:33 - Remove Tool ( Photoshop )
25:10 - Dust & Scratches ( Clean Glasses )
30:42 - Even-Out Skin Tones
36:12 - The 20/10 Technique
39:17 - Dreamy Glow
42:34 - Presets in Lightroom
44:45 - Di Edwards Sees her Portrait
47:19 - Questions
How to add REALISTIC LIGHT using LIGHTROOM's INTELLIGENT PRESETS
Here's a great way to use the Masking Section in Lightroom and / or Camera Raw for adding Realistic Light into your pictures AND how to create an Intelligent Preset to do it on ANY PICTURE with just 1-click
How I Lit and Photographed this Portrait of a Female Attendee
A couple of weeks back I was in Stoke on Trent presenting at the Guild of Photographers Event on behalf of Sony.
Kicking off first thing I hosted a workshop for a limited number of 10 people ( although 11 were there 🤣 ) and went through how I set up and light portraits but more importantly how I interact and help subjects in front of the camera to relax.
I love sharing this kind of stuff; stuff that I learned mainly from when I was full-on photographing World War 2 Veterans for my 39-45 Portraits Project. These portraits were of people who maybe weren’t so keen initially on being photographed or felt self conscious in front of the camera as opposed to me photographing models.
No eye tracking, sharpness, dynamic range or whatever will help with this.
Anyway the reason for this was mainly to share one of the portraits I took when showing a lighting set up that is incredibly simple but so incredibly effective.
I only took one photograph but this is the result; a portrait of workshop attendee & Photographer Jo Bullas …
And here’s a Behind the Scenes photograph showing the set up I used however in this one I’m now holding the light for one of the attendees…

KIT USED
Aside from my camera ( Sony A7RIV with the 85mm G-Master Lens) , this is all the kit I used for this portrait …
If you saw an earlier post you’ll recognise the set up as being the same as when I photographed my friends Ian Munro, Anthony Crothers, Dave Clayton, Brian Dukes and Gerwyn Williams; I even jumped in front of the camera too …

The difference this time was simply down to a camera setting using a wider aperture and a slightly slower shutter speed to allow more ambient ‘ natural light into the shot.
Anyway if you didn’t see the original video I shared on my YouTube Channel going through exactly how I do this, I’ve shared it below.
Enjoy,
Glyn
TRY THIS 💥 The INVISIBLE BLACK BACKGROUND (Photography Technique ... UPDATED)
Here's a SIMPLE and VERY EFFECTIVE technique for creating a Black Background behind your subject when you don't have one ... indoors or outdoors using just your camera and one flash!
This is my UPDATED Invisible Black Background Technique v2.0 😃 📷
🎬 𝐂𝐎𝐍𝐓𝐄𝐍𝐓𝐒 𝐎𝐅 𝐓𝐇𝐈𝐒 𝐕𝐈𝐃𝐄𝐎
00:00 - Introduction
00:40 - Kit Needed
00:55 - Shutter Speed Flash
01:31 - High Speed Sync
01:52 - Camera Settings
02:50 - Aperture + Flash
03:37 - Turn on HSS
04:12 - Turn on the Flash
04:46 - Options
05:25 - Recap
06:05 - The Problem with HSS
06:29 - Why not use a Neutral Density (ND) Filter?
07:46 - Dealing with Reflections