Portrait

I Am Lyme: Nicola of Kathrens Rare Knitwear, Lyme Regis

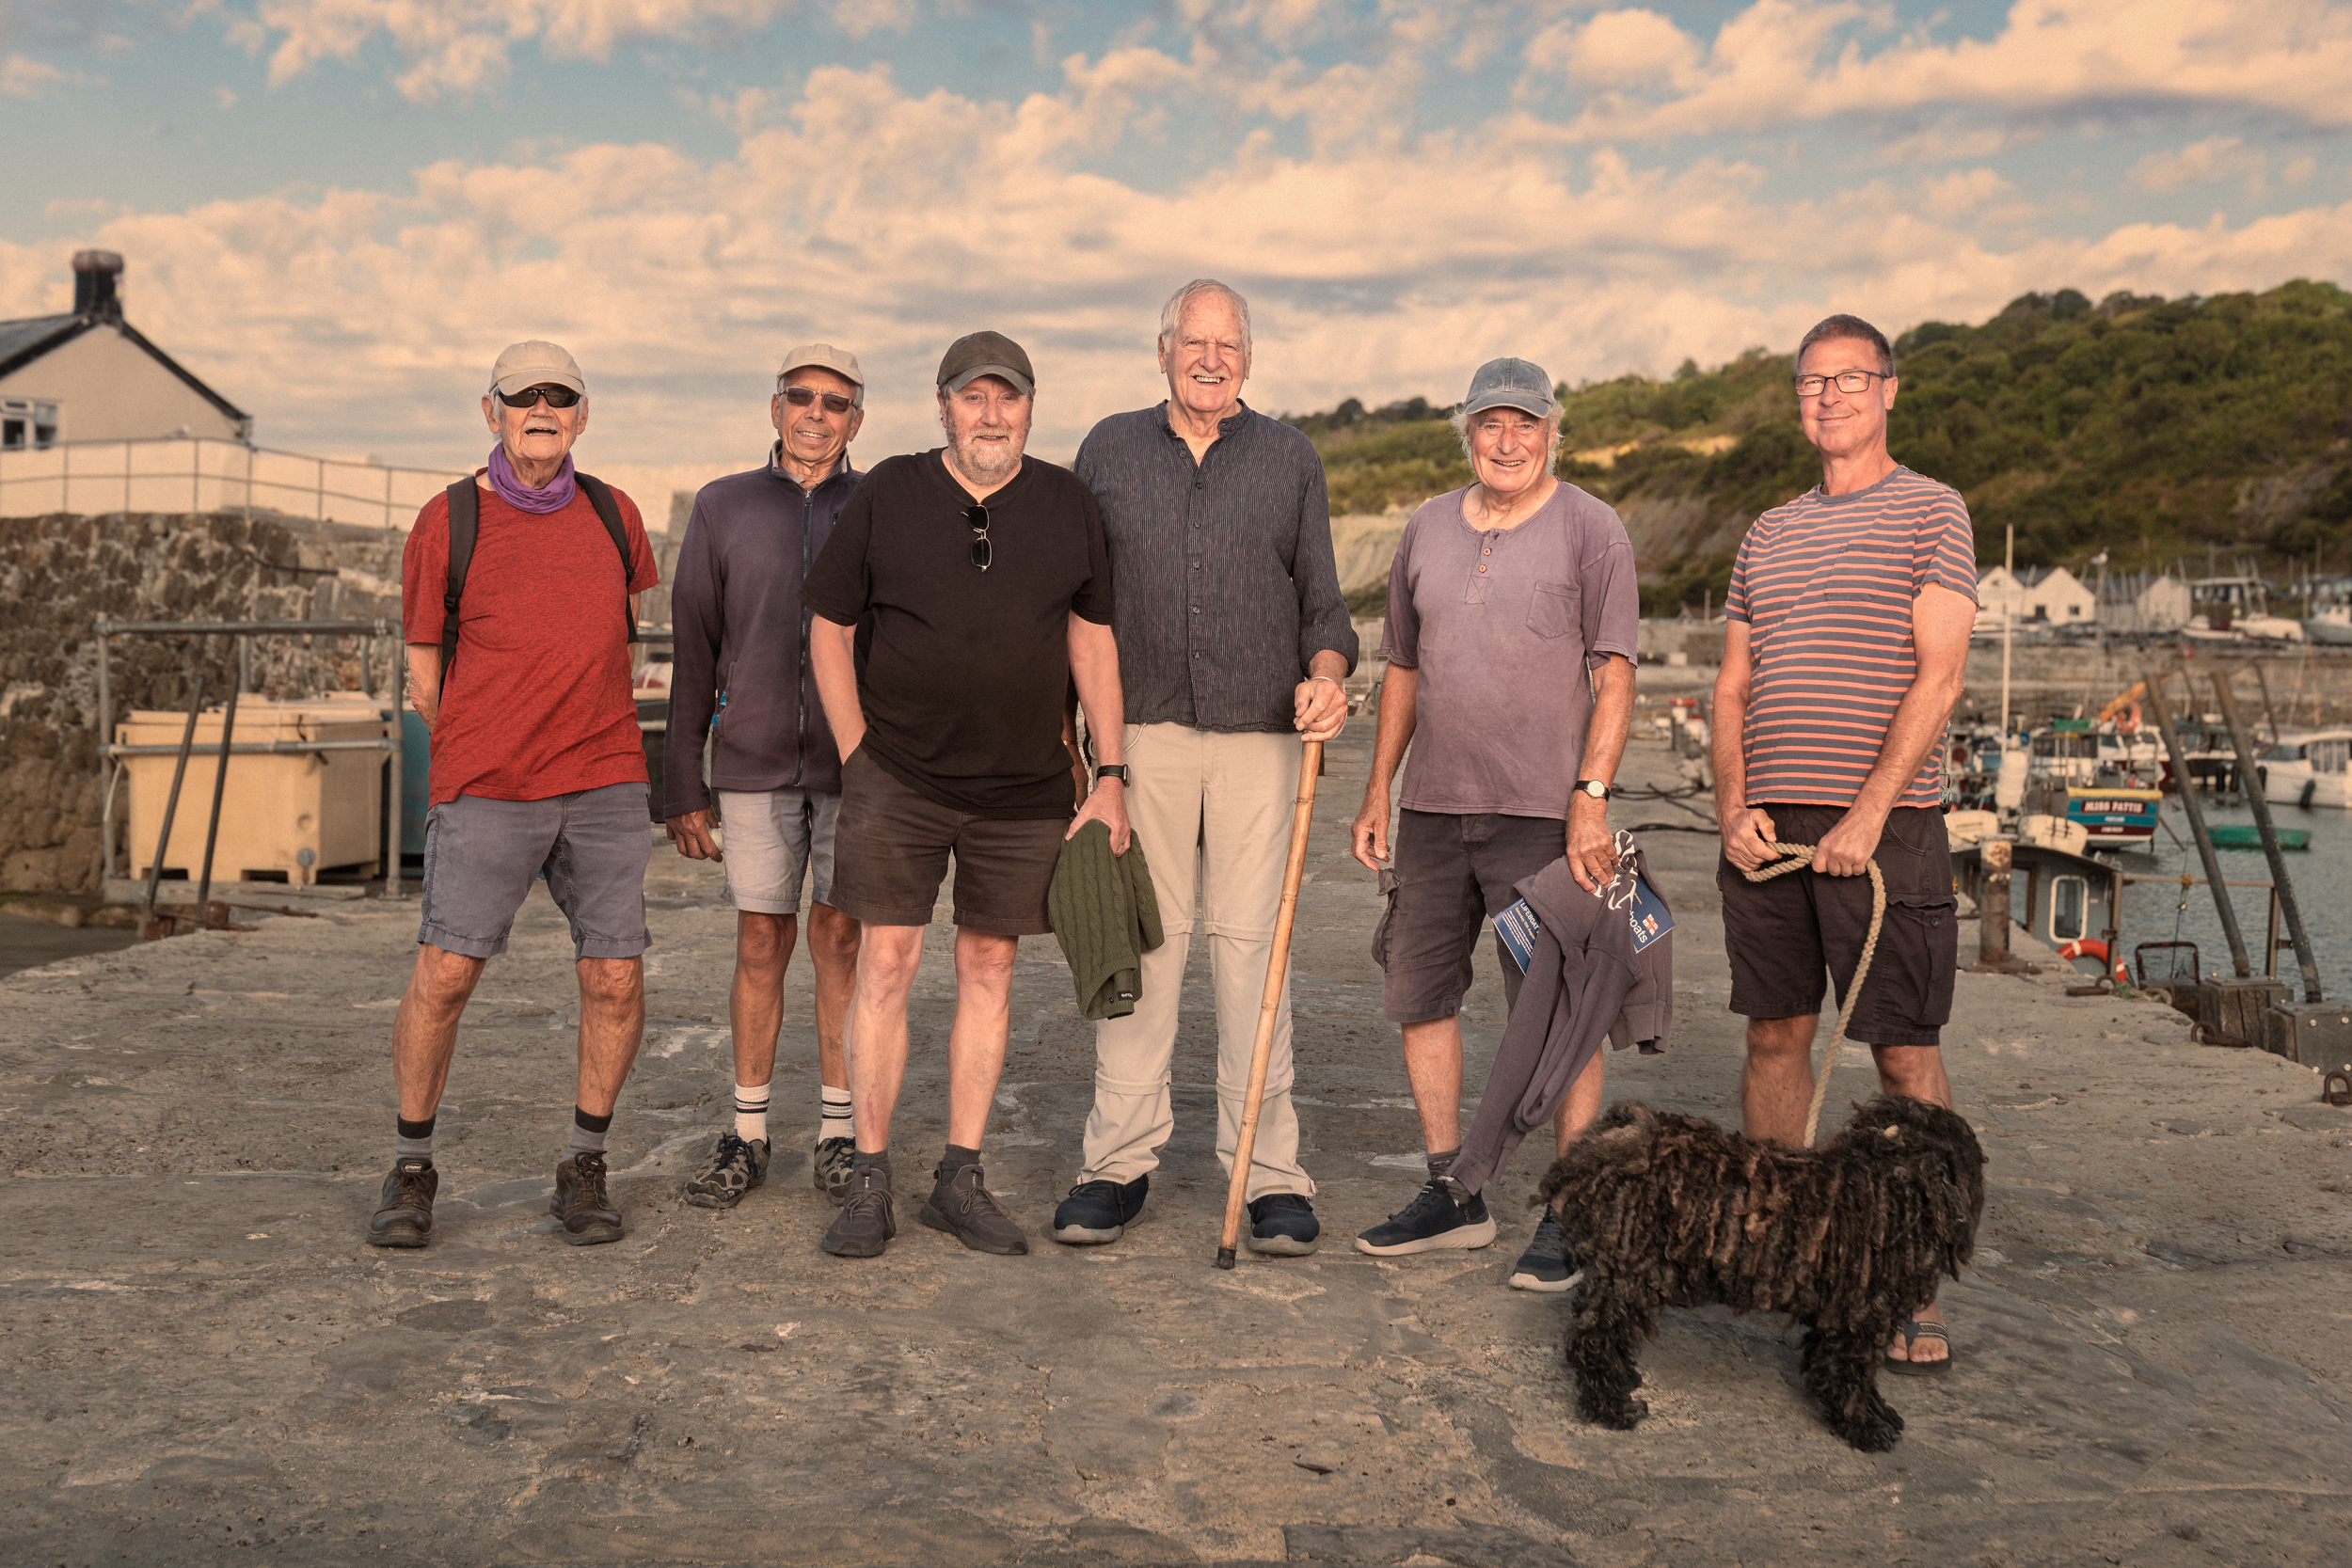
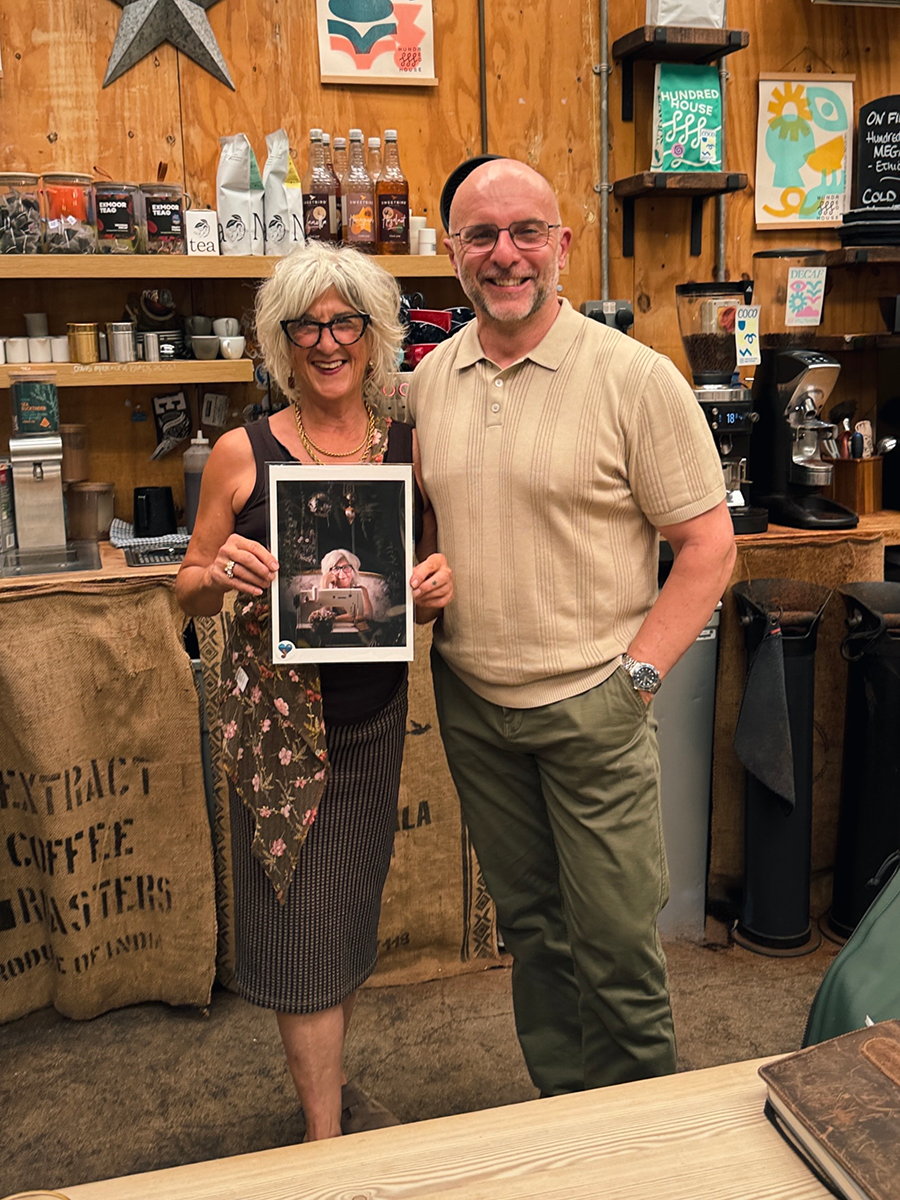
Last week I was out shooting another portrait for my I Am Lyme project, this time with the wonderful Nicola Kathren, who owns Kathrens Rare Knitwear on Coombe Street in Lyme Regis.

I'd known of Nicola for ages but we'd never actually met, until Sarah from the Town Mill Bakery introduced us a week or so ago while I was there grabbing some breakfast. We hit it off straight away, got a shoot organised, and on the day my mate Anthony Crothers drove over from South Wales to lend a hand.

The idea

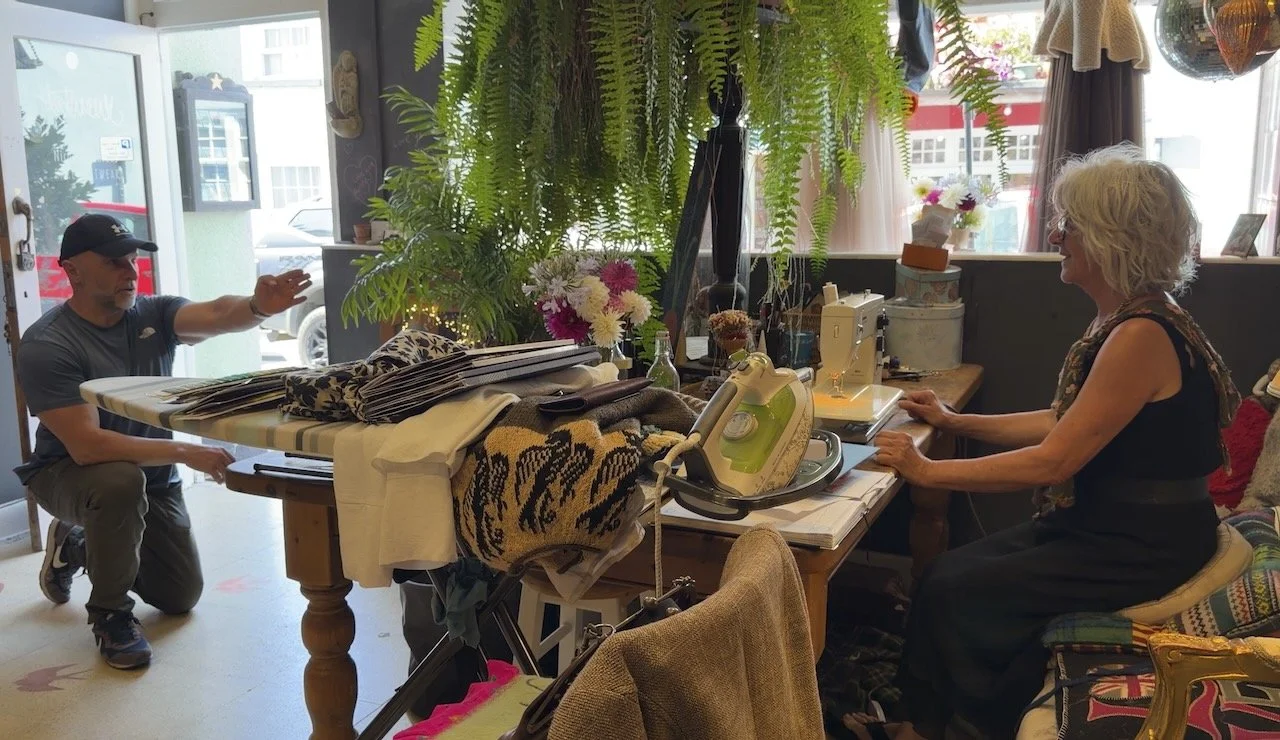
Nicola has this big desk where she sits with her sewing machine and all her day-to-day bits around her, so it made sense to photograph her right there seeing as I Am Lyme is about the people who make this town what it is; an environmental portrait of her in her own space, doing what she does, felt exactly right.

The setup

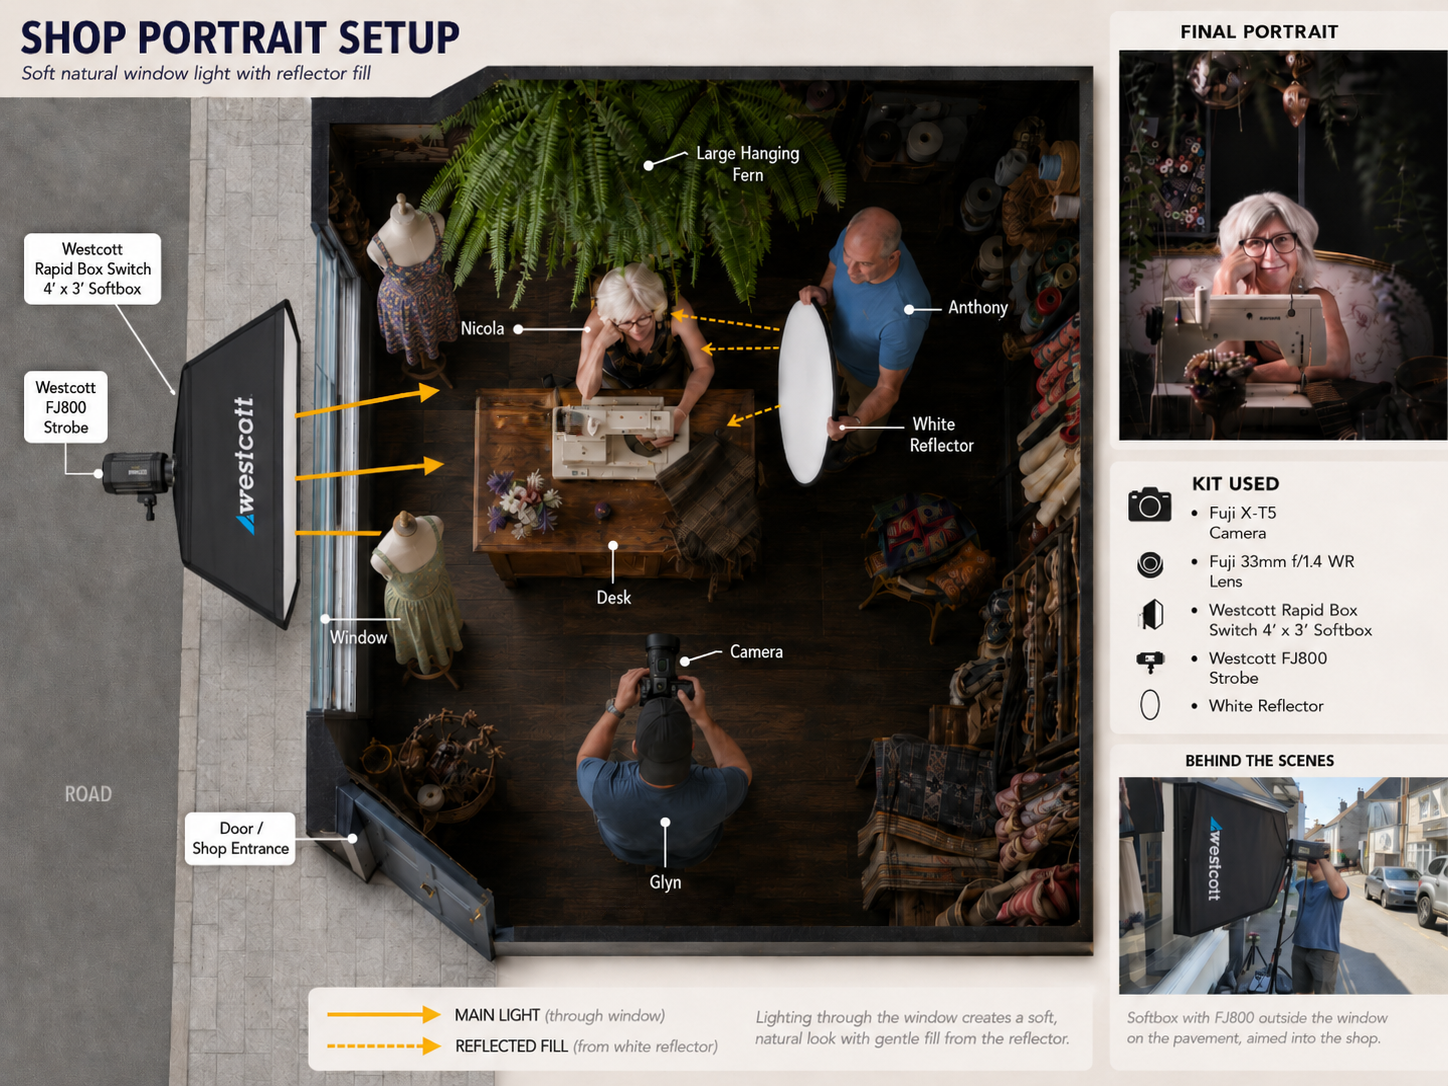
Nicola’s desk sits right by the shop's big front window, which looks straight out onto the narrow road outside. When the light comes through that window it's fantastic, but at the time we were shooting there just wasn't enough of it. It's a narrow street with tall buildings opposite, so they block a fair bit of the natural light, and at midday the position of the sun meant the shop front was sitting in shadow for much of the time.

The first challenge was actually the window display; we had to carefully reposition the mannequins so as not to disturb it, while still leaving enough of a gap for the light to come through.

Keeping things simple, I went with one light, but this time I put it outside, pressed against the window, essentially to create my own window light. The direction of that natural window light and what it did was absolutely stunning; I just needed more of it.

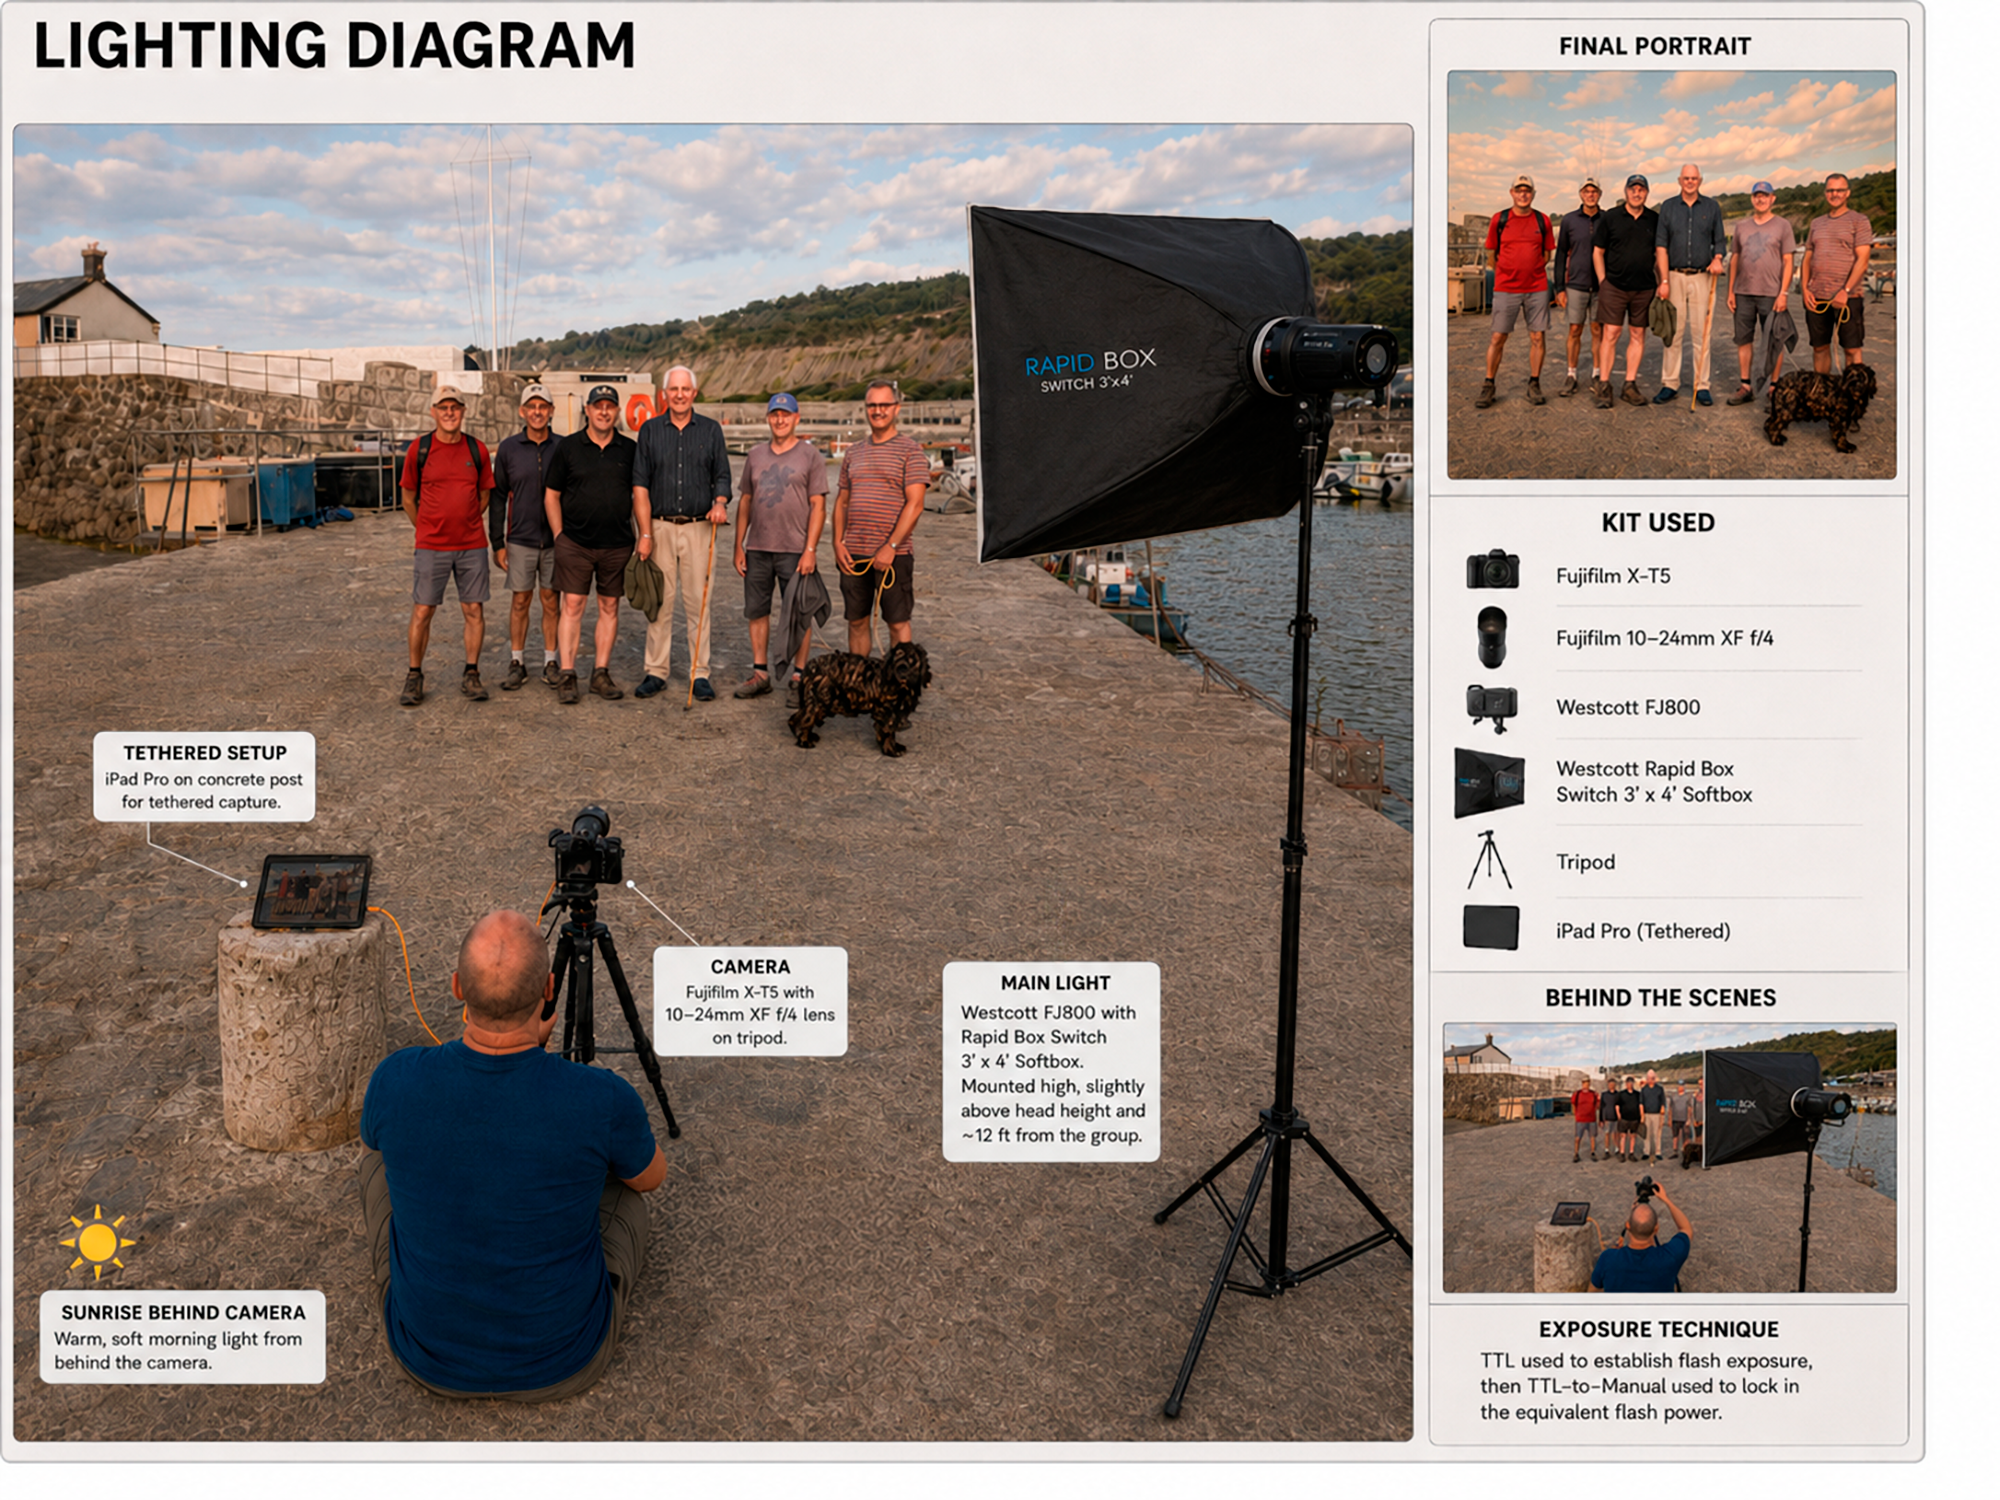
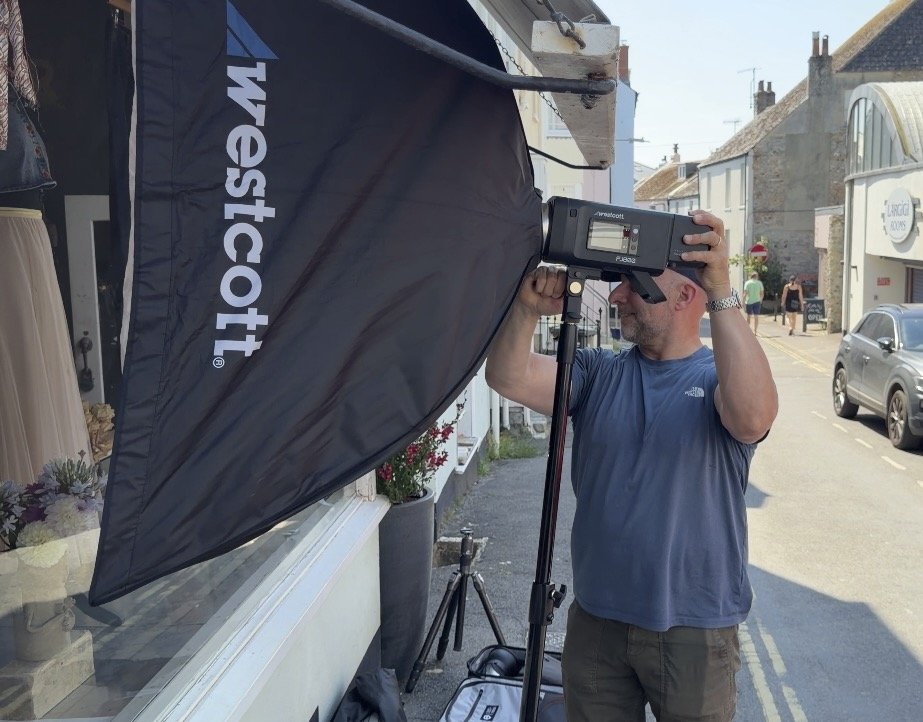
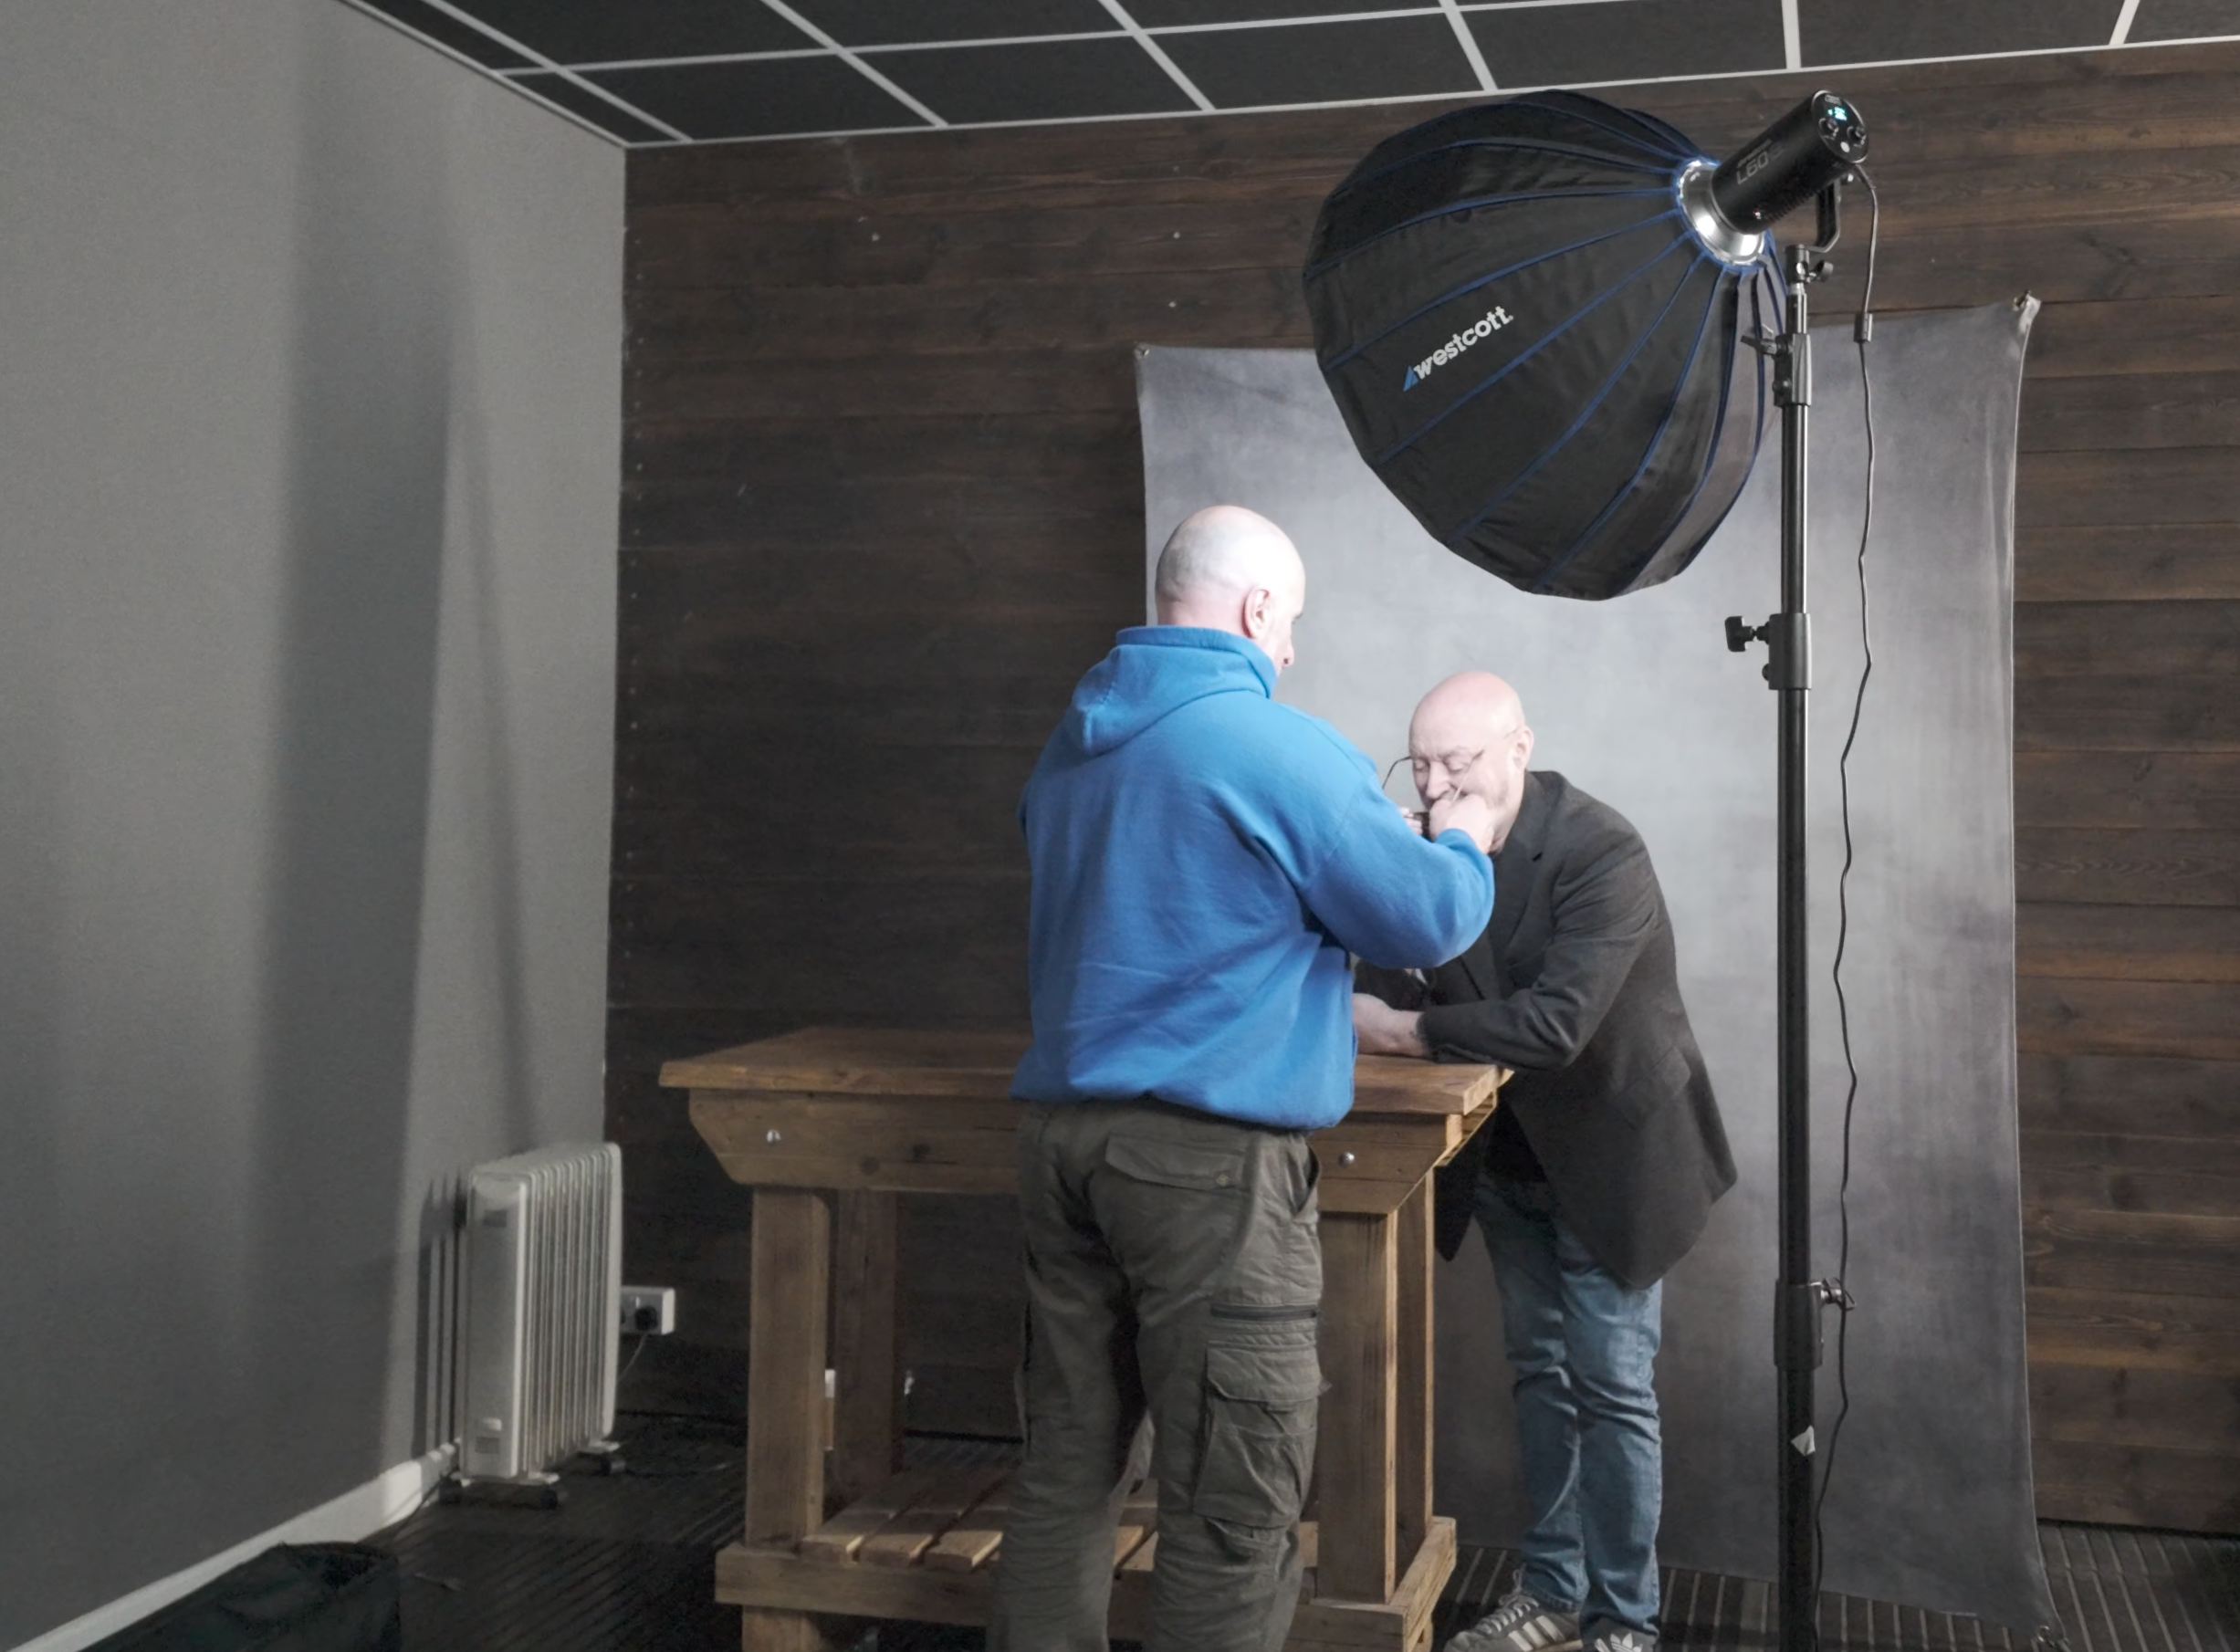
So I set up the Westcott Rapid Box 4x3 softbox and the Westcott FJ800 on the pavement, firing in, to enhance the direction that was already there rather than fight it, so it still read as natural, even though it was being lit.

Nicola's camera-right side needed a little lift, so Anthony stood just out of frame holding up a white reflector to bounce a touch more of that softbox light back onto her. I tried the silver side first, but it was too much … it flattened everything out and almost removed the shadows completely. The white gave just the gentle lift I was after.

The shoot

It only took a few minutes to get everything up and running, so Nicola sat at her sewing machine and we just chatted. It felt like a conversation with the odd frame grabbed along the way, rather than a "shoot."

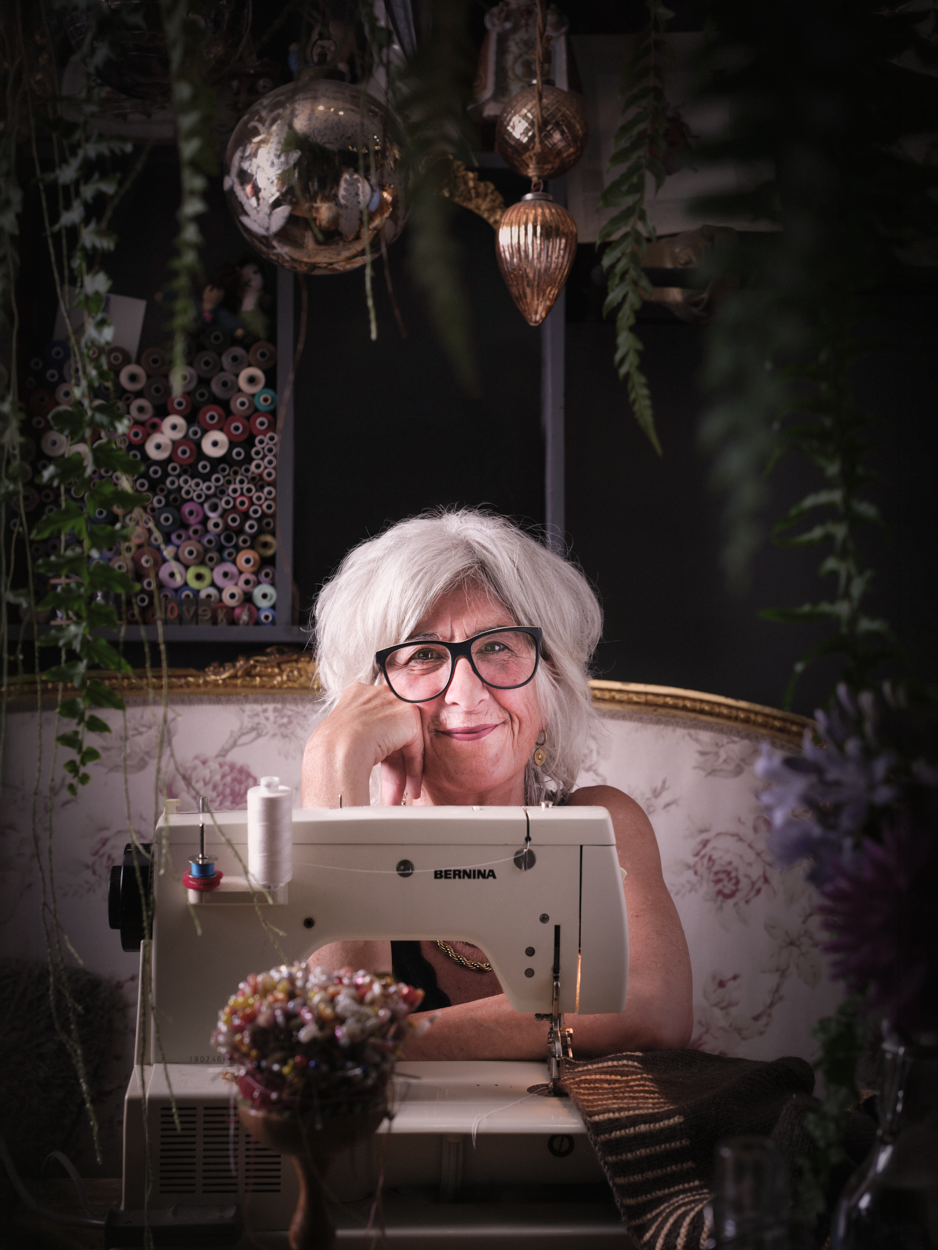
Then, in a lull, she rested her head against her hand and looked completely relaxed. That was the moment, and it came about naturally rather than being posed.

I was aiming the camera at Nicola through a gap in the big overhanging fern because I really wanted to add some layers to the image and show exactly the creative environment she works in.

Shot on the 33mm on my Fuji X-T5 (50mm equivalent), on a tripod, tethered into Capture One Mobile so I could see everything coming through as we went. Start to finish, about 45 minutes.

A brilliant shoot with a wonderful person.

What's next?

Keep ‘em peeld because very soon the I Am Lyme website will GO LIVE with the dates organised for the exhibiton in Summer 2027, to be held in the Town Mill Gallery.

Onwards and upwards 😃

🚨 Check out Kathrens Rare Knitwear, Lyme Regis ( LINK )

The Secret to Better Portraits (It’s Not Your Camera)

I've spent a fair bit of money over the years on lighting, cameras, and lenses. They're nice to have, don't get me wrong, but none of it means anything if the person in front of your camera isn't comfortable.

I learned this properly a few years ago, and it changed the way I work.

If someone isn't comfortable with you, it shows in the pictures straight away. They go stiff, they look posed, and no amount of expensive lighting or technical wizardry fixes that. Comfort comes first. The camera comes second. Always.

Here are seven things I've picked up through trial and error that genuinely improve your portraits. No complicated techniques, no expensive gear, just things that make a real difference.

1. Give yourself time before picking up the camera

I never go straight in with the camera. Before I even think about lighting or where someone's going to sit or stand, I spend time with them first, just talking. Sometimes that's ten or fifteen minutes, sometimes longer. Sometimes I'll meet someone for a coffee beforehand purely to get to know them.

This really clicked for me during my 39-45 Portraits Project. I was photographing people who'd lived through the most extraordinary times, and honestly, I just wanted to hear their stories. I'd talk with them for a good while before picking up the camera. There was no grand plan behind it, I was just genuinely interested. But when I looked back at the pictures afterwards, I noticed something: the more time I'd spent talking with someone, the better their portrait turned out. They actually looked like themselves, not a posed version. A great portrait starts with a real conversation, not with the camera.

2. Ask people about themselves

If you're meeting someone for the first time and you're not quite sure what to say, here's something that works well: ask them about their world. Their work, their family, their hobbies, what they get up to at weekends. People generally love talking about themselves, and when you're genuinely curious, the conversation just flows.

I've got a bit of a fascination with TV programmes about surgery. In a recent episode of Surgeons at the Edge of Life, I noticed something interesting. Just before a patient goes under anaesthetic, the anaesthetist doesn't start talking about the operation. They ask about the patient's family, their holidays, their life, and the patient drifts off completely calm. People feel far more at ease talking about themselves than almost anything else.

There's a little phrase I keep coming back to: MMFI, "Make Me Feel Important." It's not manipulative. It's just a reminder that people relax when someone shows a genuine interest in them.

3. Keep talking while you're actually shooting

This might sound a bit odd at first, but I never have a moment where everything goes quiet and still just before I take the portrait. There's no "ready" moment. That approach has never worked for me. The conversation just keeps going right through the shoot, even once the lighting's sorted and I'm ready to take the shot.

I did a shoot recently with Harry Anderson, a potter here in Lyme Regis. Instead of posing him for the camera, I simply asked him to carry on with what he was already doing, smoothing down a piece of pottery. I let him keep going, and every now and again I asked him to turn his gaze towards the camera, but we were chatting the whole time. That's when the best pictures happen. Not when everything's gone still and formal, but when someone's genuinely being themselves.

4. Try not to overdirect

Something I've noticed time and time again: the more you tell someone exactly what to do, the more uncomfortable they become. The moment you say "stand like this," "put your hands here," or the funniest of all, "look relaxed," someone who isn't used to being photographed will tense up almost immediately. You can watch it happen.

You might spend twenty minutes building up real comfort and ease, and one single instruction like that can undo the whole lot. Keep your directions to an absolute minimum and keep the conversation running instead. Let people find their own natural position and expression in their own time.

5. Be willing to adapt

I remember photographing a veteran who, day to day, always wore a shirt and a dicky bow. That was just how he dressed, that was him. When I turned up, sure enough, that's exactly what he had on. He mentioned to me almost in passing, "Do you want me to put my jacket and medals on?" But I could hear it in the way he said it, he didn't really want to. That wasn't him day to day. So I said, "No, we'll just photograph you as you are." And the pictures were so much better for it.

If I'd asked him to change into something that wasn't really him, he wouldn't have looked anywhere near as comfortable. Learn to properly listen and photograph people as they actually present themselves, not how you think a portrait of them is supposed to look. Read what the person in front of you actually needs, not what you'd planned on the way there.

6. Your own calm matters more than you think

Years ago I used to teach conflict management, and there's a model from that world called Betari's Box that's stuck with me ever since, because it applies just as much to a portrait shoot as it does to any difficult situation. It goes like this: my attitude affects my behaviour, my behaviour affects your attitude, which affects your behaviour, and round it goes again. It's a loop constantly feeding itself.

If you turn up stressed, that stress comes out in your behaviour whether you mean it to or not. The person you're photographing picks up on it, and it affects how they behave in front of you. Once that loop starts running in the wrong direction, you're on a loser from the start, and no amount of good lighting fixes it.

But it works the other way round too. If you show up calm, even if you're not feeling entirely calm inside, that calm comes out in your behaviour and feeds into their attitude. The way I get to that calm is by keeping things simple. Don't try to be clever with your lighting or overcomplicate your setup, especially not the first time you're photographing someone. Save the clever stuff for the second or third time, once you've got to know each other. A simple setup keeps you calm, and your calm is what the whole loop depends on.

7. Under-promise and over-deliver

When someone asks how long a shoot's going to take, I'll usually say around an hour and a half as an example, but I'll aim to be done and dusted after about an hour. Go before you're expected to go, rather than overstaying your welcome.

I heard some nightmare stories during the veterans project around this. Photographers would turn up at someone's house and stay for several hours without really reading the room. When I spoke to one of the veterans afterwards, he told me it had all gone on far too long and he'd been exhausted by the end of it. It clearly hadn't been a good experience, and the photographer concerned hadn't picked up on any of that. It all comes right back to people skills, reading the room, reading the person, and knowing when enough is enough. Under-promise on the time, over-deliver on the experience. Leave while they still want a bit more, rather than after they've had quite enough.

It's not about the kit

If you're a portrait photographer looking to improve, maybe the next thing worth reading isn't about photography at all. Maybe it's about people.

People skills are the most underrated, most forgotten skill in this whole craft. Over the years it's become all about the kit, but the kit really is secondary. People skills come first, and the portraits follow on naturally from there.

Check out the full video above for a deeper dive into these tips, and let me know in the comments which of these makes the biggest difference in your own work.

Cheers,
Glyn

Photographing a Lyme Regis Legend - Harry May

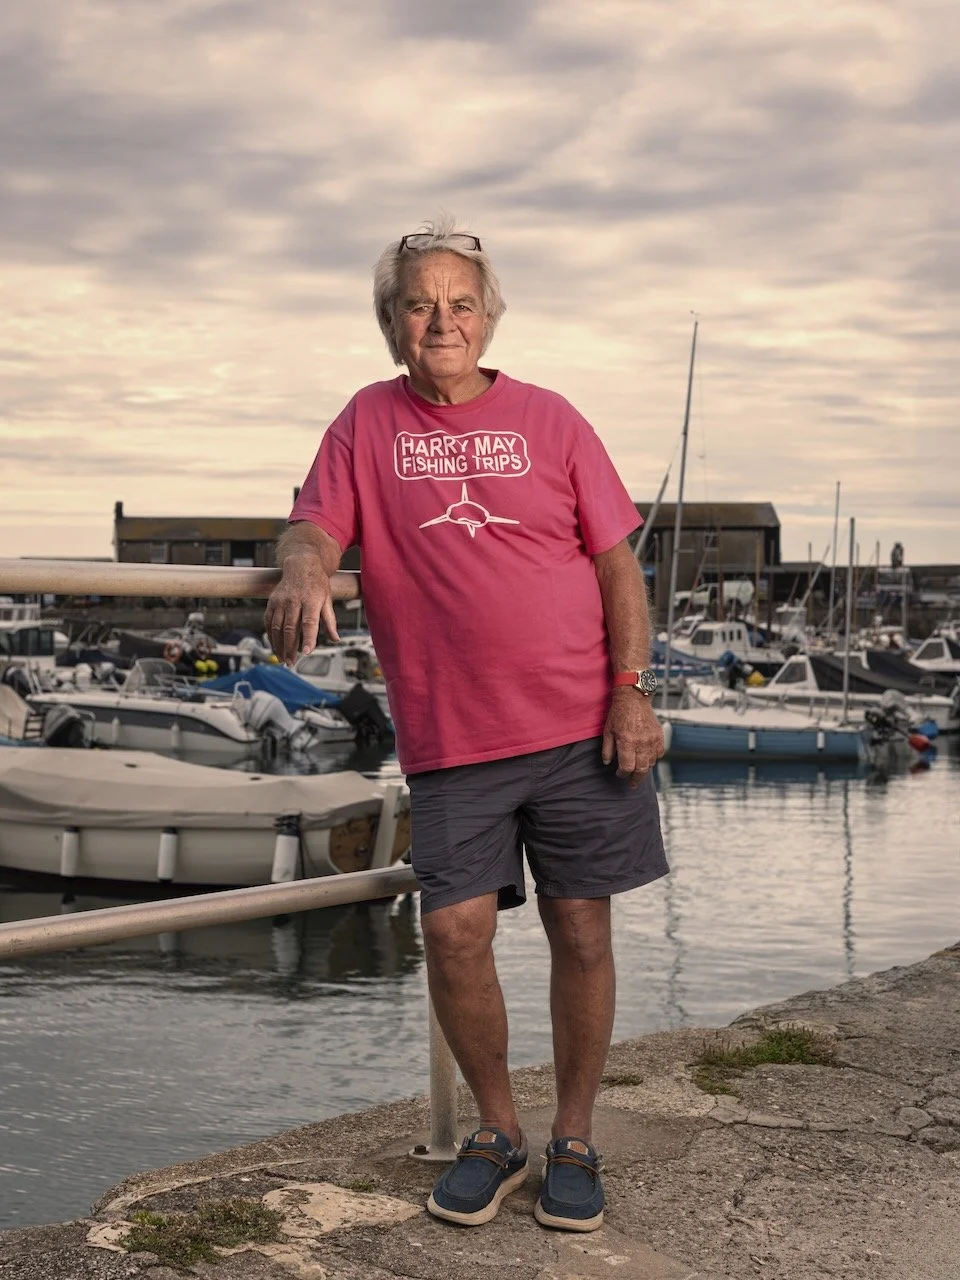
Tuesday morning I was out early to meet up with someone that can only be described as a Legend when it comes to Lyme Regis ... Harry May.

Just as with the Scallop Divers, for one reason or another, including Harry having knee replacement surgery, it had taken almost 2 years to get him in front of my camera, but it was so worth the wait.

What a super nice guy!

Honestly ... despite it being the first time we'd met and spoken in person, it felt like I'd known him for years. In fact, when Harry arrived, it was easily a good 20 minutes if not more that we chatted, before I started taking photographs. Sorry for keeping you waiting, Steve 😃

Keeping It Simple, Keeping It Classic

The brief for this one, set by me, for me, was simple: keep it classic.

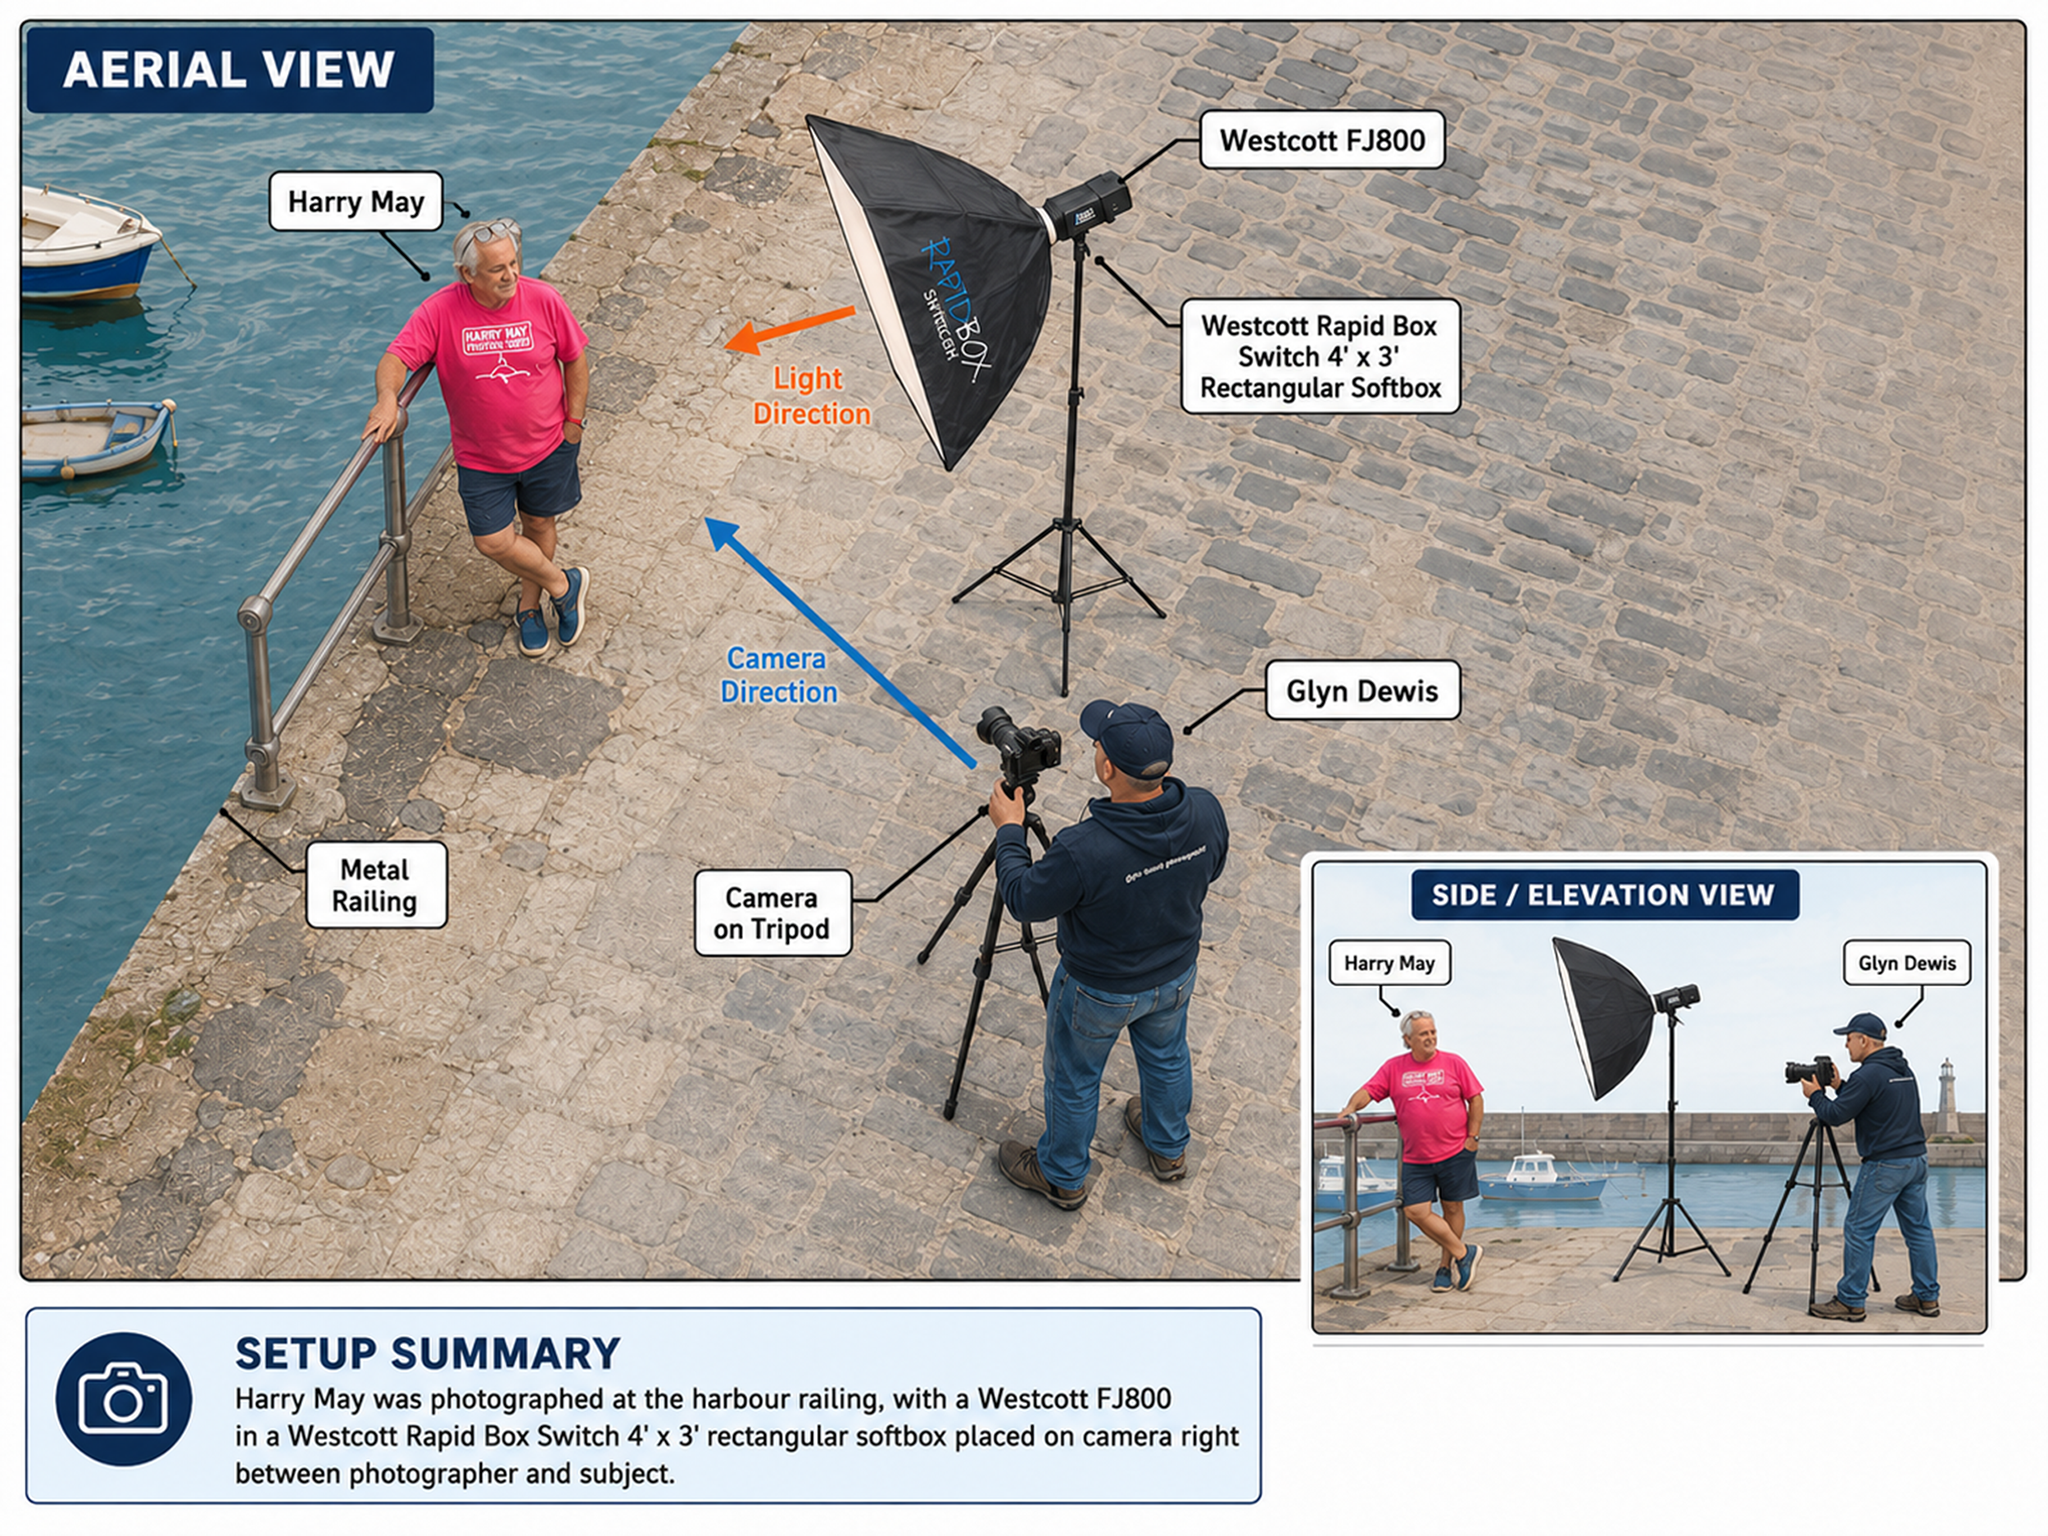
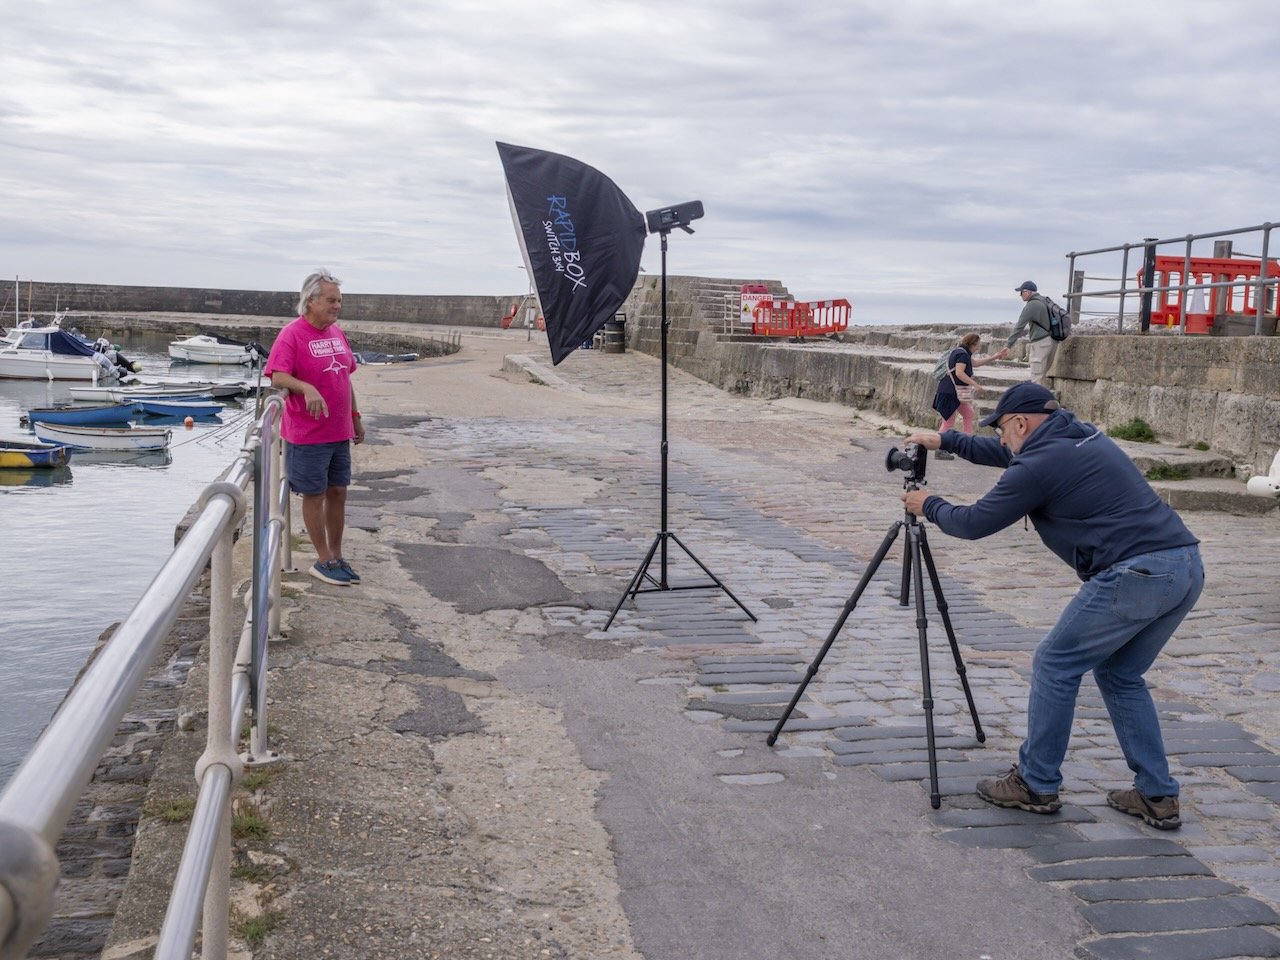
It was a glorious sunny morning with just enough cloud cover to give beautifully soft natural light. To match that softness, I used my 4x3ft Westcott Softbox, positioned about one and a half arm's lengths from Harry.

I shot at f/4.0 to soften the background slightly. Rather than using High Speed Sync (HSS) to let me shoot at a wide aperture in bright light, I opted for a 4-stop Neutral Density filter instead. The light was consistent and I'd had everything dialled in well before Harry arrived, so there was no rush and no need for the extra flexibility HSS gives you; it's simply a different way of solving the same problem: too much ambient light for the aperture you want.

• Did you see my High Speed Sync versus Neutral Density Filters Infographic ? ( LINK )

My Westcott FJ800 strobe handled it perfectly, run in TTL with +1 stop of compensation added.

Natural Direction

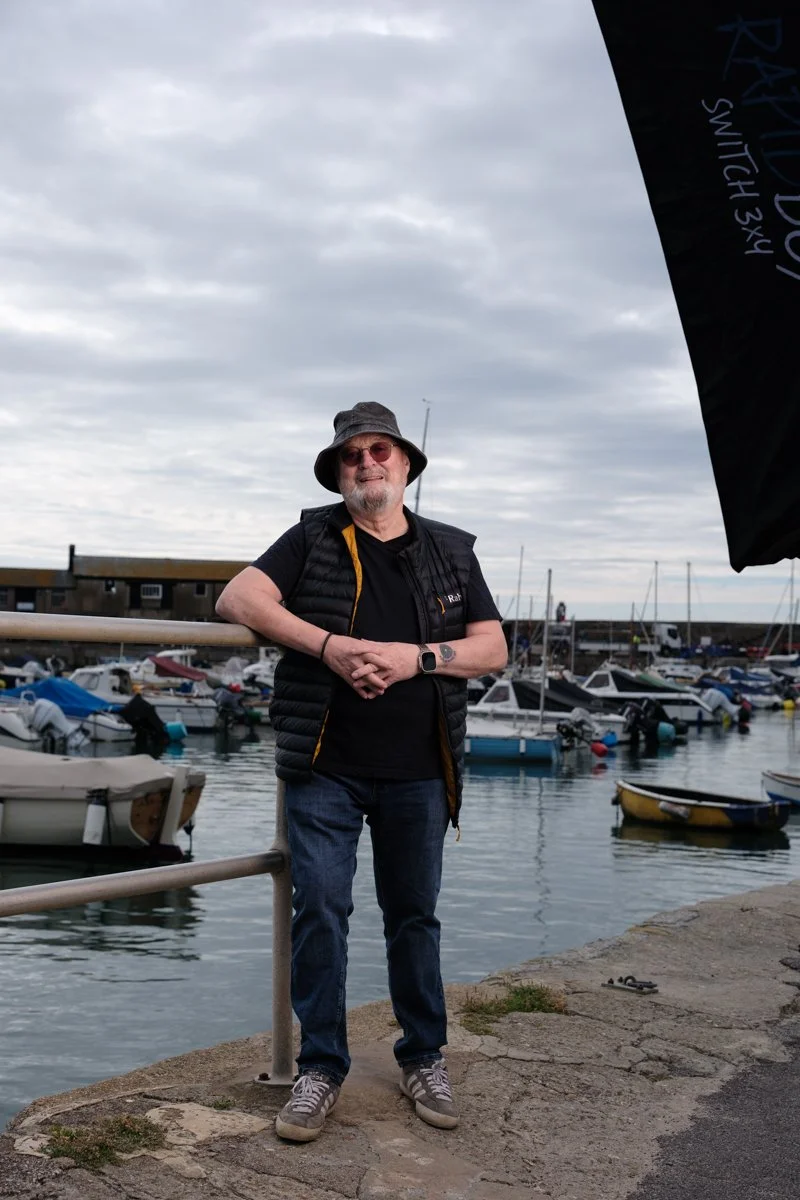
If you've ever been to Lyme Regis, there's a good chance you've spotted Harry leaning on the railing further down by his Fishing Trips board. So, having him lean the same way where we were shooting felt completely natural to him. Direction was barely needed, just "lean yourself on there and get comfy."

That's really the whole trick with portraits like this: find the pose someone already does in real life, and let them do it.

The Stunt Double

Before Harry arrived, my mate Steve Healy stepped in as stunt double, so I could get the lighting and exposure dialled in properly. That meant when Harry turned up, we were ready to go straight away rather than running test shots on the actual subject.

Three Shoots, Five Days

I'm on a high right now. This was my third shoot for my "I am Lyme" project in the last five days, and the best part is word is starting to spread. More people are hearing about the project and wanting to be part of it.

About "I am Lyme"

"I am Lyme" is a community-focused portrait series centred on the coastal town of Lyme Regis. The idea is simple: capture and celebrate the local faces that give the town its character, from fishermen and restaurateurs to B&B hosts, cafe owners and more…

The KEY to SUCCESSFUL PORTRAIT PHOTOGRAPHY with James Hole

Watch the recording of this LIVE Broadcast as I chat with UK based Commercial and Advertising Portrait Photographer James Hole and learn how he works with a team of professionals, plans a photo shoot and manages and communicates those in front of his camera to ensure that the experience of being photographed is an enjoyable one, the 'talent' feels relaxed and informed and ultimately the very best possible results are achieved.

links mentioned in the video:

Portrait using a 55mm Prime and LED Lighting

I’m currently trying out a new portrait style for me using a different lens focal length than what I’ve used for a while now, and also adding in an additonal light to my usual one-light set up.

For some time I’ve used the Sony 85mm G Master lens with my Sony A7RIV and have and still do love it for the quality and sharpness of the files it produces. However I’m now going to be using a 55mm focal length … my Zeiss f/1.8 Prime Lens.

It’s hard to put into words what I’m really liking about the look the lens gives … it’s just different. Some would say that it gives a much more realistic ‘as the eyes see it’ look but I guess that also depends on how close to the subject you position yourself.

I also like how the focal length means you’re much closer to the subject, making the portraits much more intimate and revealing of the person being photographed ... if that makes sense.

I’m also, like I said, using an additional light with this new look I’m working on; both of which are LED Constant lights.

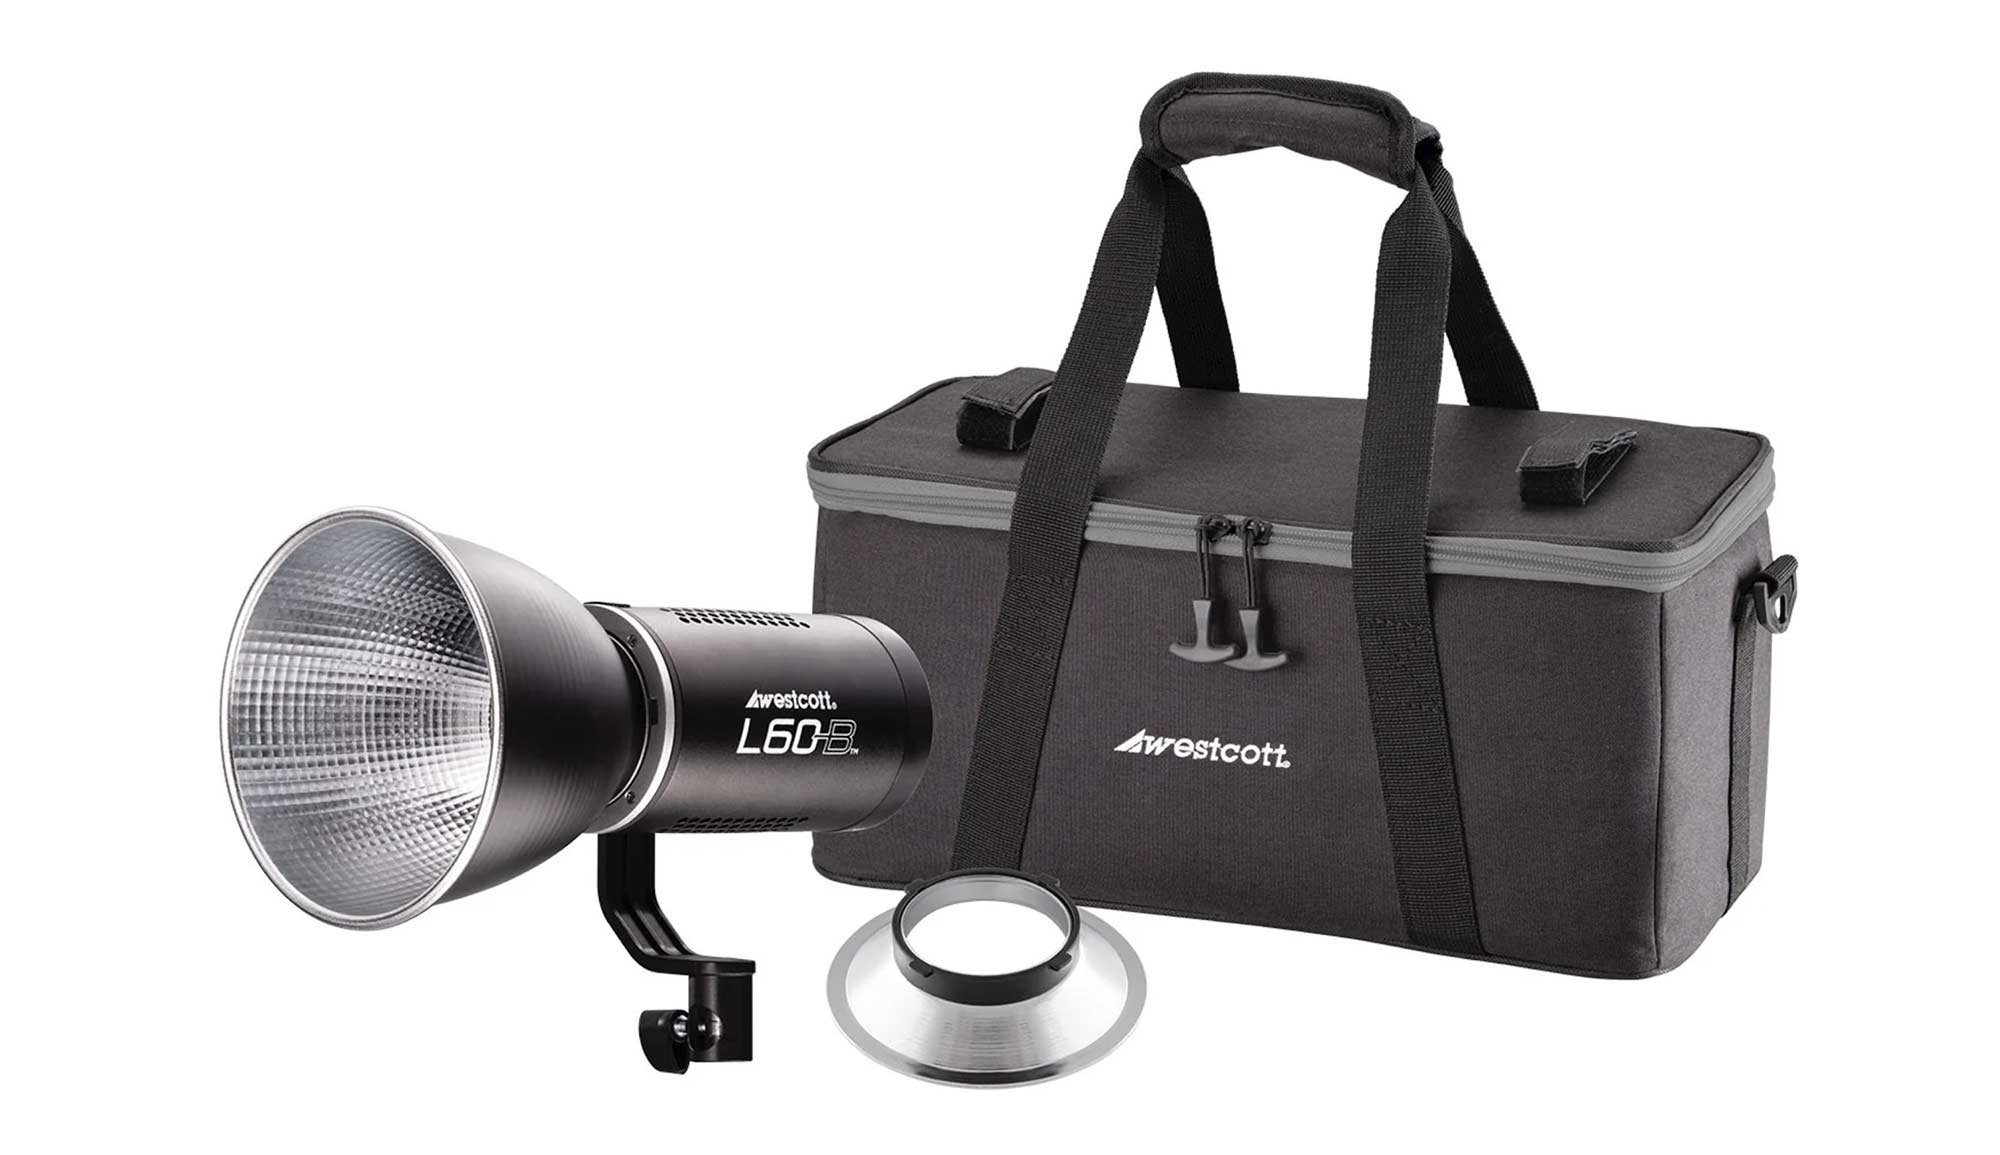
I’ve been using the 60W Westcott L60-B COB LED for a while now but a few days ago I received the new 120W L120-B COB LED; a slightly bigger unit with the advnatage that no adaptor is needed to fit any of my light modifiers.

So the portrait of my friend Anthony above, I took using one of the grey walls in my office as the background; here’s the set up showing the positon of the lights …

LIGHTING

Westcott L60-B COB LED fitted with a square Westcott Pocket Box Softbox rear and camera right and positioned so that it added both a bit of light onto the background but also a hint of light onto the camera right side of Anthony’s head.

Westcott L120-B COB LED fitted with the 24” Rapid Box Switch Softbox

Westcott 2-in-1 Reflector (silver and White) with silver side uppermost

*NOTE: If you’re looking to invest in Westcott Kit, then give me a shout and I’ll pass on a Discount Code

Westcott L120-B COB LED

Westcott 24” Rapid Box Switch Beauty Dish

Westcott Pocket Box Speedlight Softbox Kit

camera settings

  • Aperture: f/5.6

  • Shutter Speed: 1/60sec

  • ISO: 1250

When taking Anthony’s portrait I was experimenting with different apertures to see hat I prefered for this new look; f/2.0 , f,4.0 , f/5.6 and actually liked the look of f/40 as with the 55m lens it gave a great depth of field with the tip of the nose in foucs and then from the ears losing focus.

However, I mistakenly left the camera in f/5.6 so during the retouching in Lightroom I used the Lens Blur to convincingly fake the depth of the field.

retouching in lightroom

The portrait I retouched using only Lightroom and I’ve added it into my Lightroom Community Profile Page

When you go to my Lightroom Community Profile Page, click on the portrait and this will then take you to where you can see all of the retouching steps I did to the ‘out of camera’ file. You can also save the settings as a preset to use on your own images and even click on Remix to get access to a Smart Preview of my original file and have a go at retouching it yourself.

Classic Portraits with Constant Light

Recently I was back with friends in the studio taking portraits, and this time getting Steve in front of my camera to try out some ideas I’d stumbled across when browsing Pinterest that I thought would be another good excuse to get my L60-B constant light out for.

Pinterest

I’ve used Pinterest for years as a great place for not only finding inspiration by looking at the work of photographers I admire like Annie Leibovitz and Mark Seliger, but also a great tool for looking how other photographers pose their subjects, which lets face it can be awkward at times. 

Finding a balance between what you want but also making the pose look natural and the subject comfortable can be challenging to get right but I’ve always found it a massive help when you can guide your subject on what you’re looking for by showing them a picture.

Anyway, these here are some of the looks and poses I was really interested in …

Model for the Day

Model for the day was my dear friend Steve Healy whom I’ve known for years. 

There was a time when for quite a while we’d not met up because of Steve moving away to Devon but I’m glad to say that when we finally made the move to the South West , we’re now able to meet up fairly regularly to just hangout out and take photographs. This we will certainly be doing more and more of!

Anyway, Steve drove over to my house in the morning and then we both jumped into my car and headed to South Wales to catch up with the gang; some of my closest friends which to be honest are more like family … Ian Munro and Anthony Crothers.

This was the first time Steve had met up in person with Ian and Anthony even though I’m sure they felt like they knew each other anyway having messaged back and forth many times on social media and also in the chat room during my Sunday LIVE Broadcasts on YouTube. Needless to say … Steve instantly became ‘one of the gang’ 😃

So after a traditional meet up at Costa in Brynmawr, South Wales to fuel up on coffee, we then went to the studio and cracked on …

PORTRAIT 1

So the first portrait I really liked the look of doing was the one inspired by this portrait of Robert De Niro taken by Mark Seliger …

Steve had brought along a dark grey casual suit-type jacket which was ideal. He’d also bought a white shirt to wear underneath but when setting up we all felt that even though you’d only seen a small portion of it, it would be too distracting, so instead Steve kept with the black T-Shirt he was wearing.

BACKGROUND

For this I portrait as it was to be a fairly tight crop of Steve on one side and just a little bit of ‘dead space’ to the left, the 7’ x 5’ background would be plenty big enough and so this was set up with the rear supporting leg shortened so that the background took up less floor space and could be closer to the wall.


LIGHT + MODIFIER

I’ve said it before and I’ll say it again … I absolutely LOVE this light!

I wouldn’t be exaggerating when I say that positioning the light (L60-B) to get the Rembrandt Lighting Pattern 100% BANG ON took just a few seconds; such is the convenience and ease of doing so when using because … What You See Is What You Get

Bottom Left: iPad Pro with Pinterest App open showin the ‘reference’ image

To achieve a quality of light that was neither hard or soft but somewhere in between, and also to minimise the amount of light that would spill onto the background, I opted to use the Westcott 24” Rapid Box Switch Beauty Dish and with the outer diffusion panel fitted.

Westcott 24” Rapid Box Switch Beauty Dish with Outer Diffusion Panel

CAMERA + Lens

  • Sony A7RIV

  • Sony 85mm f/4.0 G Master

CAMERA SETTINGS

  • Aperture: F/4.0

  • Shutter Speed: 1/60sec

  • ISO 1250

Once set up and with any light in the studio that wasn’t contributing to the portrait turned off, I could then start taking portraits of Steve but what was really useful here was that everyone could see EXACTLY what the shots would be like without having to look at the back of my camera each time or look at my iPad Pro that I was tethering to; again because What You See Is What You Get

Studio lights and ‘any’ lights not contributing to the portrait turned off.

This made it so easy for anyone who wanted to make a suggestion and move in to maybe get Steve to angle himself differently or change the position of a hand.

It just worked and worked so incredibly well, making EVERYONE feel involved.

OUT OF CAMERA

Here’s the out of camera Raw file …

Original Raw file in Adobe Lightroom Classic

FINAL EDIT

Here’s the final retouched image which was worked on using both Lightroom and Photoshop …

Final Retocuhed Portrait

LIGHTROOM CLASSIC and PHOTOSHOP

Here’s a summary of the retouching steps carried out in both Lightroom Classic and Photoshop …

Lightroom

  • Straighten & Crop

  • Colour Correction*

  • Denoise

  • Masking (Enhance eyes - Iris and Pupil only)

*Had to do this manually as ‘somehow’ I forgot to use my Colour Checker Passport … Doh!

Photoshop

  • Clean Up

  • Dodge & Burn

  • 2010

  • Dreamy Glow (20%)

Lightroom

  • Colour (CN16)

  • Color Mixer (Reduce Orange & Red Saturation on Steve’s face)

  • Masking (Radial Gradient to Shape Light)

  • Masking Exposure on Face

  • Add Grain


PORTRAIT 2

For the 2nd portrait of Steve, this was the photograph I used as the initial inspiration / idea …

For this we went with the exact same set up albeit positioning the light camera left this time as opposed to camera right as it was for the first portrait.

Below is what the set up looked like before turning off the lights in the studio that weren’t contributing to the portrait …

Using the single L60-B coming in from high up and angled down produced exactly the lighting that was wanted (below) however I felt that the shadow side of Steve’s head was a touch too dark …

To add a touch more light onto the shadow side of Steve’s head, rather than use a 2nd L60-B we just used a Silver Reflector which also had a white side to it, however between the two surfaces, the silver side gave the best result …


OUT OF CAMERA

Here’s the ‘out of camera’ Raw file …

Out of Camera Raw file in Lightroom Classic

FINAL EDIT

Here’s the final retouched image which was worked on using both Lightroom Classic and Photoshop …

Final Retouched Portrait

lightroom classic and photoshop

Retouching steps in both Lightroom Classic and Photoshop were pretty much the same as in the first portrait, however there was one very definite difference.

When taking the 2nd portrait, we all felt that although Steve sitting on a stool worked, it did make him look a little squashed because of the height of the stool he was sitting on and also how his jacket sat, so we also tried a few shots with Steve standing …

With Steve standing it definitely stopped him looked squashed, however when looking at the images later in Lightroom Classic I was torn because I liked the pose and expression on Steve’s face from the seated shots.

So now in the retouching I was thinking I could either (a) do a head swap or (b) do the opposite of a technique I used to do when photographing physiques … and that’s what I chose to do.

PHOTOSHOP TUTORIAL

Here’s a short video showing exactly what I did in Photoshop to reduce / remove the ‘squashed’ look …

WRAP UP

Following the photo shoot we all the headed over to Abergavenny for what was a delicious bite to eat at The Angel … THANK YOU Steve!

So there you go, all of the steps that I went through from the initial idea, the kit, the set up and the final edit.

As always if you have any questions / comments, please do make use of the section below and I’ll be sure to reply.

Oh and don’t forget, if you’re interested in getting ANY of the Westcott kit including lighting, modifers, backgrounds etc then drop me a line as I’ll be able to give you a Discount Code for 10% OFF

Cheers
Glyn

Constant LED Light Portraits with Sony and iPhone

The more I use the LED Constant Light for Portraits, the more I fall in love with it.

I know I said it before in an earlier post but when you use it, the whole WYSIWYG (What You See Is What You Get) not only makes setting up so much easier and quicker but also every time I use it, the people I photograph say how much more relaxing it is not having a flash go off in their face.

Just over a week ago I was recording some content for the iPhone Photography Conference and thought it would be an interesting comparison just to see how close I could get a photograph I took with my main camera, my Sony A7RIV Mirrorless and my iPhone 15 Pro Max.

Of course I went into this knowing that the iPhone image wouldn’t equal or surpass the quality of my Sony, but just thought it would be interesting to see how far the quality has moved on and do this with a lit Portrait using the constant light … the Westcott L60-B Bi-Colour LED.

THE SET UP

For the lighting. I had originally planned to use just one light, the L60-B, however I couldn’t resist the warm light emitting from the heater that Ian had turned on in the studio. I loved the way it cast a warm glow onto the wood panelling so this was carefully raised off the ground and then became the main light and the L60-B was positioned on the opposite side of Ian further forward and higher up.

The L60-B was given a warmer temperature using the iPhone app which works incredibly well.

As soon as I opened the app it connected to the light and I was able to dial in the power settings, change the temperature and I could even make it perform lighting special effects like lightning, TV and a faulty bulb … but these are obviously for use when doing video.

CAMERA SET UP 

So with my Sony A7RIV on my tripod I used my 55mm Zeiss f/4.0 lens and tethered this into CaptureOne on my iPad, which works an absolute treat!

It’s incredibly easy to set up; you literally plug one end of a USB-C cable into the camera, the other end into the iPad, and with the app open i’st connected and ready to go.

I’m using this all the time now when tethering and what I also love about it is that you can stop and start the monthly subscription whenever you want. The subscription is only £4.49 / month so I tend to look at what I have planned and just restart it for that period, then cancel it again.

The only thing I don’t like which might (I hope) be just down to a setting I’ve missed turning on, but the photographs you take are only stored on the iPad. I only discovered this after the first shoot I did using it. I disconnected the camera and went to check the images on the camera and nothing was there. Only once my heart re-started and I looked on my iPad did I realise where they were 😳


CAMERA SETTINGS

The settings dialled into my camera were …

  • f/4.0

  • 1/60 sec

  • 2000 ISO … which for modern day cameras is nothing

using the iphone

Having taken the portrait with my Sony I then swapped over to my iPhone which was placed on the tripod using the ULANZI ST-27 Phone Mount.

I also attached the 2x Telephoto lens from ReeFlex to the 1x lens on my iPhone using one of their cases that has threads in each of the lens apertures.

The 1x lens is the equivalent of 24mm and is the only lens on the iPhone capable of shooting in ApplePro Raw at 48MP … the highest resolution and largest file my iPhone 15 Pro Max can produce.

With the 2x Telephoto lens attached this made the 1x lens the equivalent of 48mm and did this optically rather than digitally, and so doing everything possible to create the best possible file; not quite 55mm but the closest I could get oto it optically.

iPHONE PRO CAMER APP

To take the photograph with my iPhone I used a Pro Camera App from ReeFlex and called ReeFlex.

This app like most other pro camera apps gives you control over extra settings like Shutter Speed and ISO but it also makes it very clear to see not only what file format you are in but also the resolution.

ReeFlex Pro Camera App usinfg 1x lens in Apple ProRaw at 48MP

However here’s the catch …

If when you’re using the 1x lens in Apple ProRaw at 48MP you make changes to the shutter speed and / or ISO then the file size immediately drops from 48MP to 12MP.

ReeFlex Pro Camera App using 1x lens with Shutter Speed Adjusted

So because of this I opted to leave the iPhone in the AUTO settings which kept the 1x lens in Apple ProRaw at 48MP, and these are the out of camera and out of phone results, with the Sony image on the left and the iPhone image on the right …

Now at this 100% magnification the iPhone file, although different to the Sony file, certainly looks to be holding up.

However, it’s when you zoom in on that iPhone file that things look VERY different …

Look how the file looks soft and slightly out of focus. Look how the file lacks texture and detail in Ian’s skin, his hair and the wood panelling.

Apple ProRaw

This softening appearance to the image is all because of shooting in the supposed highest resolution settings, AppleProRaw at 48MP and that’s because Apple ProRaw isn’t like a traditional Raw file as we know and understand them.

You see Apple ProRaw files do actually receive some processing such as Noise Reduction ( quite al lot ) and Smart HDR, so the file we end up with is also a blend of a number of images at different exposures taken and processed increibly quickly.

So not REALLY a Raw file as you would expect 🤷‍♂️

topaz sharpen ai

Running the file thorugh Topaz Sharpen AI does recover alot of that lost detail as you can see here …

However knowing what Apple ProRaw does to your files does arm you with a bit of knowledge so that you can make the decision to use it or not.

Depending on how serious you are about your iPhone photography you might want to consider shooting in 12MP Raw which Pro Camera apps like Moment and ReeFlex allow you to do …

Naturally we always want the highest resolution file possible but the noise reduction that Apple ProRaw does, might make you reconsider.

12MP Bayer raw files

Currently ALL Raw Long Exposure apps produce 12MP Bayer Raw files and that’s what all of my seascape images are and I’m more than happy with them.

Sure more resolution would be good but until that time, these 12MP Bayer Raw files are very acceptable …

So acceptable in fact that Digitalab even printed one of my iPhone seascapes at 72” on the longest side and it looked incredible …

final retouched portraits

Here though are the final retouched portraits with the Sony file on the left and the iPhone file on the right, and yeah the Sony file is definitely better and that’s to be expected, but looking at the iPhone file the future is going to be VERY interesting indeed!

wrapping up

So more testing to be done which will be interesting as new iOS updates come along and the iPhone 16 later this year.

In the mean time I’m going to carry on taking seascapes with my iPhone because I really enjoy doing them BUT I’ll also be taking them with my Sony too.

As for Portraits I’ll keep taking them with my iPhone but only as an extra bit of fun and experimentation when taking them with my Sony.

Catch you next time
Glyn