photoshop

AI Just Changed How We ENHANCE EYES in PHOTOSHOP 💥

Two Ways to Add Detail to Dark Eyes in Photoshop

If you’ve ever edited a portrait where the eyes are so dark there’s no detail to recover, you’ll know how tricky it can be. Brightening them often makes things look worse, leaving the subject with flat, lifeless eyes.

In the video above, I walk you through two powerful techniques that solve this problem:

  • A reliable method using Photoshop’s traditional tools

  • A newer approach that uses AI to generate realistic iris detail

Here’s a quick overview of what you’ll see in the tutorial.

The Traditional Photoshop Method

This approach has been in my toolkit for years. It doesn’t try to recover what isn’t there. Instead it creates the impression of natural iris texture.

By adding grain, applying a subtle radial blur, and carefully masking the effect, you can fake detail that looks convincing. A touch of colour adjustment finishes the look, leaving you with eyes that feel alive instead of flat.

It’s a manual process but it gives you full control, and the result is surprisingly realistic.

The AI-Powered Method

Photoshop’s Generative Fill takes things in a different direction. With a simple selection around the iris and a prompt like “brown iris identification pattern”, Photoshop can generate natural-looking iris textures, the kind of fine patterns you’d expect to see in a close-up eye photo.

Once the AI has created the base texture, you can enhance it further using Camera Raw:

  • brighten the iris

  • increase contrast, clarity, and texture

  • even add a little extra saturation

Add a subtle catchlight and the transformation is incredible. The eyes go from lifeless to full of depth and realism in seconds.

Why These Techniques Matter

Eyes are the focal point of most portraits. If they’re dark and featureless, the whole image suffers.

These two techniques, one traditional and one modern, give you reliable options to fix the problem. Whether you want the hands-on control of Photoshop’s tools or the speed and realism of AI, you’ll be able to bring that essential spark back into the eyes.

Ragnar - Viking Composite using Photoshop

Following on from the earlier article I wrote ( LINK ) showing the Behind the Scenes of a recent Viking Photo Shoot, I’ve now finished the 2nd image so thought I’d share it here for you to see …

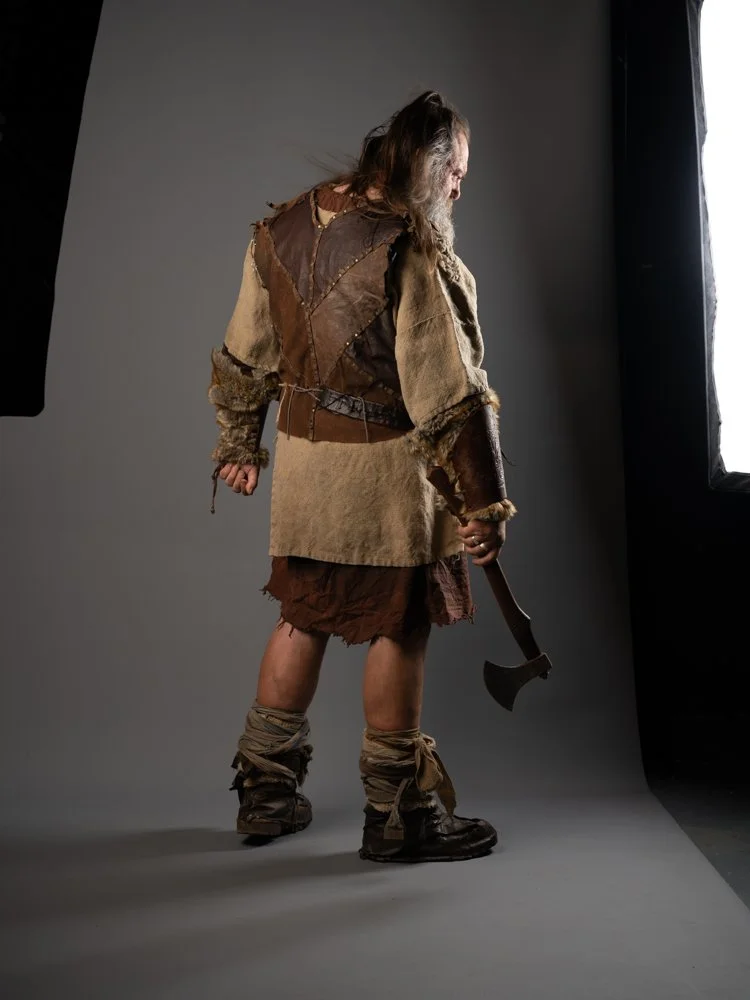
This is a composite made using Photoshop and is a combination of several images comprising the original studio photograph of my friend Simon ‘Foxy’ Fowler dressed as the Viking, the Location Shot and several Sea Bird Photographs.

Here’s the studio photograph of Simon …

Here’s the location shot which is a part of the coastline at Three Cliffs Bay, The Gower, South Wales …

To make sure that I got the angle and height correct, when at Three Cliffs Bay, my great friend Anthony Crothers stood in the spot where I would eventually place Simon …

In the studio when photographing Foxy, my camera was on a tripod and at a height where the lens was in line with the top portion of his nearest thigh.

When on location photographing the background / scene, Anthony was stood on a rasied area of ground …

(Note: it looks precarious but actually isn’t … to the front of Anthony on the other side is a flat area that you can comfortably walk on)

so to get the angle / height to look as though Simon was photographed higher than he actually was, the camera lens was level and aimed just below Anthony’s nearest knee.

My new compositing workflow

Returning to some compositing has seen me now approach them in a different way especially when it comes to potentially time consuming cutouts such as hair anf fur.

My new workflow sees me leaving this part to the very end and getting great results in literally a fraction of the time …

This is something that I’ll definitely be going through in my Combining Old and New : Mastering Selections and Cut Outs in 2024 class in the upcoming ( FREE ) Photoshop Virtual Summit 6 …

CLICK / TAP FOR YOUR FREE PASS

If you’d like to see a larger version of both images created from this photo shoot, I’ve now added them into my PORTRAITS PORTFOLIO ( LINK )

Thanks for looking in,
Glyn

Returning to Composites: Ragnar Viking Portrait

It’s been a good few years since I did any compositing but recently I’ve been getting the urge to get back to it again. I don’t know if it’s because of all the updates that have come into Photoshop over the past few years or what, but something is drawing me back to start working in this area again … and I’m really excited about it.

So rather than just start creating random images, I’ve taken my own advice and decided on a project that brings together my photography, retouching and something outside of that world that I have a genuine interest and fascination with … and that’s Vikings. I’m a BIG fan of the Vikings Drama Series on Amazon Prime with incredible characters like Ragnar Lothbruk and Ivor the Boneless.

So not being one to hang around I started gathering ideas for the first pictures I wanted to work on and so for this I made use of technology that wasn’t available a few years ago when I was last doing composites … Adobe Firelfy AI and the ‘Text to Image’ technology.

This is such an incredibly useful piece of technology for coming up with concepts by simply writing your idea.

So using the Generate Image function in Photoshop I wrote …

Viking with beard and plaited hair and holding an axe stood on cliff looking down onto the sea

… and this is just some of the results that were created …

Now with images of what ideas I had in my head it was so much easier to first of all message my friend Simon Fowler aka Foxy and send him a picture of what I wanted to create of him as a Viking.

Then it was time to source the appropriate clothing for Foxy to wear, and for that I headed to Marigold Costumes in Cardiff and arranged to meet Simon and another friend Anthony Crothers there.

I’ve used Marigold Costumes a few times in the past for other photo shoots as there’s such a huge choice of costumes, and sure enough within no time we’d sorted out what was needed …

With clothing sorted it was then just a few days until the gang were all together in the studio for the photo shoot.

Here’s a look at the set up for the first image which is the one where the Viking will be looking down from the cliffs onto the sea below …

Doing this using the LED Constant Lights made it so much easier for everyone to see what was being captured … before it wss captured. It also made setting up so incredibly easy.

kit used:

To the front of Foxy I used the light and soft box combination below …

This was used to mimic the light / highlights coming from the sun.

Now when it comes to composting, I was always someone that liked to get the backgrounds first and then photograph the model / subject. I did this because having the background first meant I then had a light style and direction to mimic in the studio.

However I knew where I was going to photograph the background location … Hartand Quay in North Devon.

This is a location I have been to many times and know really well. It’s perfect for the picture I had in mind. I also had a good idea of where the sun would be located at a certain time of day which is why I positioned the light as I did to the front of Foxy.

I did check using the PhotoPills App though just to be sure …

And here’s one of the ‘out of camera’ shots, which as you can see shows that I also photographed Foxy against a grey background.

The reason for this is two-fold; firstly it contrasts against Foxy so makes it easier to cut him out later in Photoshop. Secondly, because it enables me to capture the real cast shadows, and being grey gives me the option of using a blend mode later in Photoshop to retain them and have them appear in the final composite rather than me paint them in …

The background / scene

As for the background I intend to add the photograph of Foxy into, I headed over to Hartland Quay over this past weekend with my friend Brian Dukes.

Conditions ended up being perfect with the clouds and incoming tide, and in addition to getting the shots I wanted, it made for a great day hanging out with a close friend in a fabulous location …

back to the studio

Anyway, back to the studio, there was one more shot I wanted and that was with Foxy stood facing directly towards the camera. I had an idea of creating a movie poster type of picture.

the set up

For this picture I changed the set up having rim lighting on either side of Foxy and a single light infront …

I really should get another 1x4 Softbox to use for the rim lighting, but as it happened, just using the 3x4 softbox and positioning it facing directly across the back of Foxy and him slightly forward worked out just fine. The other 1x4 I positioned on the opposite side, again facing directly across the back of Foxy.

The light directly to the front of Foxy was another Westcott L60-B Bi Color LED and this one was in a Westcott Rapid Box Switch Medium Octa (36”).

With it being on a C-Stand and on a boom, it was easy to get the camera on the tripod directly below so the light was on camera axis.

Here’s the out of camera photograph …

And below is the final edit.

Genuinely loved working on this adding textures, shadows on the background, dodging and burning, lighting effects, colour grading and creating the text from scratch along with the glow from the fire below and the sparks.

It was so much fun seeing how the updates can help with what I’m doing such as using Adobe Express for the fire and sparks and also Generative Fill AI to change the look of the axe head. Loved it!

So that’s my new Viking Series officially started and I cannot wait to get working on the other picture from this photoshoot.

Needless to say I’ll share it once finished. I’ll also look at creating some tutorial walk-throughs going through all of the retouching for both.

It sure feels good to be back doing this kind of work 😃 and as always a BIG thank you to my ever supportive friends … Ian Munro, Foxy, Anthony Crothers, Gerwyn Williams and Brian Dukes.

Photoshop Virtual Summit 6

Very excited to announce that the Photoshop Virtual Summit 6 has been announced and is now open for registration for FREE PASSES and / or Early Bird VIP Access Passes.

Spread over 5 days running from 11th - 15th November, this Virtual Summit includes 40 classes from 23 instructors, of which I’m increddibly excited to say I am one.

I’ll be presenting 2 classes, namely …

  • Combining OLD and NEW: Mastering Selections and Cut Outs in 2024

  • Oldies BUT Goldies: Photoshop Techniaues that stand the test of time

As with previous Virtual Summits, you can GRAB A FREE PASS and then be able to watch every single class for 48 hours from the time it was released during the week. There’s also the option grab an EARLY BIRD VIP ACCESS PASS for $99 (increases to $159 on November 11th - Day 1 of the Summit)

Use the button link below for information on both passes …

CLICK / TAP FOR FREE + VIP PASS INORMATION

To celebrate the launch of the Photoshop Virtual Summit 6, I hosted a LIVE Broadcast on my YouTube and Facebook Channels going through a few Photoshop techniques for FIXING SELECTIONS but also talking about the Summit and bringing in the Founder / Creator, Dave Cross who very kindly gave some time to answer questions.

If you missed it, the recording is below but if you want to see the LIVE chat from the Broadcast, you can watch it over on my YouTube Channel ( HERE )

Uncovering MORE than PHOTOSHOP with Unmesh Dinda

Watch this recording of a LIVE Broadcast as I chat with Photoshop Wizard and YouTuber Unmesh Dinda of PIXIMPERFECT and discuss Starting Out, his Process, Business, Teaching, Dealing with Negativity and more … including a few Photoshop Goodies 😉

links mentioned in the video:

From Movie Magic to Photographic Mastery | Lisa Carney

Thoroughly enjoyed chatting with Hollywood Movie Poster / Art Work Retoucher Lisa Carney and uncovering the HOW, WHAT and WHY of her personal work, her photography, process, retouching, personal projects and travel.

At the beginning of this recording check out the slideshow of her images and then learn how she captures and edits them because I guarantee, like me, you’ll be blown away!

Links mentioned in the video

Website: lisacarney.com (Portfolios, Photoshop Tutorials, Courses and more … )

Grief ( Art as Therapy - Personal Project ) LINK

Instagram: @lisacarney

The Lightroom Virtual Summit 2024: bit.ly/lvs-2024

Glyn’s Adobe Lightroom Community Page: LINK

Unsurprisingly, Lisa was a HUGE hit judging by some of the comments posted already from folks watching the recording …

I PRINTED a 72" iPhone Photo and you WON'T BELIEVE THE RESULT !!!

Yes you read thar right … a 72” print of an iPhone photograph!

In this video I not only show ther print but also give you a look at the kit I used along with my favourite iPhone App for creating Long Exposure Photographs.

I also show what I used to upscale the original image more than 4 times, taking up to the final 72 inches!

The future of mobile photography is VERY exciting 📱😃