iPhone

From Movie Magic to Photographic Mastery | Lisa Carney

This is the recording of a live broadcast where I chat with Hollywood movie poster and artwork retoucher Lisa Carney and uncover the how, what and why of her personal work. We talk about her photography, her process and retouching, her travel and her personal projects, including Grief, which is about art as therapy. The recording starts with a slideshow of her images, and then you get to learn how she captures and edits them; I guarantee that, like me, you'll be blown away.

Links mentioned in the video

Website: lisacarney.com (Portfolios, Photoshop Tutorials, Courses and more … )

Grief ( Art as Therapy - Personal Project ) LINK

Instagram: @lisacarney

The Lightroom Virtual Summit 2024: bit.ly/lvs-2024

Glyn’s Adobe Lightroom Community Page: LINK

Unsurprisingly, Lisa was a HUGE hit judging by some of the comments posted already from folks watching the recording …


Screenshot of viewer comments praising a video interview
Red Notice film poster with two men in suits and a woman in a red dress
Black and white portrait of two smiling older women seated together
Misty lake shore at golden hour with rocks in the foreground and trees fading into haze
Older woman in a patterned sari seated on a chair in front of a colourful shop
Split level view of a turquoise sea below the surface and clouds above

Constant LED Light Portraits with Sony and iPhone

The more I use the LED Constant Light for Portraits, the more I fall in love with it.

I know I said it before in an earlier post but when you use it, the whole WYSIWYG (What You See Is What You Get) not only makes setting up so much easier and quicker but also every time I use it, the people I photograph say how much more relaxing it is not having a flash go off in their face.

Just over a week ago I was recording some content for the iPhone Photography Conference and thought it would be an interesting comparison just to see how close I could get a photograph I took with my main camera, my Sony A7RIV Mirrorless and my iPhone 15 Pro Max.

Side-by-side Sony and iPhone portraits of a man in a leather jacket leaning on a wooden wall

Of course I went into this knowing that the iPhone image wouldn’t equal or surpass the quality of my Sony, but just thought it would be interesting to see how far the quality has moved on and do this with a lit Portrait using the constant light … the Westcott L60-B Bi-Colour LED.

THE SET UP

Studio set-up with a man in a leather jacket before a wooden wall, lit by a large softbox

For the lighting. I had originally planned to use just one light, the L60-B, however I couldn’t resist the warm light emitting from the heater that Ian had turned on in the studio. I loved the way it cast a warm glow onto the wood panelling so this was carefully raised off the ground and then became the main light and the L60-B was positioned on the opposite side of Ian further forward and higher up.

The L60-B was given a warmer temperature using the iPhone app which works incredibly well.

As soon as I opened the app it connected to the light and I was able to dial in the power settings, change the temperature and I could even make it perform lighting special effects like lightning, TV and a faulty bulb … but these are obviously for use when doing video.

iPhone showing the Westcott LED app beside a man posing against a wooden wall

CAMERA SET UP 

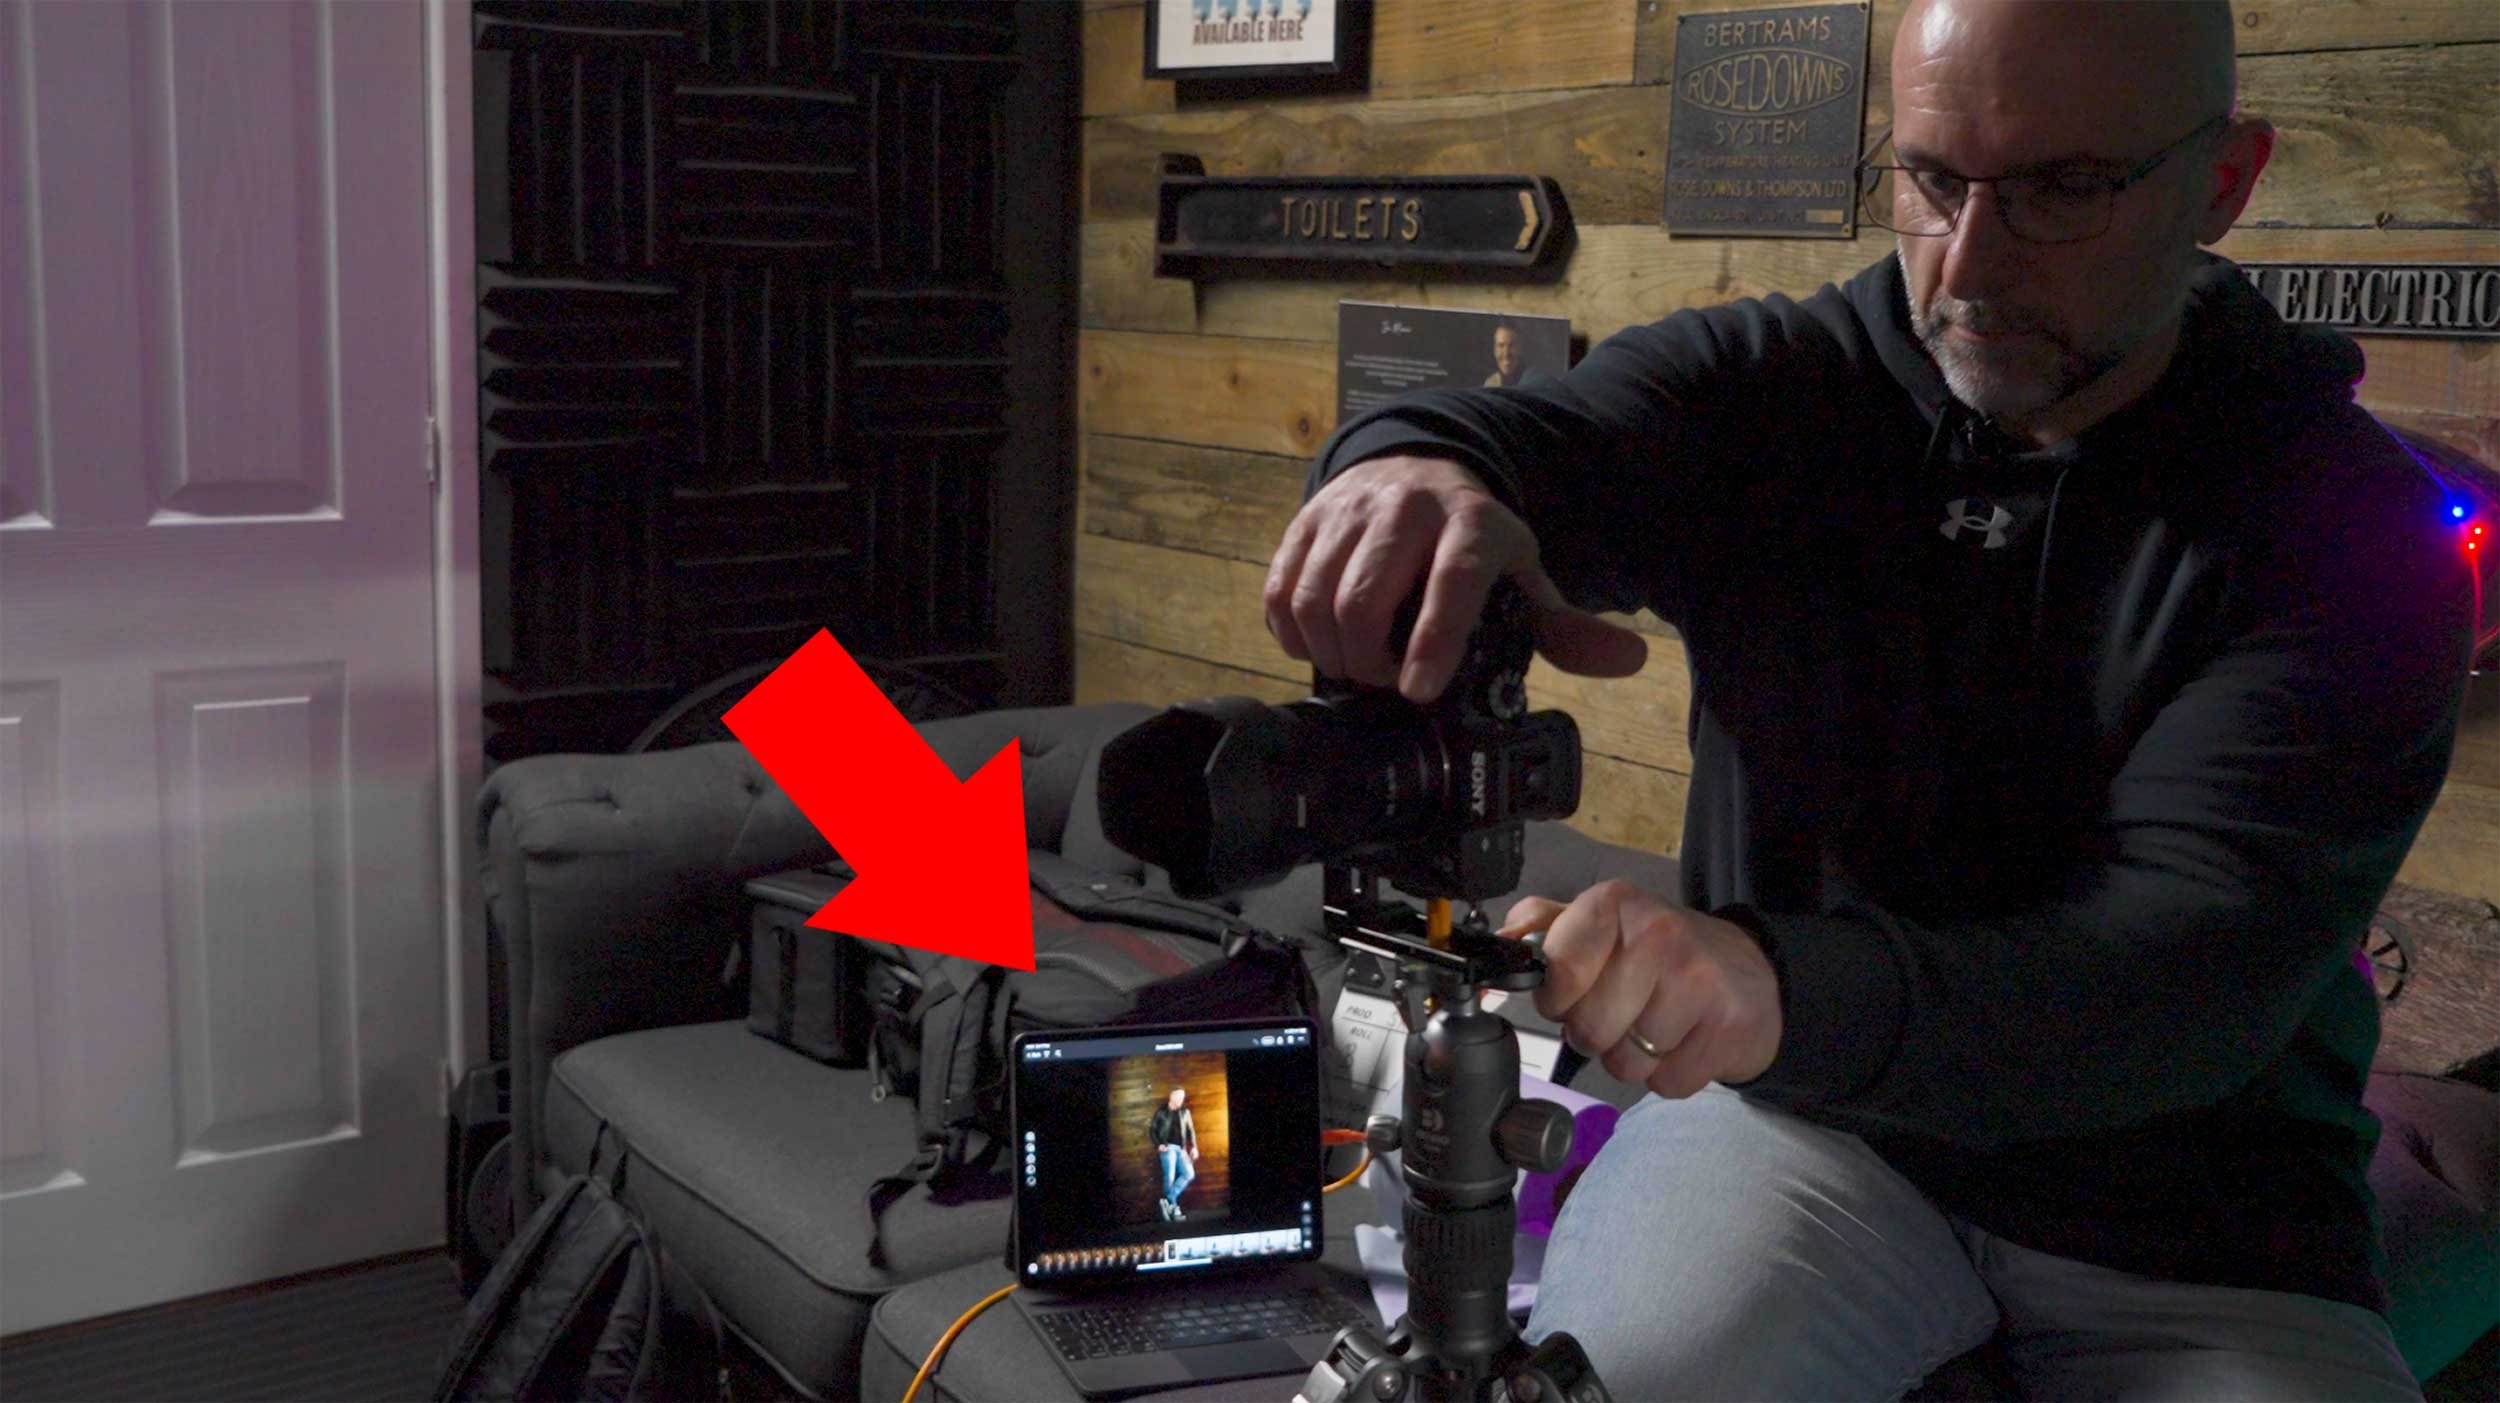
So with my Sony A7RIV on my tripod I used my 55mm Zeiss f/4.0 lens and tethered this into CaptureOne on my iPad, which works an absolute treat!

It’s incredibly easy to set up; you literally plug one end of a USB-C cable into the camera, the other end into the iPad, and with the app open i’st connected and ready to go.

Man adjusting a camera on a rig with a red arrow pointing to the attached screen

I’m using this all the time now when tethering and what I also love about it is that you can stop and start the monthly subscription whenever you want. The subscription is only £4.49 / month so I tend to look at what I have planned and just restart it for that period, then cancel it again.

The only thing I don’t like which might (I hope) be just down to a setting I’ve missed turning on, but the photographs you take are only stored on the iPad. I only discovered this after the first shoot I did using it. I disconnected the camera and went to check the images on the camera and nothing was there. Only once my heart re-started and I looked on my iPad did I realise where they were 😳


CAMERA SETTINGS

The settings dialled into my camera were …

  • f/4.0

  • 1/60 sec

  • 2000 ISO … which for modern day cameras is nothing

using the iphone

Having taken the portrait with my Sony I then swapped over to my iPhone which was placed on the tripod using the ULANZI ST-27 Phone Mount.

I also attached the 2x Telephoto lens from ReeFlex to the 1x lens on my iPhone using one of their cases that has threads in each of the lens apertures.

Hand holding an iPhone in a rig with a large lens attachment

The 1x lens is the equivalent of 24mm and is the only lens on the iPhone capable of shooting in ApplePro Raw at 48MP … the highest resolution and largest file my iPhone 15 Pro Max can produce.

With the 2x Telephoto lens attached this made the 1x lens the equivalent of 48mm and did this optically rather than digitally, and so doing everything possible to create the best possible file; not quite 55mm but the closest I could get oto it optically.

iPHONE PRO CAMER APP

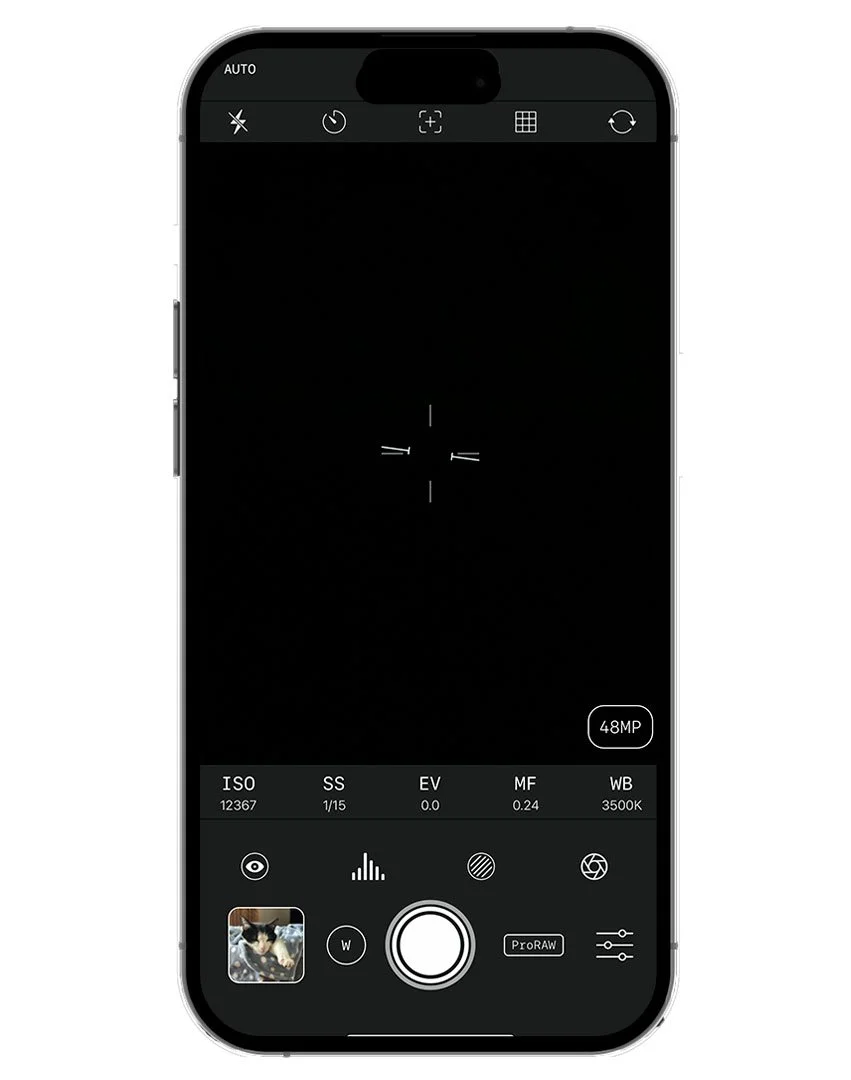
To take the photograph with my iPhone I used a Pro Camera App from ReeFlex and called ReeFlex.

This app like most other pro camera apps gives you control over extra settings like Shutter Speed and ISO but it also makes it very clear to see not only what file format you are in but also the resolution.

iPhone camera app interface in portrait orientation on a dark screen

ReeFlex Pro Camera App usinfg 1x lens in Apple ProRaw at 48MP

However here’s the catch …

If when you’re using the 1x lens in Apple ProRaw at 48MP you make changes to the shutter speed and / or ISO then the file size immediately drops from 48MP to 12MP.

iPhone camera app interface with manual controls on a dark screen

ReeFlex Pro Camera App using 1x lens with Shutter Speed Adjusted

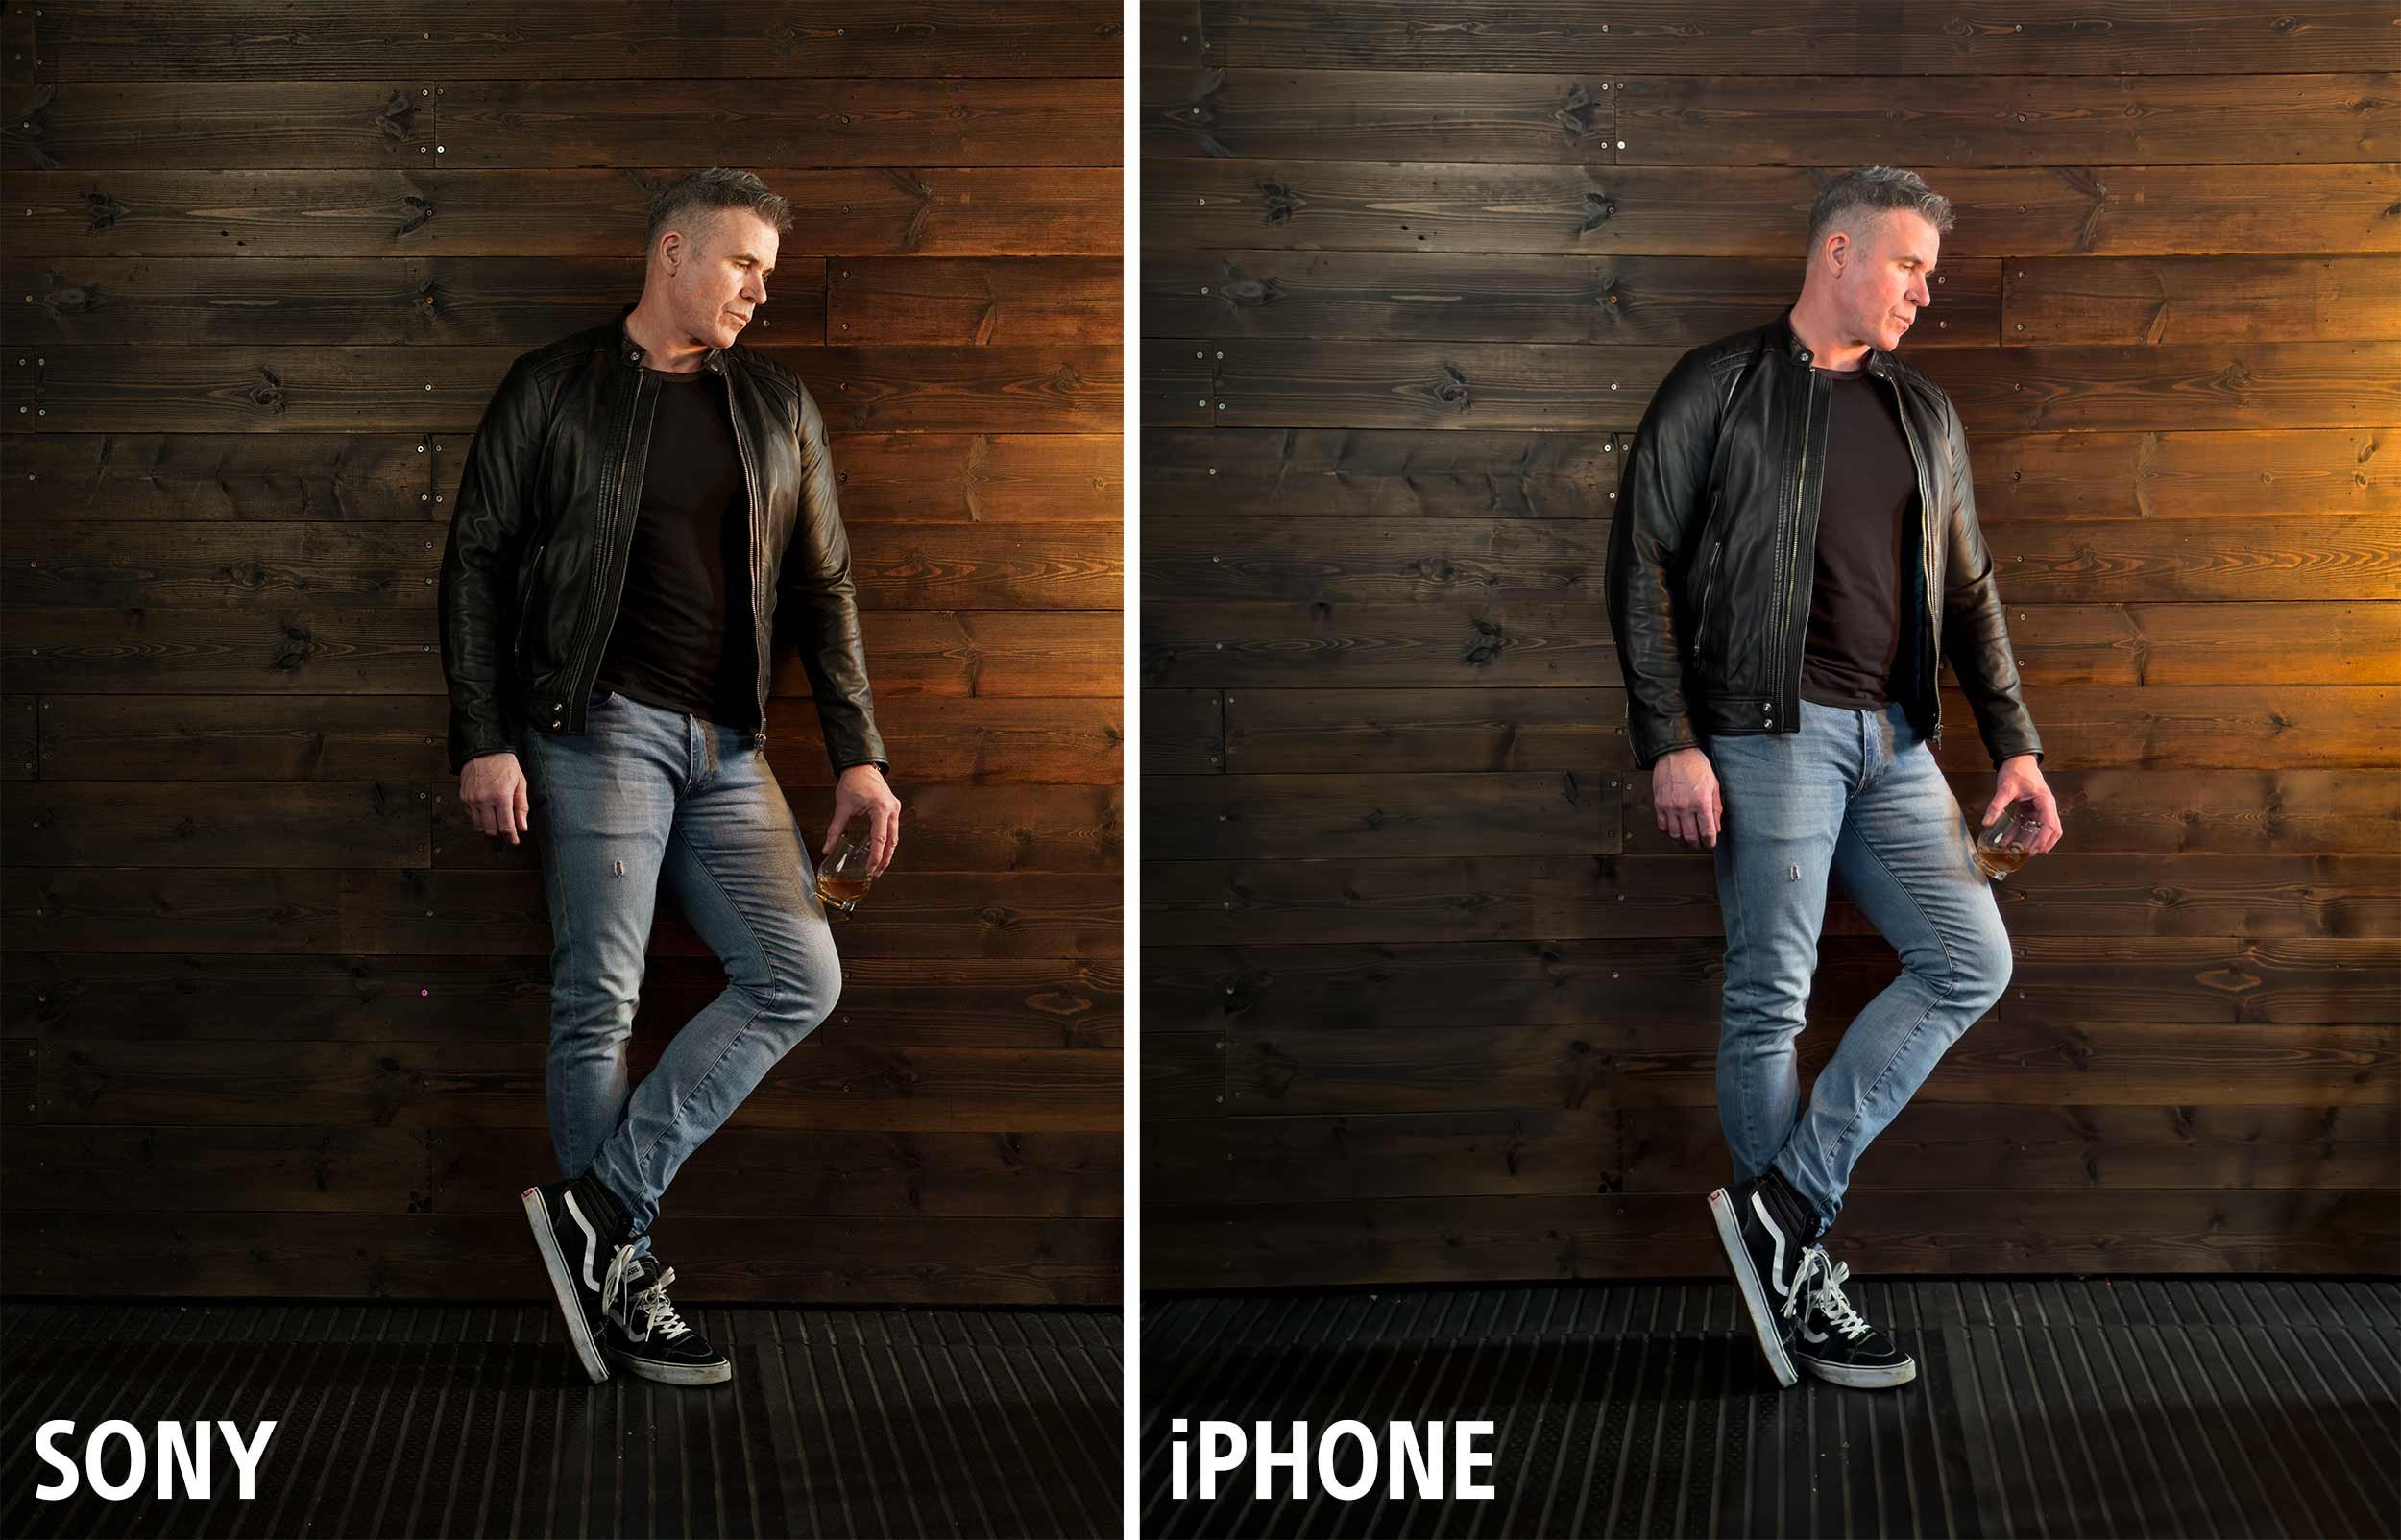
So because of this I opted to leave the iPhone in the AUTO settings which kept the 1x lens in Apple ProRaw at 48MP, and these are the out of camera and out of phone results, with the Sony image on the left and the iPhone image on the right …

Sony and iPhone versions of a portrait of a man in a leather jacket against a wooden wall

Now at this 100% magnification the iPhone file, although different to the Sony file, certainly looks to be holding up.

However, it’s when you zoom in on that iPhone file that things look VERY different …

Close-up side profile of a grey-haired man in a leather jacket against a wooden wall

Look how the file looks soft and slightly out of focus. Look how the file lacks texture and detail in Ian’s skin, his hair and the wood panelling.

Apple ProRaw

This softening appearance to the image is all because of shooting in the supposed highest resolution settings, AppleProRaw at 48MP and that’s because Apple ProRaw isn’t like a traditional Raw file as we know and understand them.

You see Apple ProRaw files do actually receive some processing such as Noise Reduction ( quite al lot ) and Smart HDR, so the file we end up with is also a blend of a number of images at different exposures taken and processed increibly quickly.

So not REALLY a Raw file as you would expect 🤷‍♂️

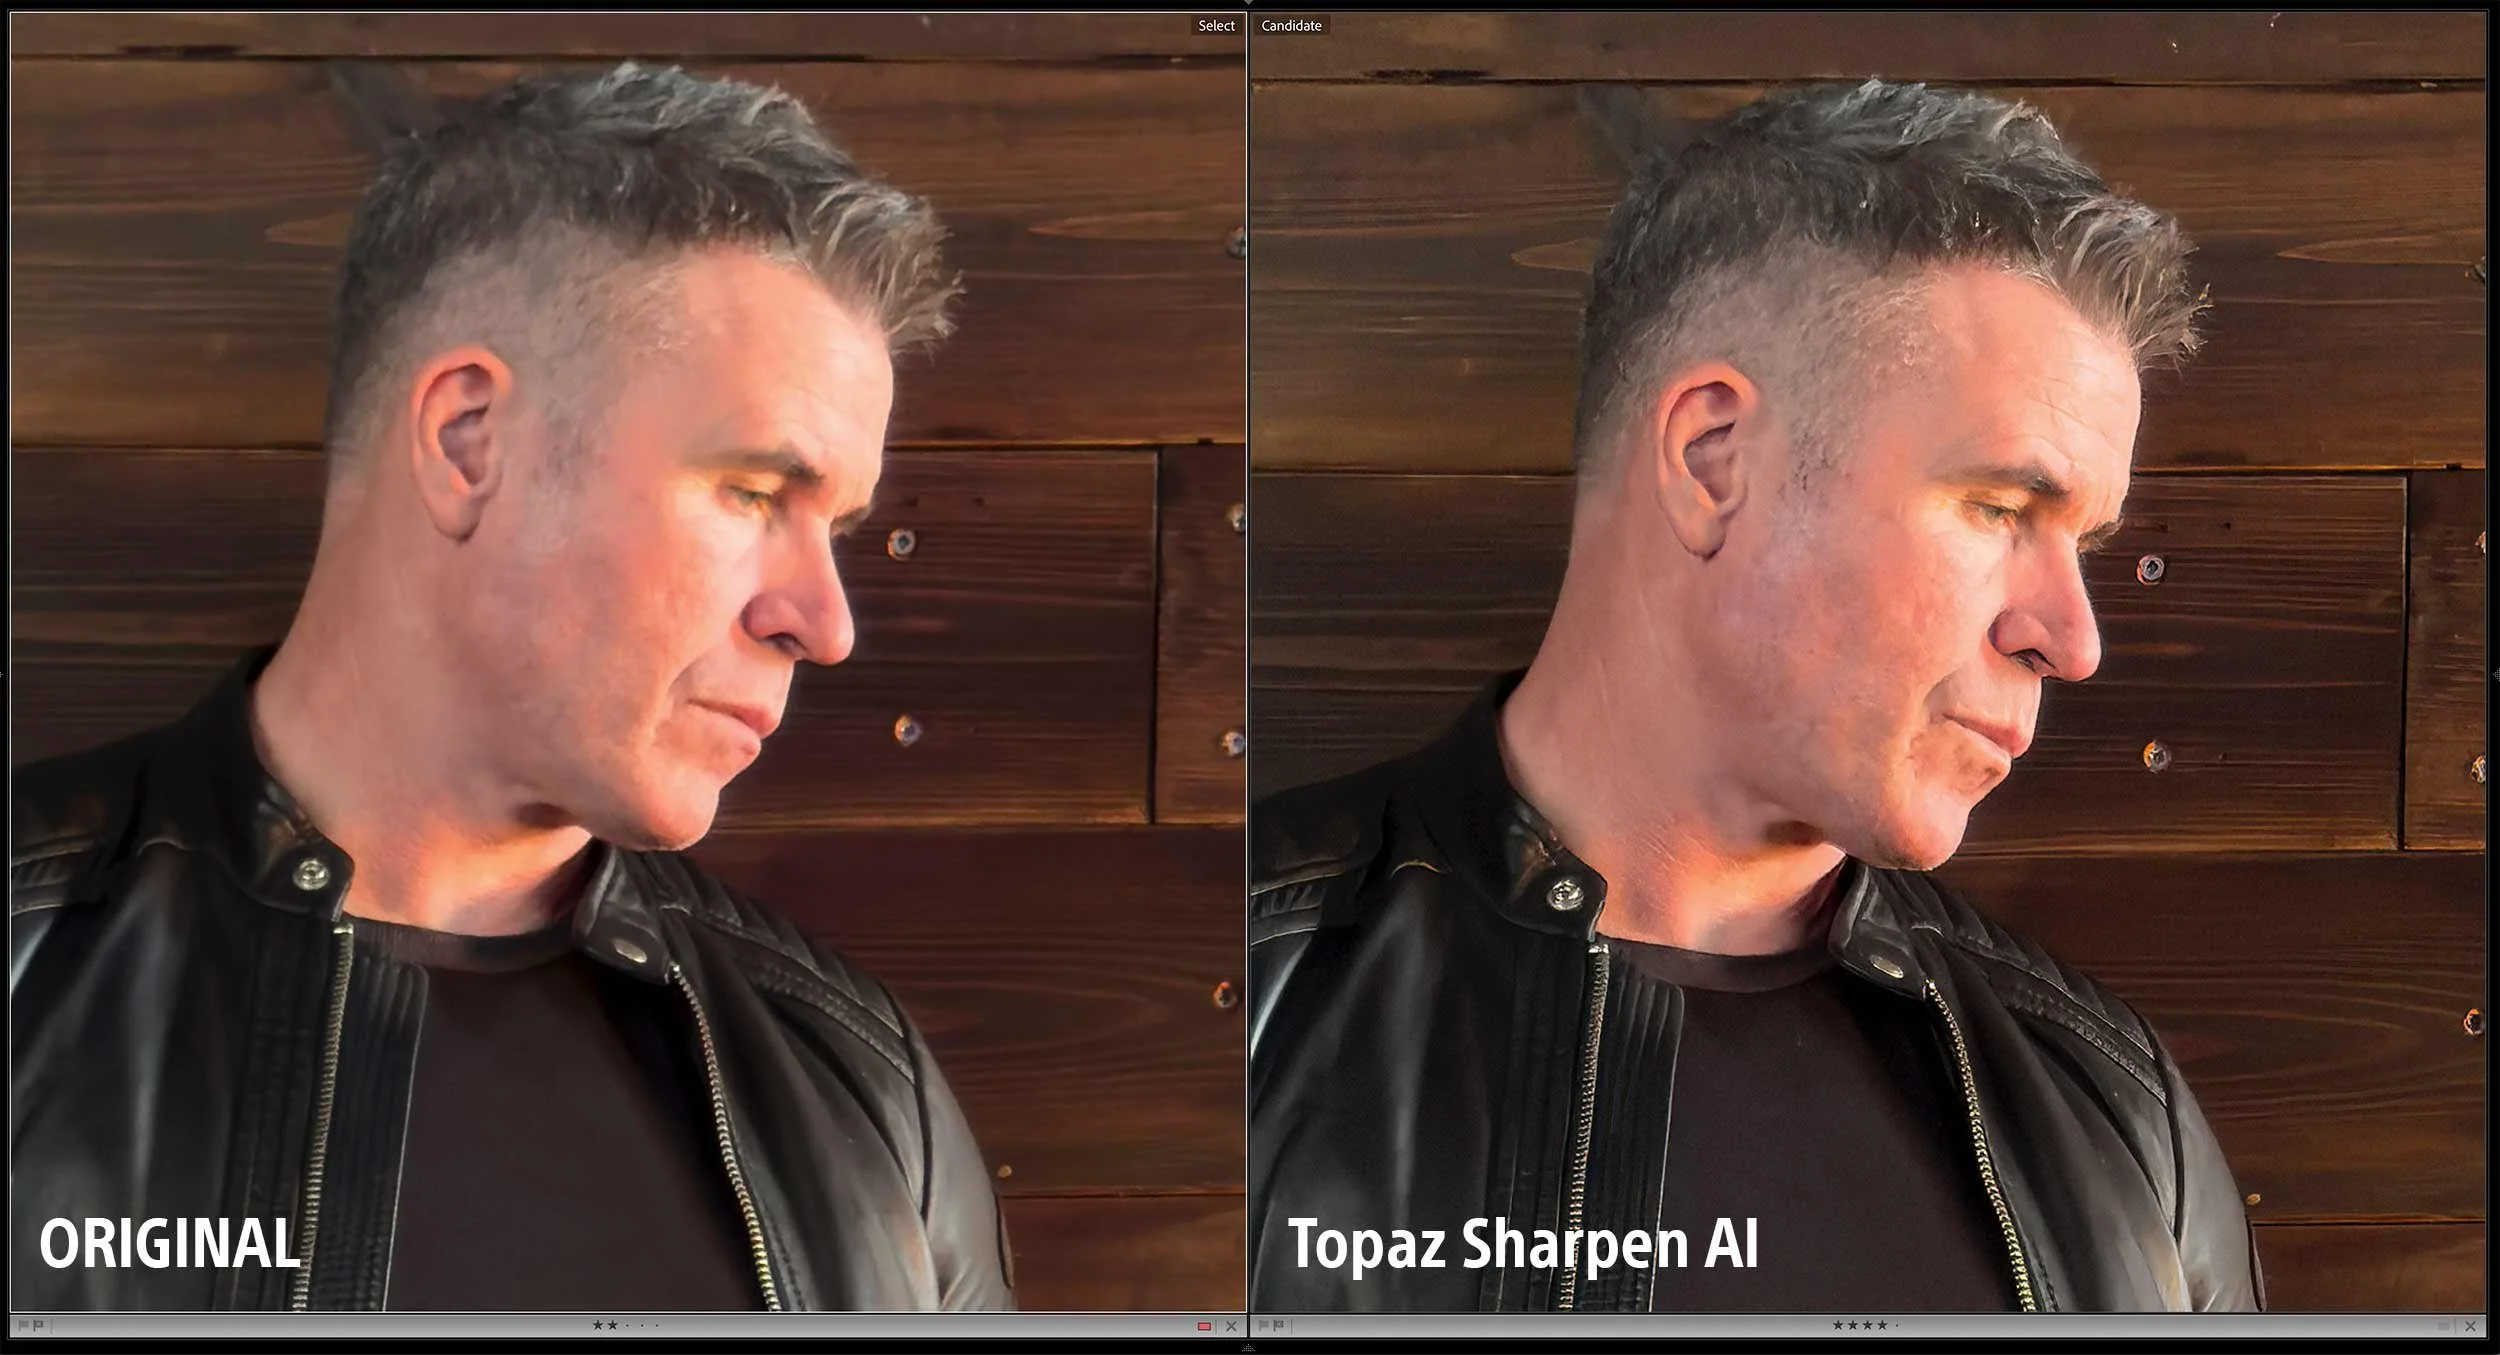
topaz sharpen ai

Running the file thorugh Topaz Sharpen AI does recover alot of that lost detail as you can see here …

Original and Topaz Sharpen AI comparison of a man's profile portrait

However knowing what Apple ProRaw does to your files does arm you with a bit of knowledge so that you can make the decision to use it or not.

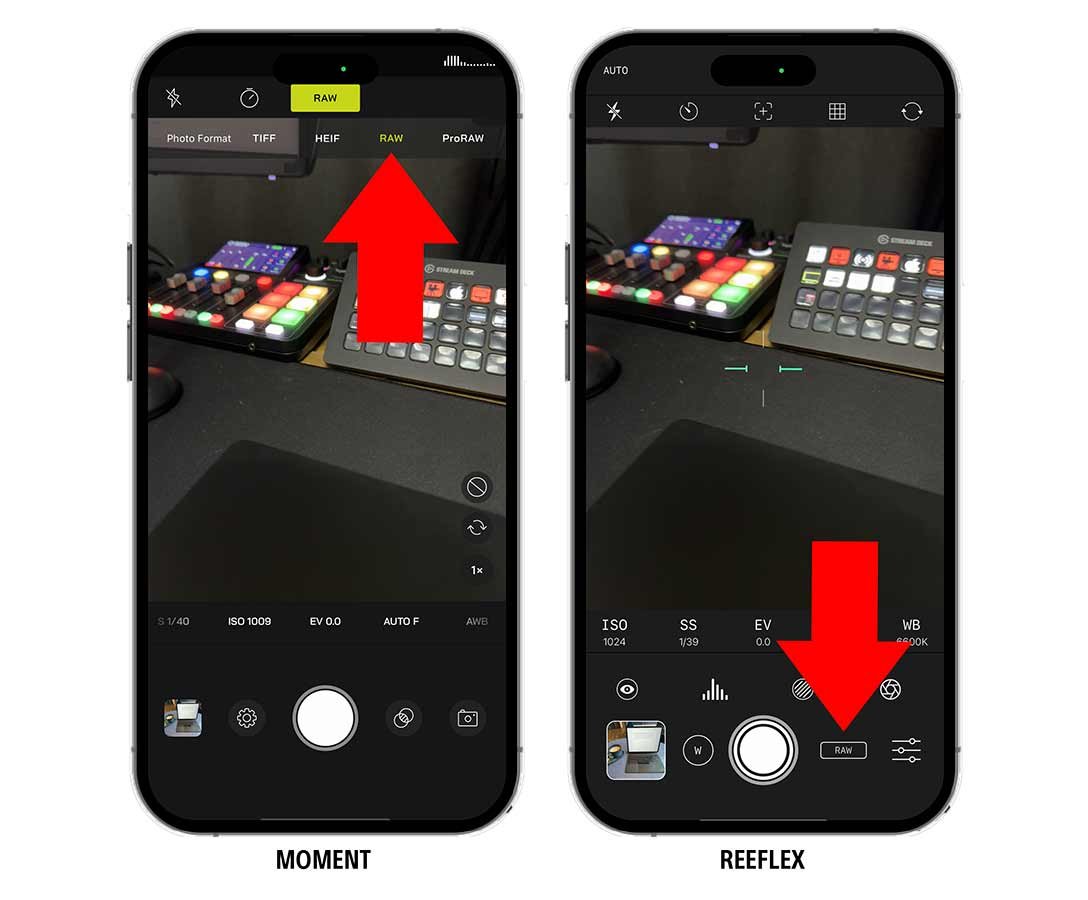
Depending on how serious you are about your iPhone photography you might want to consider shooting in 12MP Raw which Pro Camera apps like Moment and ReeFlex allow you to do …

Two iPhone screens showing the Moment and Reeflex camera apps with red arrows on the settings

Naturally we always want the highest resolution file possible but the noise reduction that Apple ProRaw does, might make you reconsider.

12MP Bayer raw files

Currently ALL Raw Long Exposure apps produce 12MP Bayer Raw files and that’s what all of my seascape images are and I’m more than happy with them.

Sure more resolution would be good but until that time, these 12MP Bayer Raw files are very acceptable …

Black and white photograph of waves crashing over rocks below a harbour wall and stormy sky
Curving stone harbour wall leading into calm misty water under a white sky

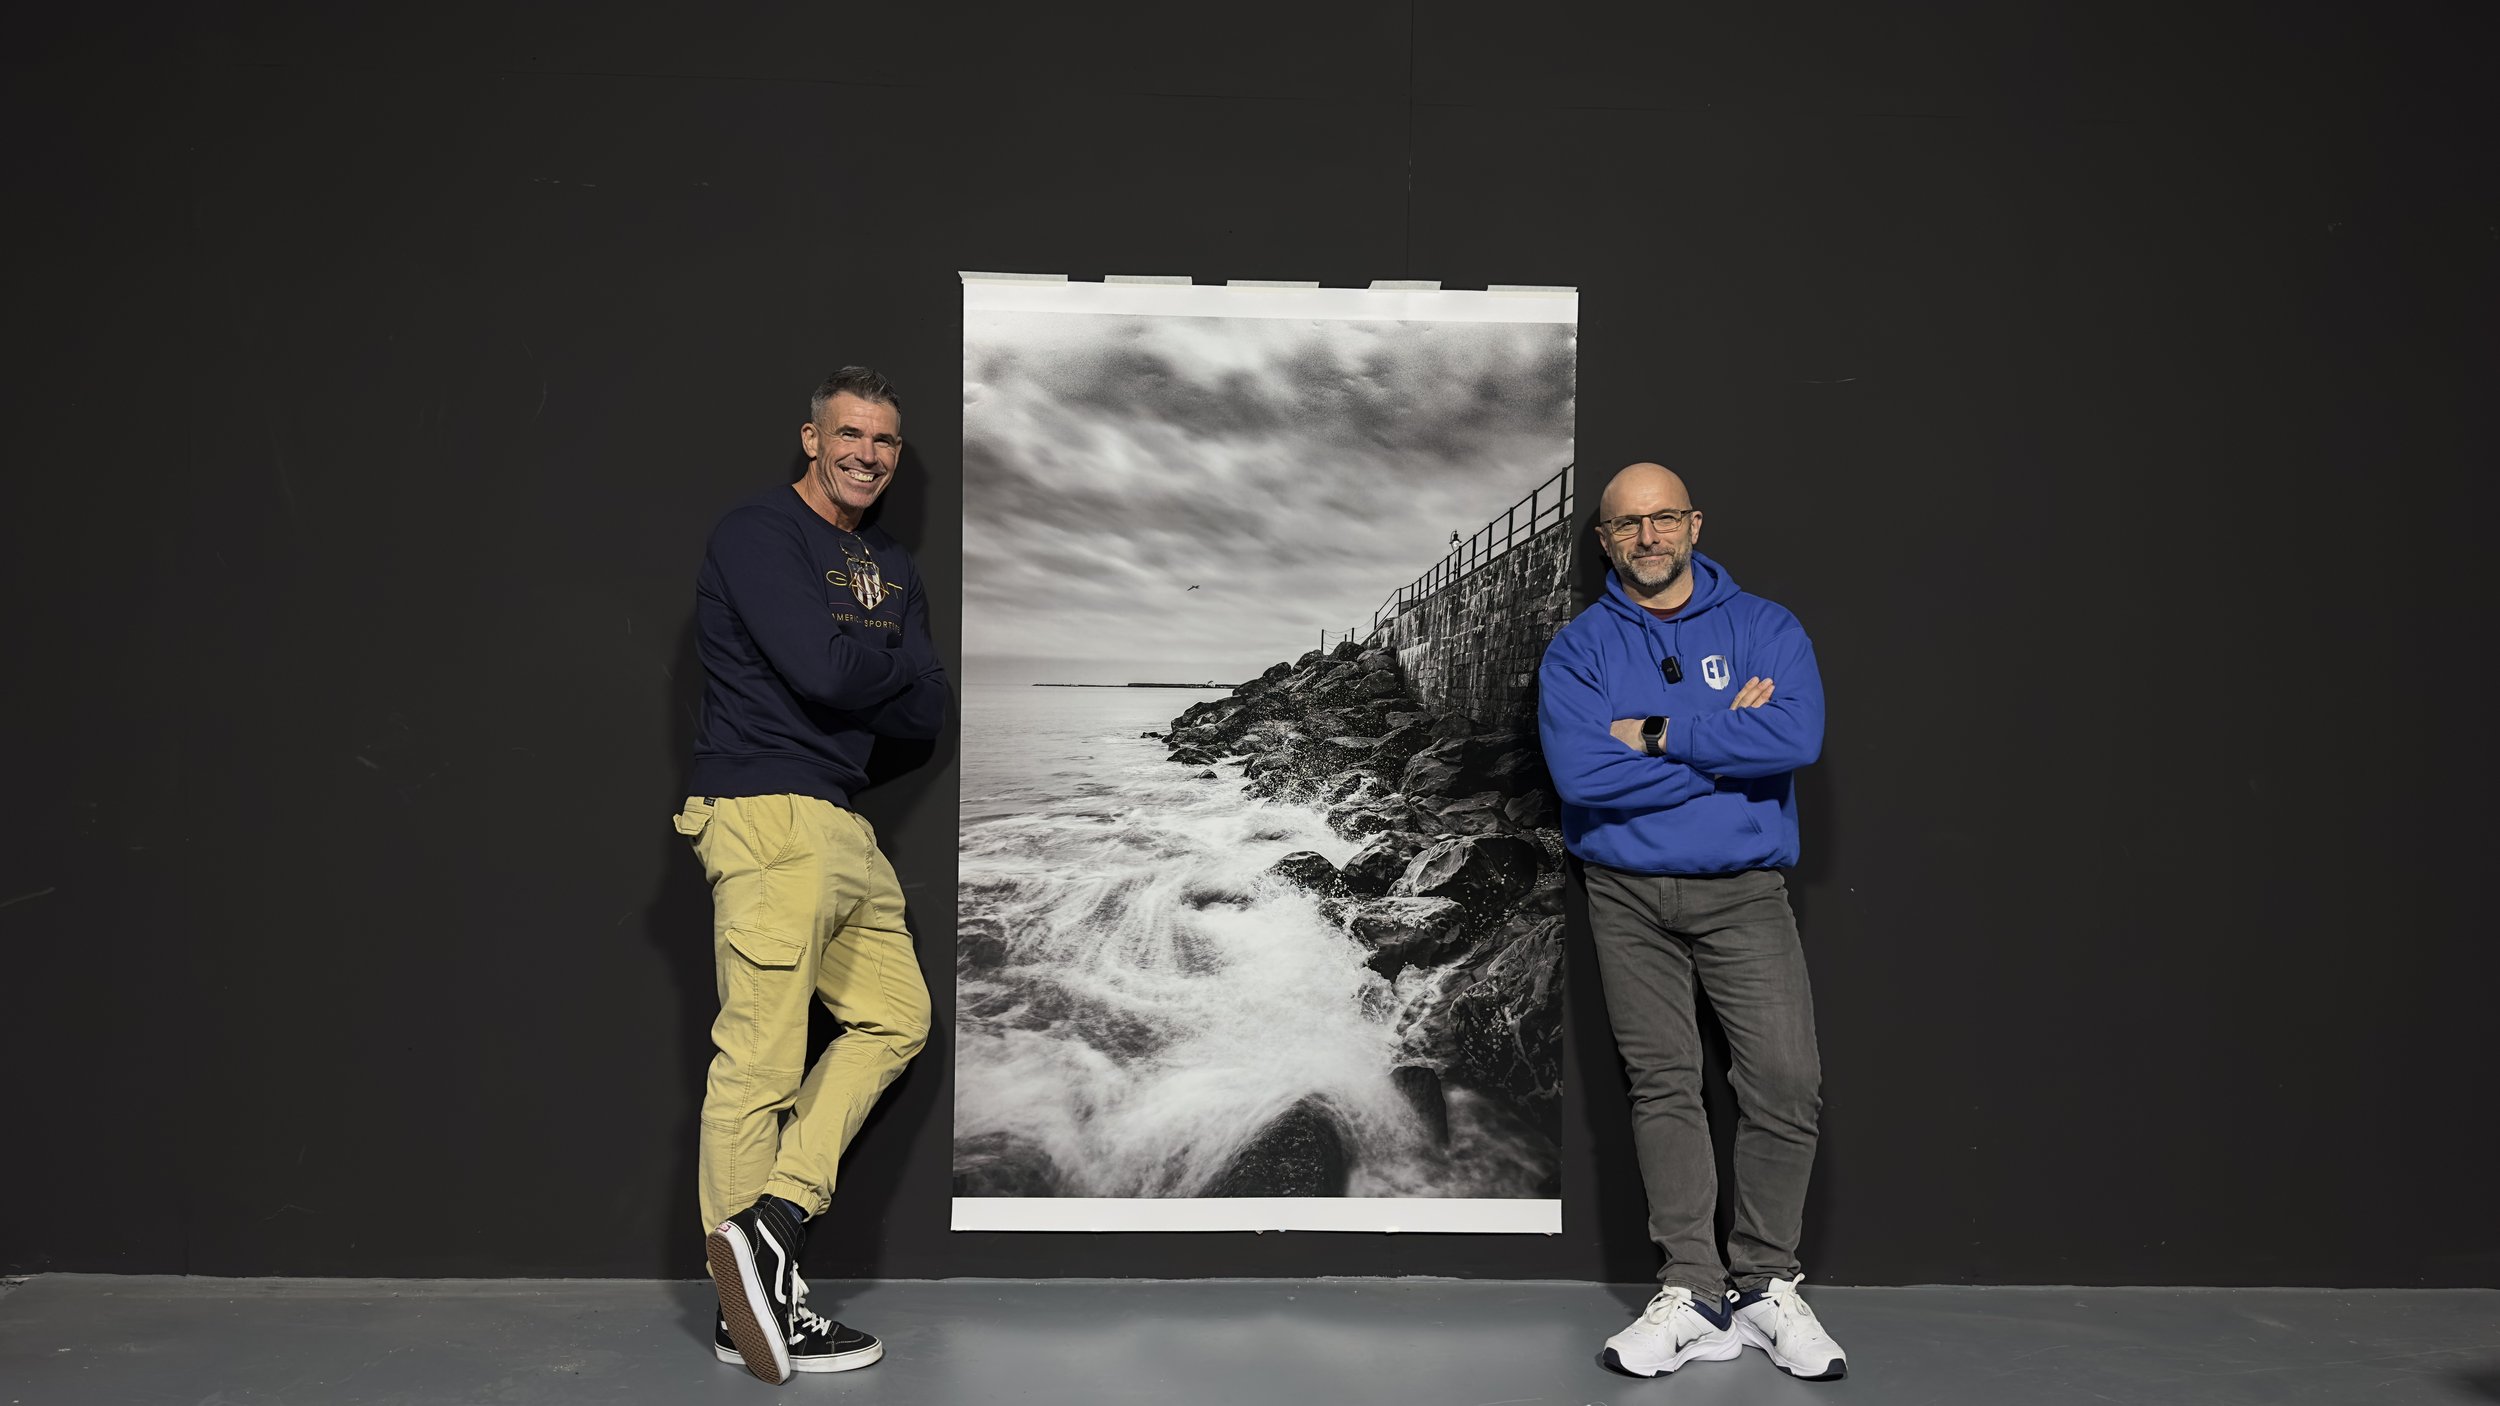
So acceptable in fact that Digitalab even printed one of my iPhone seascapes at 72” on the longest side and it looked incredible …

Two men standing either side of a large black and white seascape print in a studio

final retouched portraits

Here though are the final retouched portraits with the Sony file on the left and the iPhone file on the right, and yeah the Sony file is definitely better and that’s to be expected, but looking at the iPhone file the future is going to be VERY interesting indeed!

Two versions of a full-length portrait of a man in a leather jacket against a wooden wall

wrapping up

So more testing to be done which will be interesting as new iOS updates come along and the iPhone 16 later this year.

In the mean time I’m going to carry on taking seascapes with my iPhone because I really enjoy doing them BUT I’ll also be taking them with my Sony too.

As for Portraits I’ll keep taking them with my iPhone but only as an extra bit of fun and experimentation when taking them with my Sony.

Catch you next time
Glyn


iPhone Photography using Neutral Density Filters ... Why ???

With the rise in popularity of mobile photography, a new industry has developed producing add-ons such as grips to make using your iPhone more like using a regular camera along with bluetooth shutter buttons, lenses, filters and more.

I’ll cover lenses in future posts and videos but for now I just wanted to concentrate on filters … in particular ND (Neutral Density) filters.

I’m writing this on Day 1 of the KelbyOne iPhone Photography Conference for which I’m presenting 2 classes, namely … …

  • Capturing Pro Quality Portraits

  • Essential Gear for the Modern iPhone Photographer

It was in the preapration for both of these sessions that I did A LOT of testing and research and in the process learned a lot more, or rather uncovered a lot more about the iPhone.

UnderStanding Neutral Density Filters

First, let's grasp the concept of neutral density filters. These accessories are essentially pieces of glass that reduce the amount of light entering the camera lens without affecting the color or hue of the image. They are commonly used in photography to achieve effects such as blurring motion in bright conditions or using wide apertures in daylight.

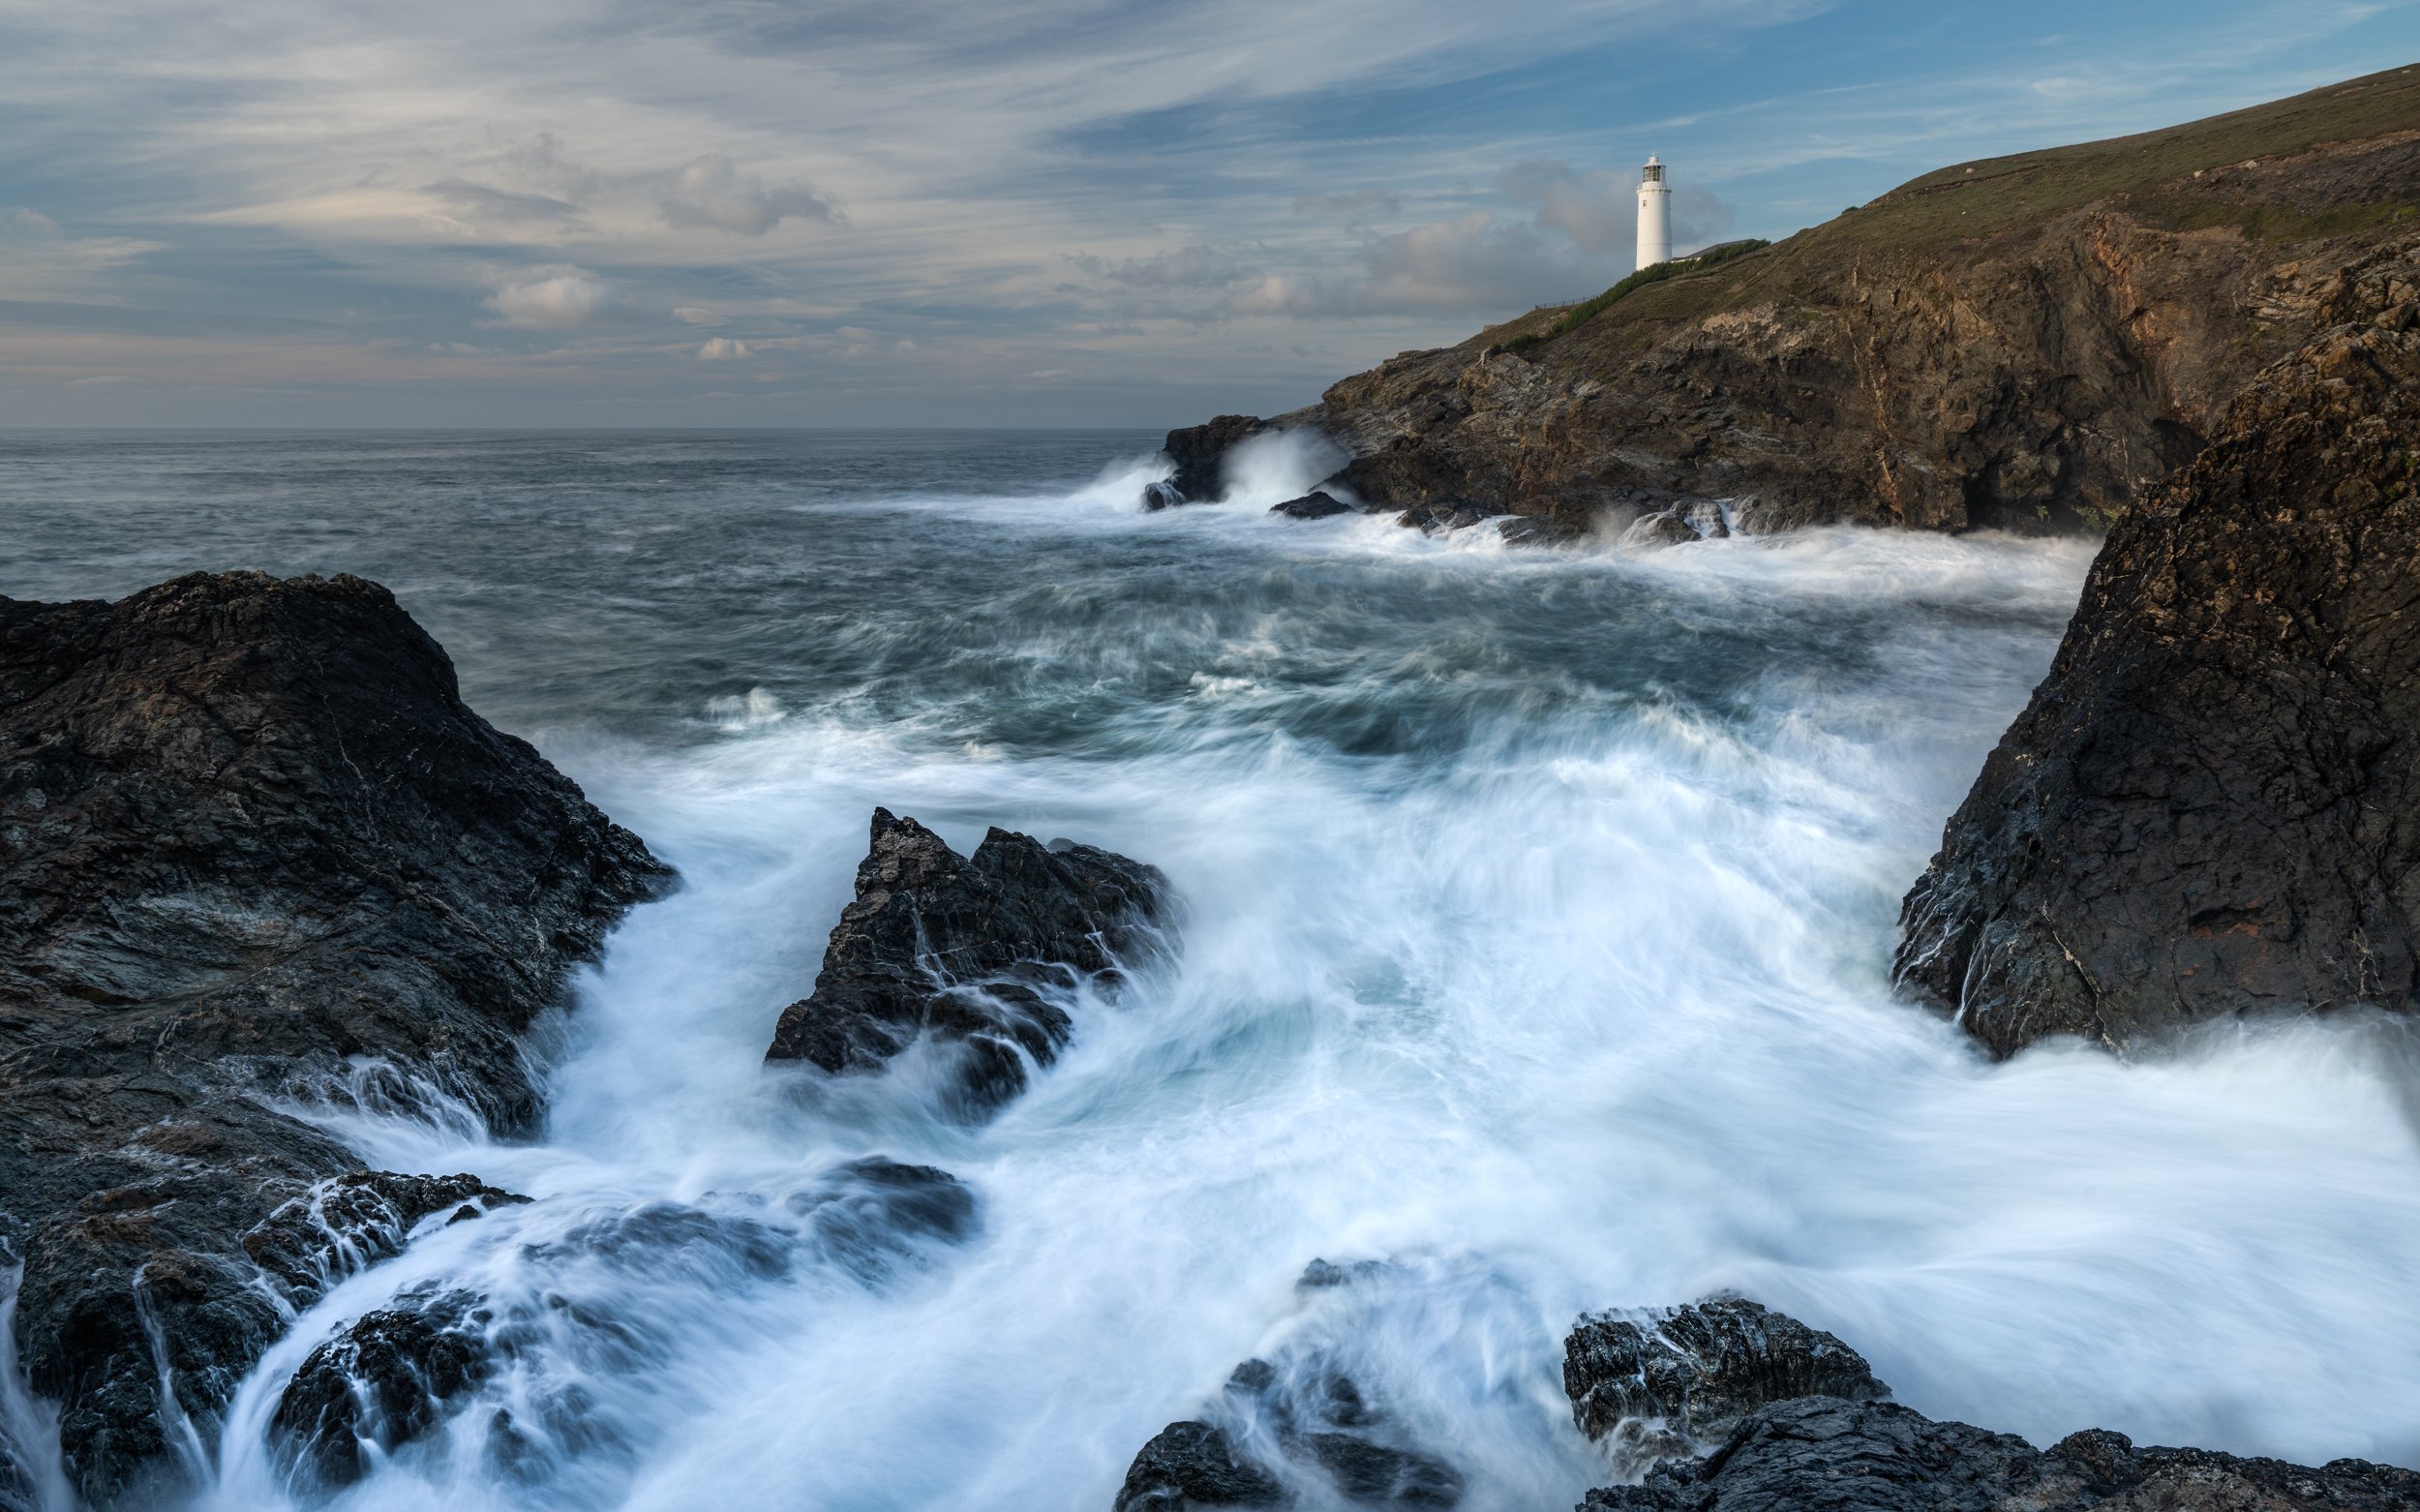
I’ve used them in the past many times with my main camera, my Sony A7RIV when venturing out taking seascape images such as this one here at Trevose Head in Cornwall.

Using Neutral Density Filters made it possible for me to correctly expose the image with a 2 second exposure to give motion and blur to the waves as they crash against the rocks …

Long exposure of waves washing over rocks below a clifftop lighthouse

I’ve also used them with my Sony to capture this 30 second exposure of Teignmouth Pier in Devon …

Black and white long exposure of a pier stretching into a calm sea

long exposure seascapes with my iphone

Over the past year or so I’ve been capturing seascapes more and more with my iPhone thanks to apps like ReeXpose that make all of this possible by instead of the need for Neutral Density Filter, computatiopnally blending a series of images together to create the long exposure effect … and doing so incredibly quickly.

ReeXpose app logo

The app works incredibly well and allows the user to capture exposures from ½ second all the way to Bulb Mode, and using it I’ve taken what I consider my best seascape images to date …

Black and white image of waves crashing against a rocky shore below a harbour wall

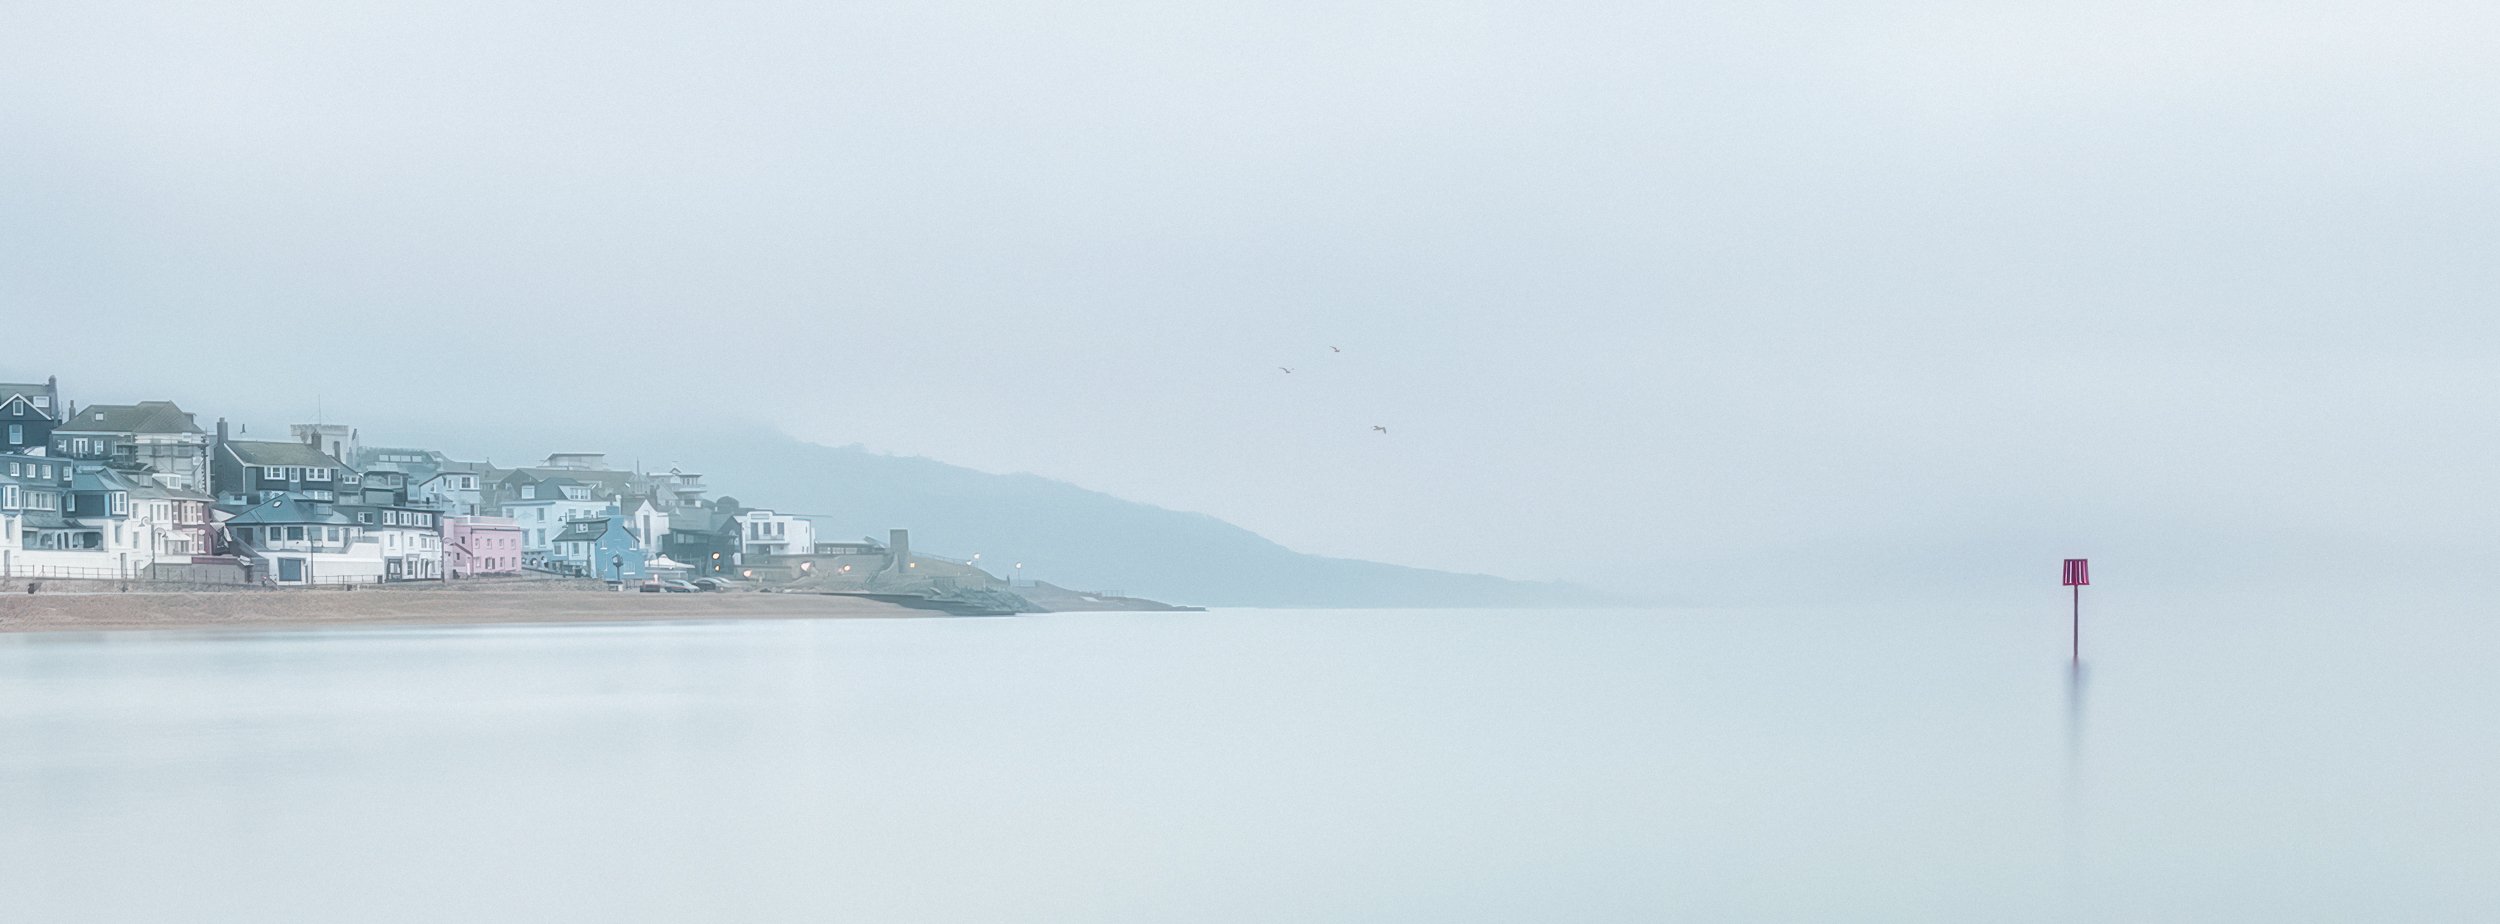
Lyme Regis

Blend of ½ Second and 1 Minute Exposures in Photoshop taken with ReeXpose Long Exposure App

Minimalist long exposure of a calm, misty sea with a seaside town in the distance

Lyme Regis

1 Minute Long Exposure using the ReeXpose Long Exposure App

Black and white long exposure looking along the underside of a long bridge over water

Prince of Wales / Severn Bridge over the Bristol Channel

1 Minute Long Exposure using the ReeXpose Long Exposure App

The ReeXpose app produces Raw files, but like every other long exposure app available at the moment, those are limited to 12MP Bayer Raw files, which despite not sounding much by todays standards, are very acceptable and workable. Digitalab even printed one of my iPhone long exposure 12MP Bayer Raw File images at 72” on the longest edge, and it came out looking great …

Two men standing either side of a very large black and white seascape print

However, despite being 12MP and me being VERY happy with the results I wish there was a way to produce 48MP long exposure files from my iPhone using these kind of apps but that’s just not possible at the moment.

So when I got hold of the new range of Neutral Density Filters from ReeFlex for use with my iPhone it got me thinking …

Would it be possible to use the Neutral Density Filters with one of the Pro Camera Apps that are available so that I could use them to shoot at 48MP in Apple ProRaw AND slow the shutter down … basically capture a long exposure the traditional way? I mean why else would there be Neutral Density filters available for the iPhone?

close but no cigar

So can it be done?

Well, the short answer is NO.

You see first of all when using the iPhone along with one of the Pro Camera Apps available like ReeFlex, Moment, CameraPixels and so on, if you set them to shoot at 48MP in Apple ProRaw and then adjust the exposure using the Shutter Speed or ISO, the file instantly drops to 12MP.

The only adjustment you can make and keep in 48MP is using the EV (Exposure Vlaue) slider which is basically the equivalent of dragging your finger on the screen to brighten or darken image as you would in the native Apple iPhone camera app, so no good for long exposure.

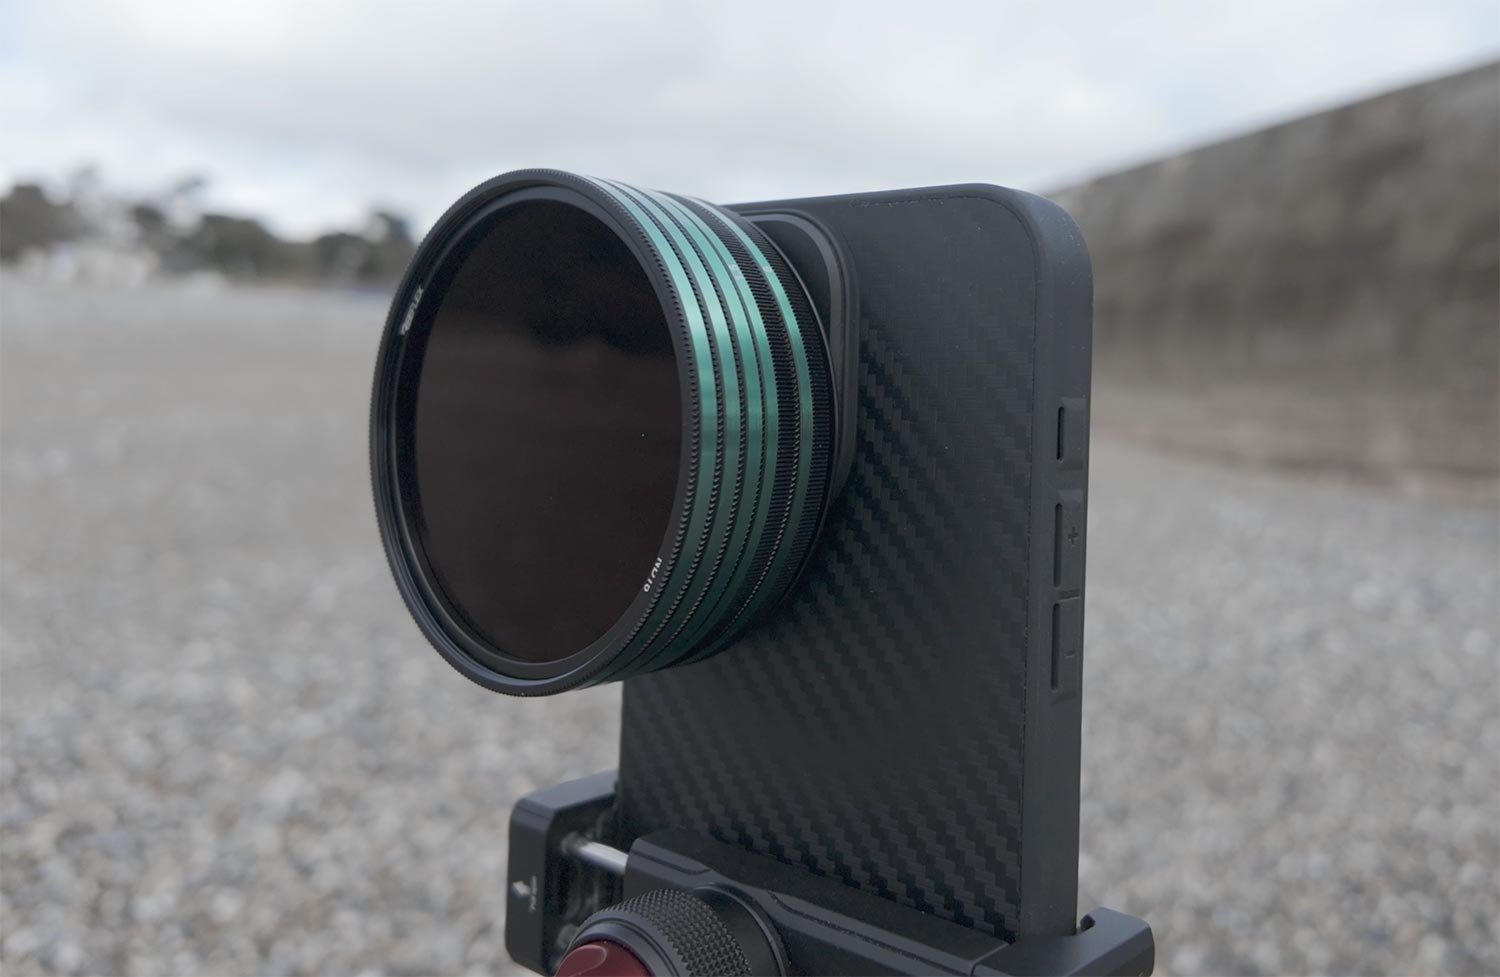
If you leave the settings alone though and then just add on the Neutral Density filters, sure enough you can slow the shutter down … but don’t get too excited, because no matter how many Neutral Density filters you stack on top of each other, the shutter speed will NOT go slower than 1/15 sec

ND filter fitted to a smartphone camera, close up

Even with all the ND Filters I have stacked on front of my iPhone … 1/15 sec is all that’s possbile in ProRaw at 48MP.

Oh and by the way that’s 29 Stops of Neutral Density right there 😳

Long exposure camera app interface on an iPhone screen

ReeFlex Pro Camera App
48MP ProRaw in AUTO

If you make ANY changes to the Shutter Speed or ISO then the file drops to 12MP …

Long exposure camera app settings on an iPhone screen

ReeFlex Pro Camera App
12MP ProRaw

So looking at this, with the way the current iOS works, what is the point of Neutral Density FIlters for Photography with the iPhone?

If you want the scene darker or brighter then you could just use the EV slider and that would remain in Apple ProRaw at 48MP, but you can’t take the shutter speed slower than 1/15sec and remain in 48MP. Period!

are all 12mp files the same?

Now if we just accept the whole 48MP and 12MP thing how about this …

Raw Long Exposure Apps for the iPhone do so by computationally blending a series of shots to create the final long exposure image as a 12MP Bayer Raw File.

You can see this really clearly when you set a ½ second exposure time.

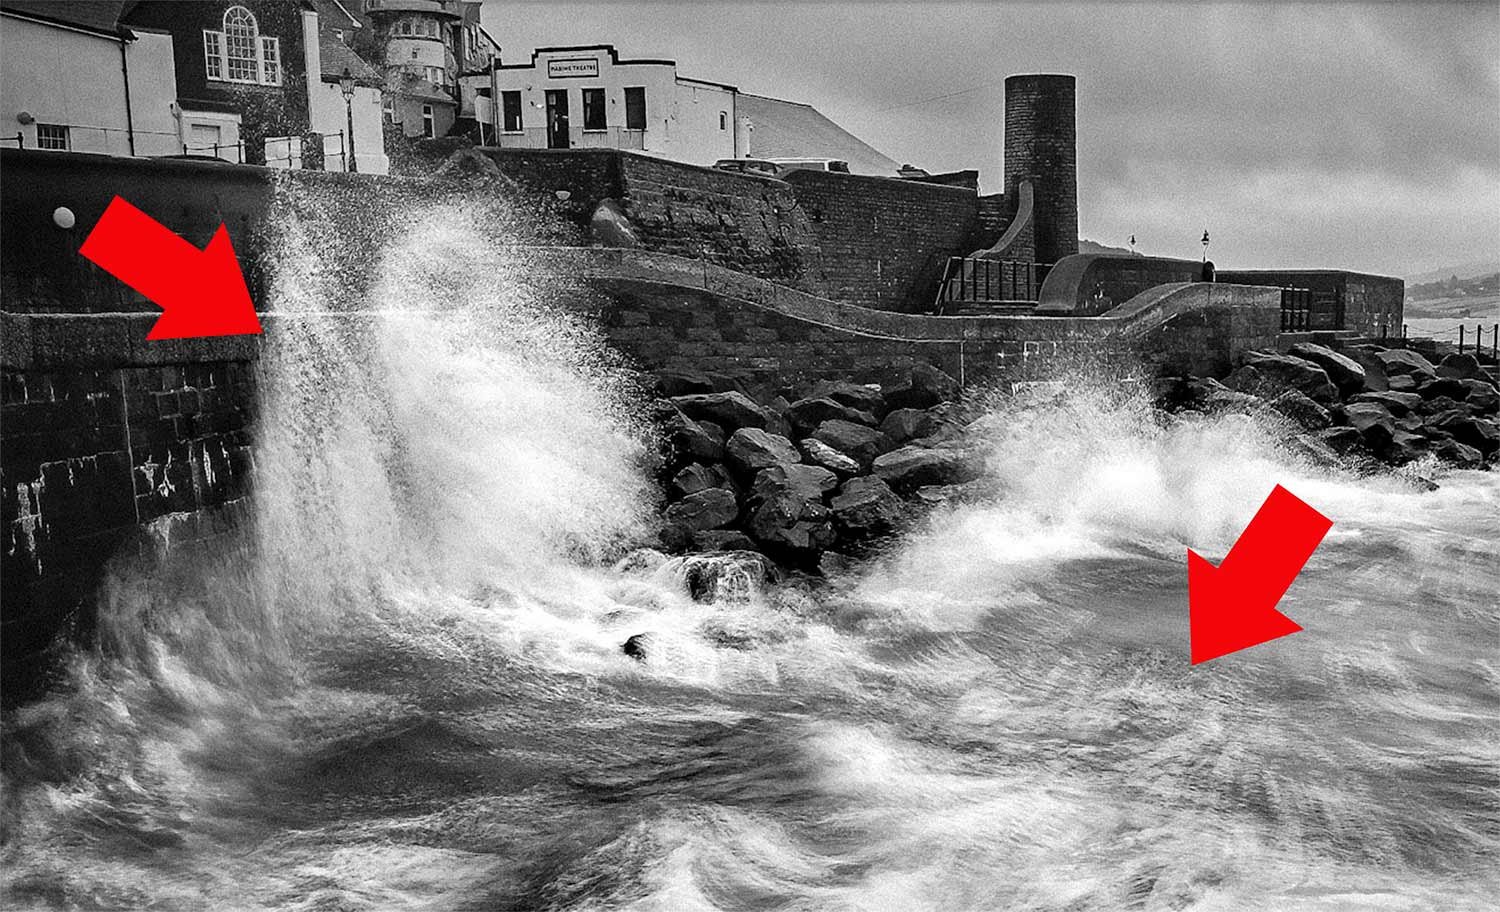
Look at the image below and notice the overlapping of files. You don’t notice this at longer exposure times but with fewer images taken at a faster long exposure (if that makes sense) it makes it harder to blend together … because there’s less files to overlap.

You do need to really look to see it but once you do, you can’t un-see it as shown in the zoomed in image below …

Black and white photo of waves crashing against a harbour wall, with arrows marking areas of detail

So here then is my thinking, which I hasten to add I am popping out tomorrow morning to test …

Accepting that if I use manual controls the file will drop to 12MP, what if I use the Neutral Density Filters to get a correct exposure with a shutter speed of ½ second or the maximum of 1 second?

Thinking of this in really basic terms … as that’s not being used to blend images together, it should in theory produce a single shot long exposure right? When I’m sat in my office with the phone in those manual settings and move it around the image is blurry so that should work for moving objects like the sea right?

I’ll keep you posted with the testing once I’ve been out tomorrow.

Just to add though … the slowest shutter speed you can set is 1/1 sec so for anything longer than that it calls for one of the long exposure apps that does the computational blending thing.

Apple Proraw isn’t really raw

Whatever the technical reason / limitations there are for this I really do hope in the near future this is overcome, otherwise Apple continually calling the camera system “Pro” could start to get a little bit "Boy who cried Wolf” if you know what I mean.

That said though, because of how Apple ProRaw works, there may well be times you wouldn’t want to use it anyway because of the processing it applies to the files i.e. Noise Reduction and Smart HDR.

I’m going to be covering that very soon in another article and video.

ND FILTERS WITH iPHONE FOR VIDEO ???

This is a definite YES though and I’ll be covering that in a post and video VERY soon.

Right, I’ll go charge my filming kit for tomorrow and keep you posted once I’m done with the testing 👍🏻

The MOST ANNOYING thing about the iPhone

The more people I mention this to, the more I’m aware that it’s not common knowledge or at least its something that hasn’t been noticed, but Apple promoting the 48MP sensor of the iPhone is not all its made out to be.

Two black and white seascapes of waves crashing on a rocky coast

Now don’t get me wrong, I’m a BIG advocate of mobile photography. I’m loving getting out and capturing seascapes. I love the convenience of it and I’m loving the results and ease of doing so. Of course it calls for the usual skills such as understanding light and composition and anyone that says it’s the phone doing that essential part for you is well, quite frankly, missing the point.

My best landscape / seascape images I’ve taken with my iPhone however when it comes to portraiture it is limited. We can capture natural light and I’m experimenting more and more with constant LED light and glad to say, having a level of success. ProFoto even have a strobe on the market that the iPhone is capable of triggering; if you’ve never seen examples of this then I’d highly recommend you check out Russell Brown on Instagram and / or Facebook. I also am very aware that a certain lighting company is also working on their own strobe and app capable of being triggered by the iPhone, so there’s lots of exciting things on the nearing horizon.

Two low-key portraits of an older man in a dark jumper and beanie

However, certainly at the time of writing this there is, in my opinion a HUGELY annoying and disappointing aspect of iPhone photography, and that’s how Apple have the camera system set up.

Let me explain …

By default when we open the camera app on our iPhones, the system defaults to the 1x lens, and this is the lens that gives us the ability to take photographs at 48MP; any other lens we use 2x, 5x etc and we drop down to 12MP.

Now this isn’t anything out of the ordinary as I know from friends with other brands of phone cameras, that similar happens for them too, but with the iPhone 48MP Pro Raw is only available using the 1x lens AND when using AUTO settings!

iPhone camera app with an arrow pointing to the resolution setting

This means if you change ANY setting that takes it out of AUTO, then you drop down to 12MP.

So if you’re using the Apple Camera App and tap and drag on the screen to lock or alter exposure, you drop from 48MP to 12MP.

iPhone camera app with an arrow pointing to the shooting controls

If you use ANY of the Pro Camera Apps out there with their fancy all Bells and Whistles interfaces where you can alter White Balance, Shutter Speed, ISO and so on … the moment you alter ANY of them, you drop from 48MP to 12MP.

iPhone camera app with an arrow pointing to the format setting

Now don’t get me wrong, the 12MP Bayer Raw files my then iPhone 14 Pro Max captured were great as are the ones from my iPhone 15 Pro Max; not the quality of my Sony Mirrorless, but still great and VERY useable. Infact I even had a 72” print done of one of my seascapes by Digitalab and the quality was very impressive, BUT I couldn’t help think at the time what it would have been like at 48MP … especially when editing.

Photographer standing beside a large black and white seascape print

Of course I’m going to continue taking photographs with my iPhone because I really do see this as becoming BIG in the near future and I thoroughly enjoy doing it, but unless / until Apple make it so that we can maintain 48MP out of Auto, then calling it Pro is pushing the truth somewhat. 12MP Raw is good but 48MP Raw is better!

There’s more I want to cover about this and will do so very soon because I’ve discovered something about using ND filters with the iPhone that I think will very much come as a surprise, so I’ll keep you posted when I share that.

Oh and finally, if you’re reading this and you use another brand of phone camera, I’d be intrigued to hear if you do in fact have the same thing happen when adjusting settings as I’ve mentioned, so please do share any comments / thoughts below.

Cheers,
Glyn

Photographing the Severn Bridge with my iPhone 15 Pro Max

So last weekend, having been there almost exactly 12 months ago and done the same, along with my mate Anthony Crothers I headed back Bristol to photograph the Severn Bridge (aka the Prince of Wales Bridge) …

Two men in dark jackets and caps standing on rocks beneath the Severn Bridge

Weather conditions this time were definitely warmer and less breezy although the tide height looked to be pretty much the same. From what I’d checked I had expected it to be a little higher than it actually was, but this worked in our favor to be honest with it revealing foreground interest in the mud / silt.

kit

Since the last visit, some of the kit I used this time had changed.

Of course as there had been an upgrade I was now using my iPhone 15 Pro Max, but to mount it onto my Benro Tripod I was using the Ulanzi ST-27 Phone Tripod Mount.

This thing is small, incredibly well built and robust and rock solid. Love it!

iphone photography app

There were some great clouds in the sky but due to there being very little breeze, they were moving incredibly slowly.

So, to create some motion blur and also smooth the water surface, I opted for a 60 second exposure and to do this I used the Raw long exposure app called ReeXpose App from ReeFlex …

ReeXpose logo, a green aperture shape around the letter R on black

Not wanting to go for an identical composition as the last time we were there, I opted to photograph the bridge from the lower right hand side which would include the bridge as it meandered off into the distance, so this is what I ended up with …

Black and white long exposure of a long road bridge stretching across calm water

Edited in Lightroom and with a couple of tweaks in Photoshop, I couldn’t resist running a print off the Epson SC-P900, and with it being printed on an a3 sheet of Baryta 310 from Permajet, I couldn’t be happier 😃

Smiling man in glasses and a blue hoodie holding up a black and white print of a bridge

As for the last time we were there 12 months ago, this below is the picture I made, however we do plan to head back in March when the the Severn Bore appears; not neccesarily to photograph the bore but to take advantage of the much higher water level.

Black and white long exposure from beneath a bridge deck, with rippled sand and a distant bridge

As for the bore itself … I will most definitely be taking my drone along to capture some footage, so … watch this space 😉

Photographing Storm Henk at West Bay with my iPhone

It’s fair to say the weather during the tail-end of 2023 has been pretty dire with what seems like storm after storm , bringing high winds and heavy rainfall , and being perfectly honest I’ve found myself getting more than a little fed up with it.

New Years Eve was no exception with Storm Henk making an appearance , but I had to end the year on a positive , so despite the weather and featureless grey skies I decided to head out with minimal kit ( iPhone and Tripod ) to see what I could capture. 

Living in the South West of the UK and a short drive from the coast , I decided to head down to West Bay, Dorset which is about a 40 minute drive , and I’m so glad that I did because when I arrived , there was blue sky, still plenty of moody clouds , high winds , but … no rain.

Parking up on the Quayside I could immediately hear the sound of the waves crashing onto the beach , and this combined with the sun making an appearance and throwing patches of light onto the sea as it peered between the clouds, conditions could not have been better !

Storm Henk waves rolling in below the cliffs at West Bay, shot on iPhone
Rough sea breaking below the golden cliffs at West Bay under a cloudy sky

To capture these images I used the Pro Camera App from Moment ; a great app that in addition to giving manual control over shutter speed and iso, also lets you separate focus and exposure lock, does exposure bracketing and so much more including Burst Mode when pressing the shutter; and that’s exactly what I used to capture the movement in the waves.

Waves crashing towards the shore beneath sunlit cliffs at West Bay during Storm Henk
Stormy sea and foaming waves below the cliffs at West Bay, iPhone photograph

The images were edited in Lightroom on my iPad and then in Lightroom Classic, with a final finishing touch in Photoshop to give a ‘painterly’ look.

So yes … very happy I decided to venture out on the last day of the year.

ReeFlex iPhone G Series Lenses, Filters and Cases

ReeFlex ran a Kickstarter campaign for their G Series range of lenses, filters and cases for the iPhone, and it was fully funded within eight minutes of launch. I'd had time with the near-finished product, so this is a short video I put together from my experience with the lenses. The idea is to push mobile photography with pro quality glass: optical zoom on the iPhone 15 Pro Max, real optical bokeh and depth of field, and macro, wide angle, ultra wide and telephoto options, all at 48MP. Having used them, I knew that everyone who got hold of them was going to be really happy.

Photographing Storm Agnes with my iPhone 15 Pro Max

So although in the South West we didn’t get the full force of Storm Agness last week (unlike Ireland and parts of Wales) , what we did get still caused some pretty impressive scenes.

Timing couldn’t have been better on Thursday last week as the tail-end of the storm also coincided with a high tide of 4.5 metres at Lyme Regis Sea Front.

This was also to be my first time out ‘in anger’ with my new iPhone 15 Pro Max which I used to photograph the storm along with the ReeXpose App from ReeFlex.

I only had a few mintes to capture whatever I could before the heavens opened and heavy rain joined the party, but here’s the results …

Black and white iPhone photograph of Storm Agnes waves crashing on rocks below seafront buildings

Both results are a blend of several long exposures ( 0.5 seconds and 1 seconds ) taken with my new iPhone 15 Pro Max and the ReeXpose App from ReeFlex and edited in Lightroom Mobile / Cloud and Photoshop.

Black and white iPhone photograph of Storm Agnes with rough sea over rocks and a heavy sky

One of the BEST pieces of advice I was given when starting out as a Portrait Photographer was to move around ... don't take photographs from one spot ... look how the light changes as you take a step to the left or a step to the right.

Since the Covid Pandemic when I first ventured out into landscape and seascape photography as a means of keeping active and keeping creative, one of the most important things I've learned is ... when you find a composition make sure to LOOK BEHIND YOU

This is how the 2nd results came about with the tail-end of Storm Agnes and was what was happening behind me whilst I captured the first.

IT DOESN'T GET EASIER THAN THIS 🥹 Mobile Photography and COMPLETE Editing Workflow

This is the recording of a YouTube live broadcast where I went through the complete mobile workflow for a seascape long exposure, from capture through to the finished retouch. I took the photograph with my iPhone 14 Pro Max using the ReeXpose app, and then edited it in Lightroom and Photoshop, showing each step along the way. I also talked about some of my wishes for the iPhone 15 Pro Max, whatever it ended up being called, and how a change to USB-C, which I was hoping for, would make a huge difference to the mobile workflow, especially when travelling and away from good internet speeds.

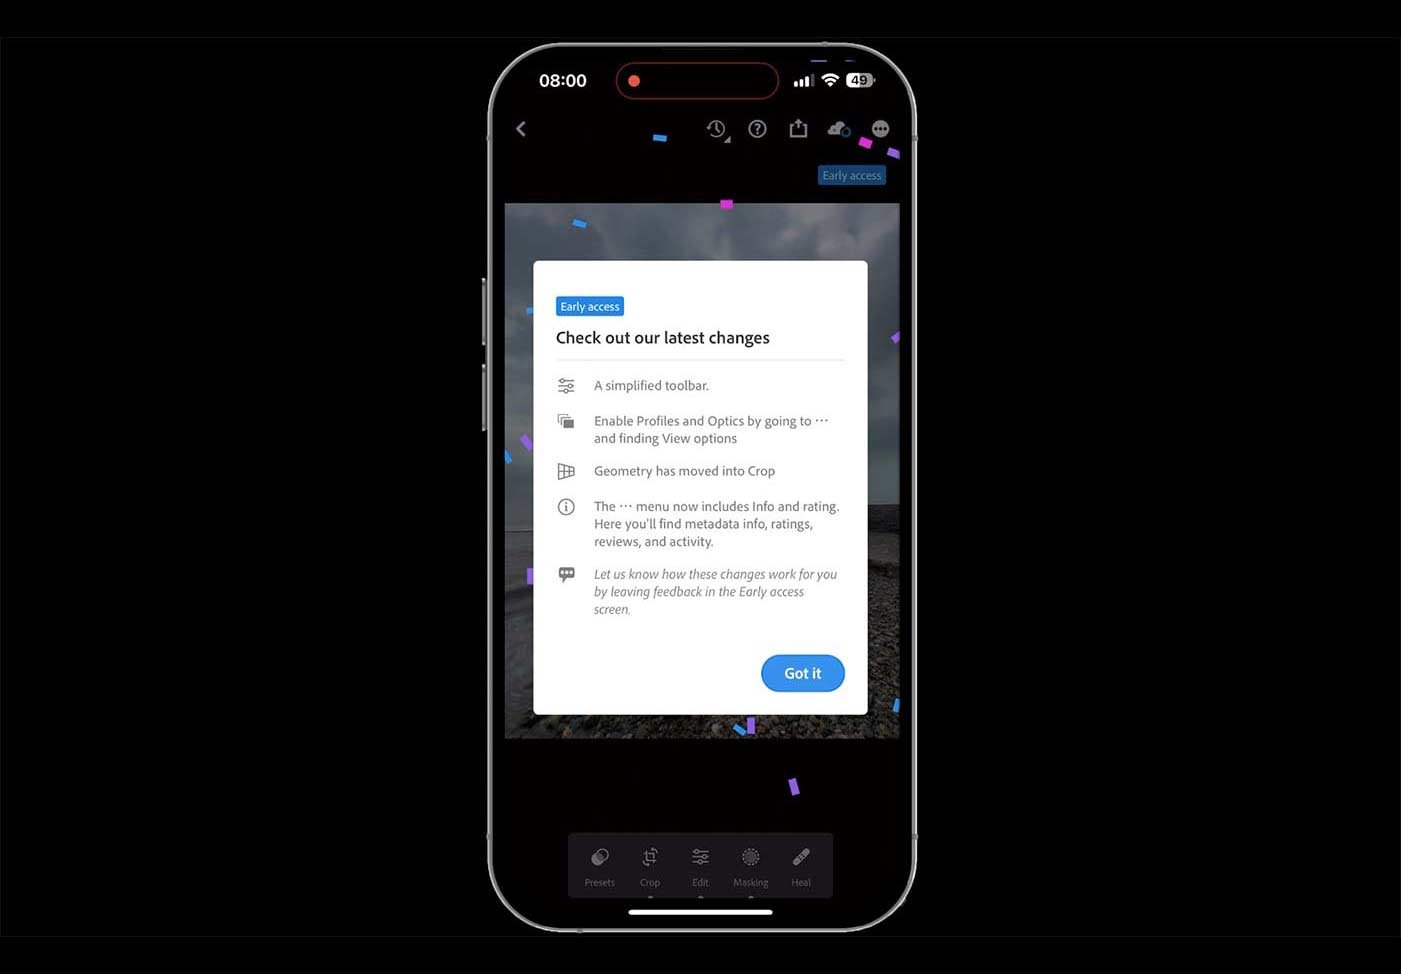
Lightroom Mobile iOS gets a July 2023 UPDATE

Adobe released an update to Lightroom Mobile for iOS in July 2023, taking it from version 8.4.0 to 8.4.1. The main thing it brought with it was Early Access Preview, along with a much improved editing tool bar and workflow. This is a quick run through, under a minute long, showing what the update brought and how the changes to the tool bar make editing on your phone that bit smoother.