Apple

Is Apple Photos REALLY Better Than Adobe Photoshop?

I honestly didn’t expect to be asking that question.

Photoshop has long been my first choice for removing unwanted people and objects from photographs. However, after testing the updated Clean Up tool in Apple Photos, I got results that weren’t simply comparable to Photoshop—they were noticeably better.

To find out whether this was a one-off, I put Apple Photos and Photoshop through three increasingly difficult tests.

Apple Photos Clean Up vs Photoshop Remove Tool

For the Photoshop edits, I used the Remove Tool with its mode set to Auto. This allows Photoshop to decide whether to use generative AI, Content-Aware technology or another method to fill the selected area.

For Apple Photos, I used the Clean Up tool on my iPhone, selecting the High Quality option. The same technology is also available in the desktop version of Apple Photos.

In both applications, I made quick, rough selections around the people I wanted to remove. I wasn’t attempting to produce perfect selections or spend time manually tidying the results. The aim was to see what each application could produce on its own.

Test One: Removing People From a Railway Station

The first photograph was taken at Cardiff Central railway station during a World War II-themed portrait shoot.
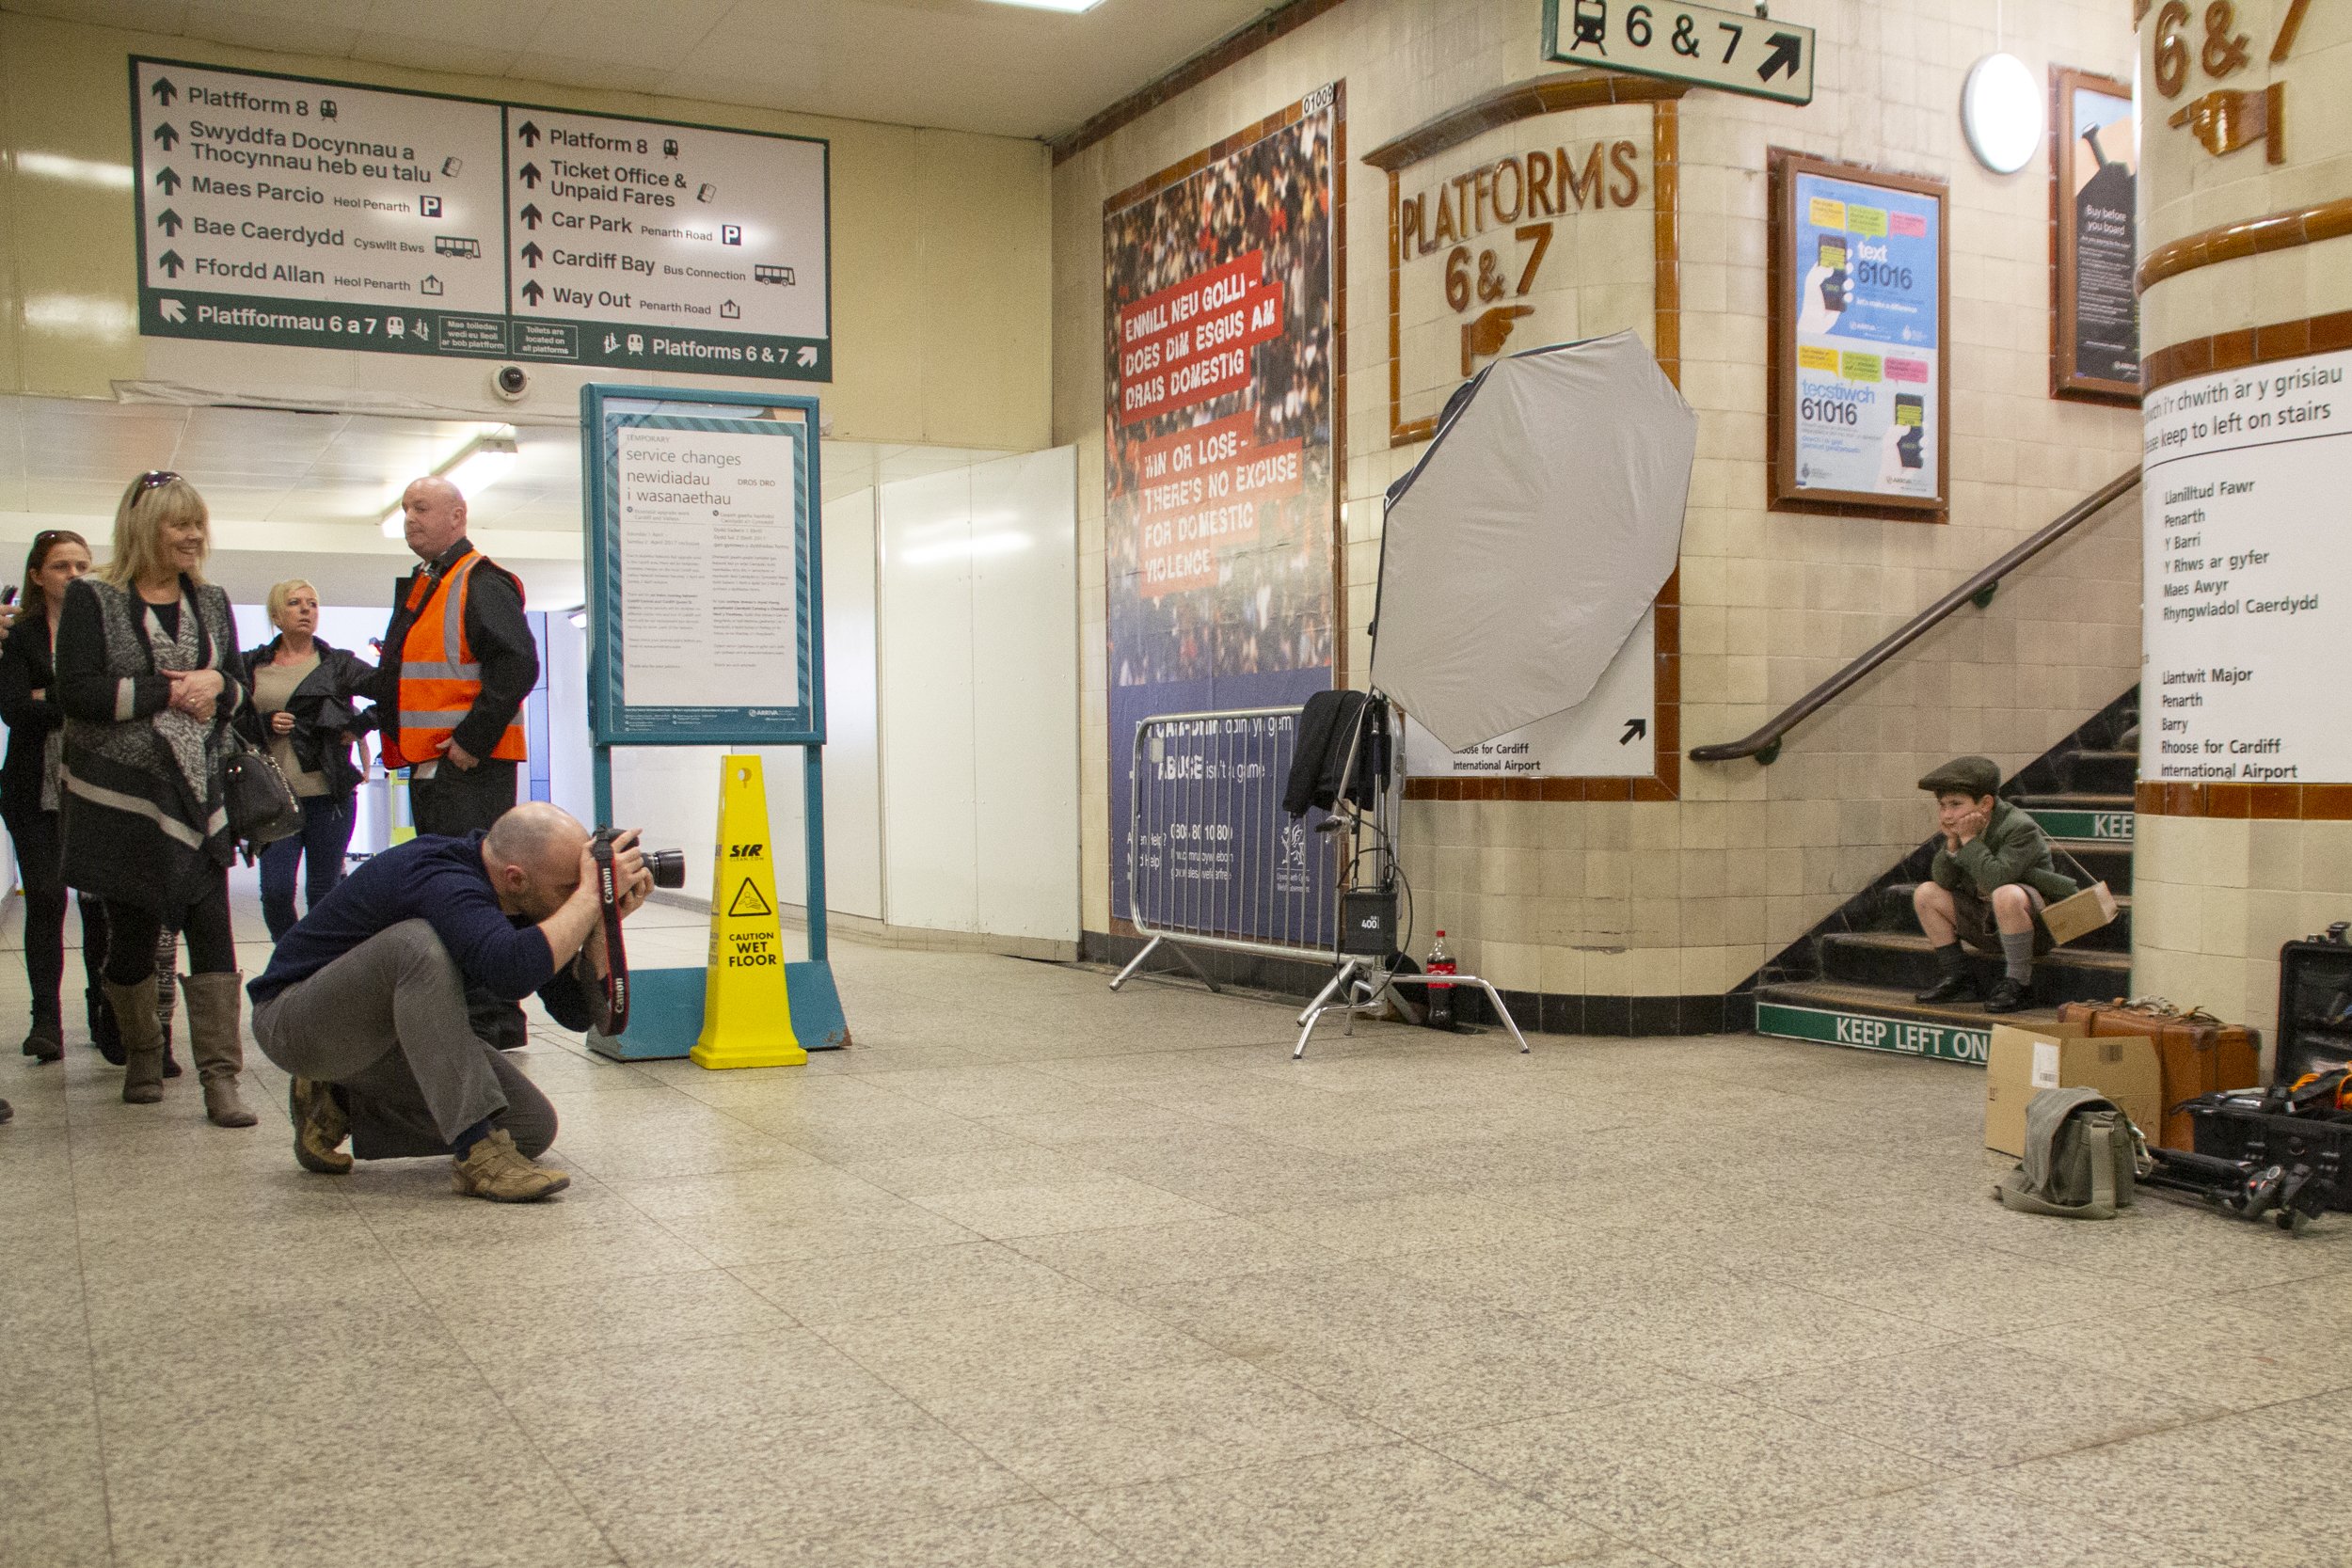
Original

I wanted to remove a group of people on the left-hand side of the frame. This meant the software needed to rebuild part of the station interior behind them.

Photoshop took almost a minute to process the removal. From a distance, the result looked acceptable. It had reconstructed much of the background and hadn’t caused too much damage to the surrounding areas. However, closer inspection revealed several areas that would need tidying.

Apple Photos completed the same task in around five seconds.
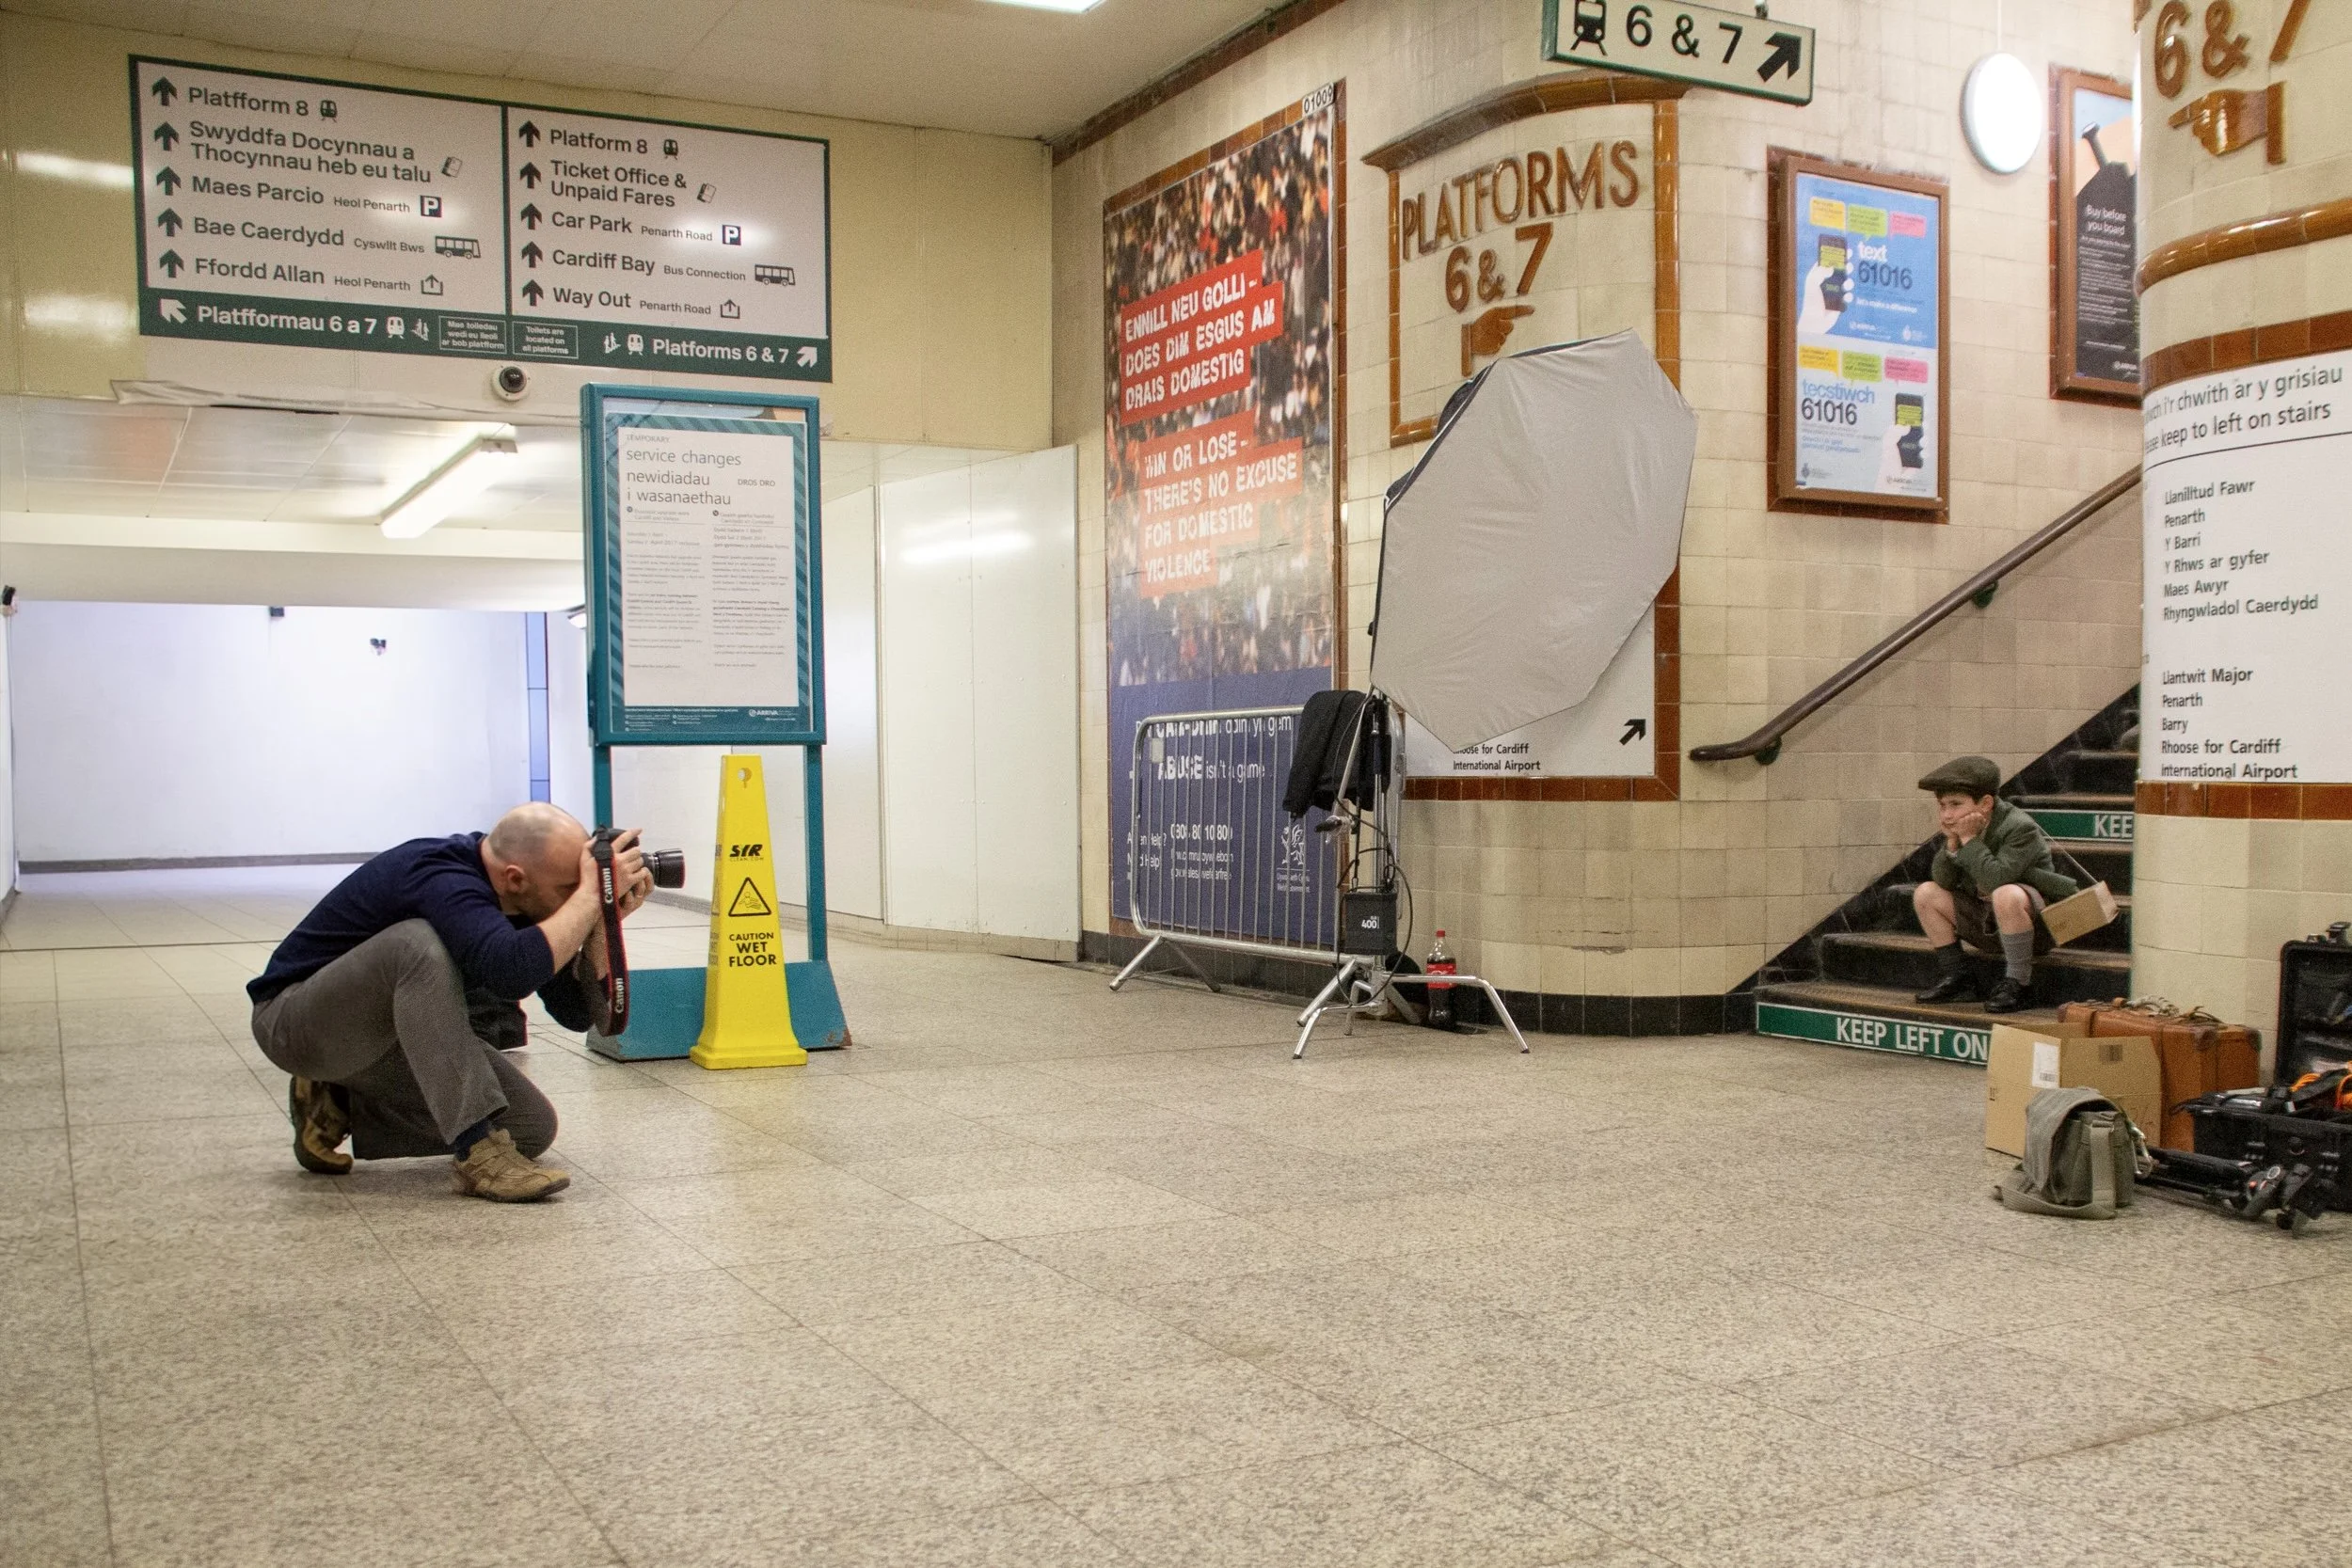
Clean Up using Apple Photos

The result was much cleaner. It reconstructed the background convincingly, removed distracting marks and shadows from the floor and created a space that genuinely looked as though you could walk through it.

It was an impressive start for Apple Photos—but the next test was considerably harder.

Test Two: Rebuilding a Complex Event Backdrop

The second photograph showed me standing with Carly from BenQ at the Wex Summer Roadshow.
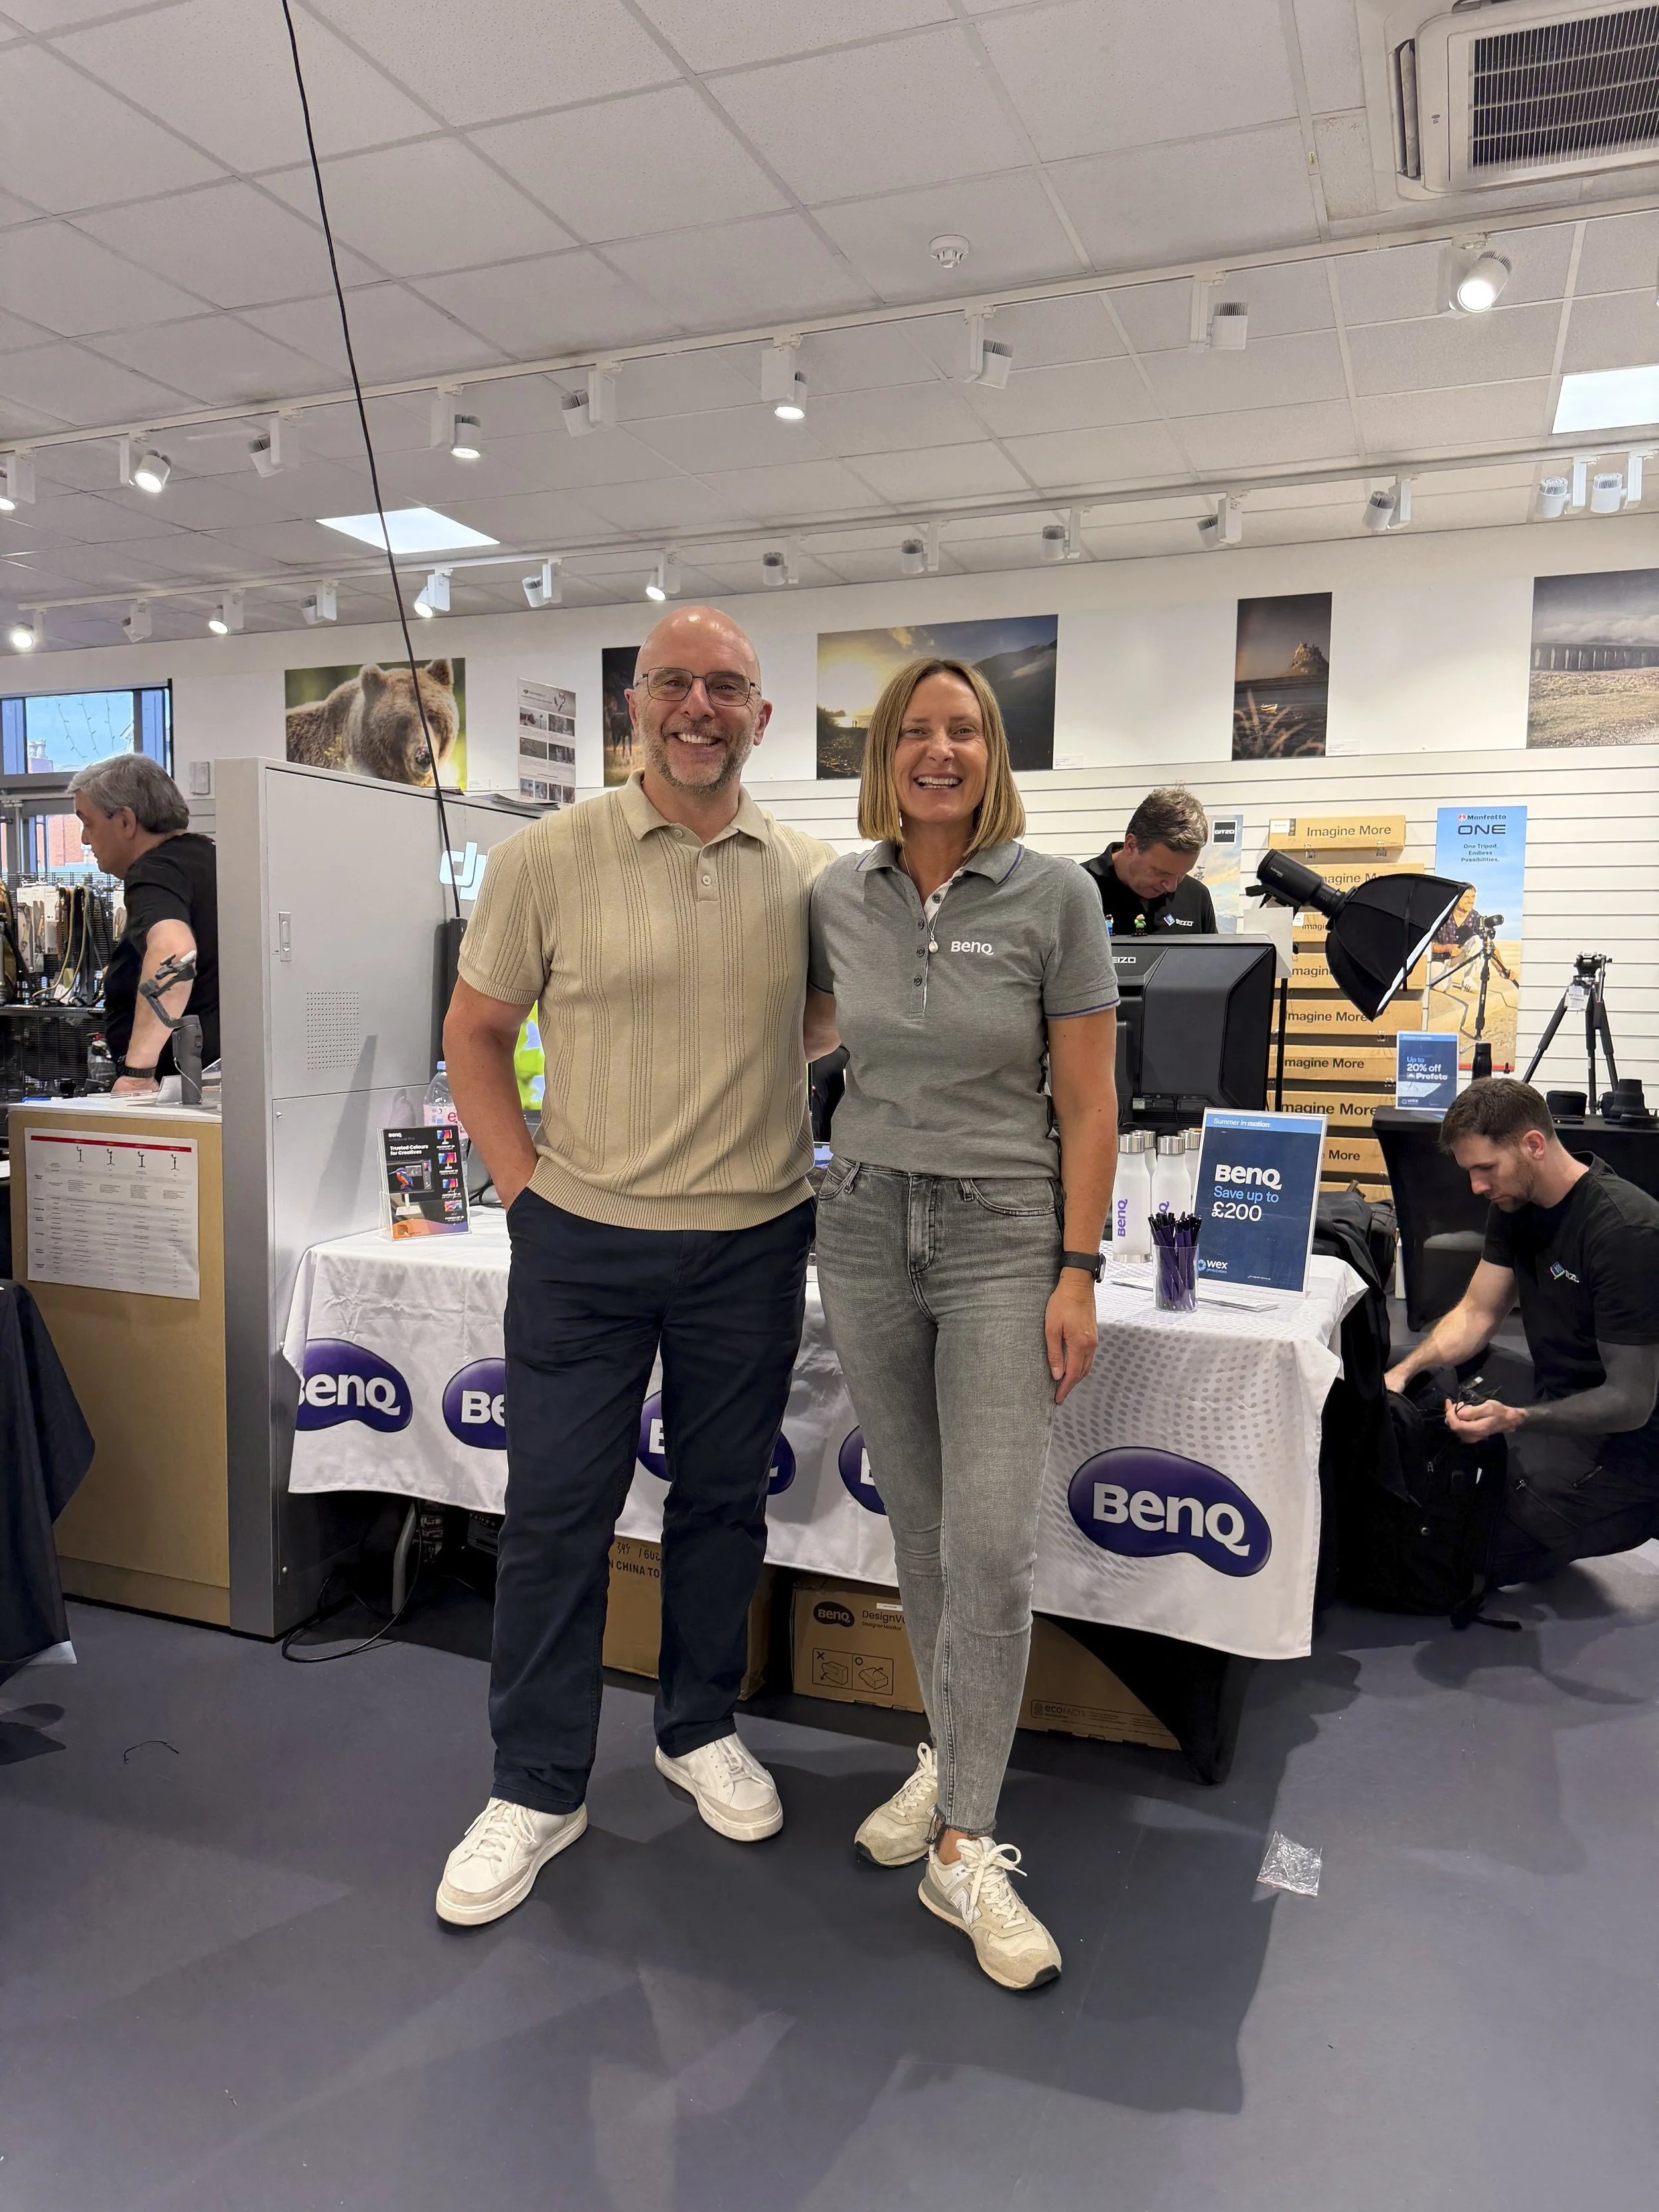
Original

Removing both of us meant rebuilding a large section of the image, including a branded backdrop, a table, several logos and objects in the background.

Photoshop initially produced a result that looked quite impressive. It managed to recreate several BenQ logos and parts of the display. However, the longer I looked at the image, the more problems appeared.

Some of the logos were distorted, the table didn’t make complete sense and Photoshop had created several strange objects in the background. It had filled the empty space, but the result would require a fair amount of additional work.

Apple Photos took approximately 15 seconds to complete the same removal.

The difference was remarkable.
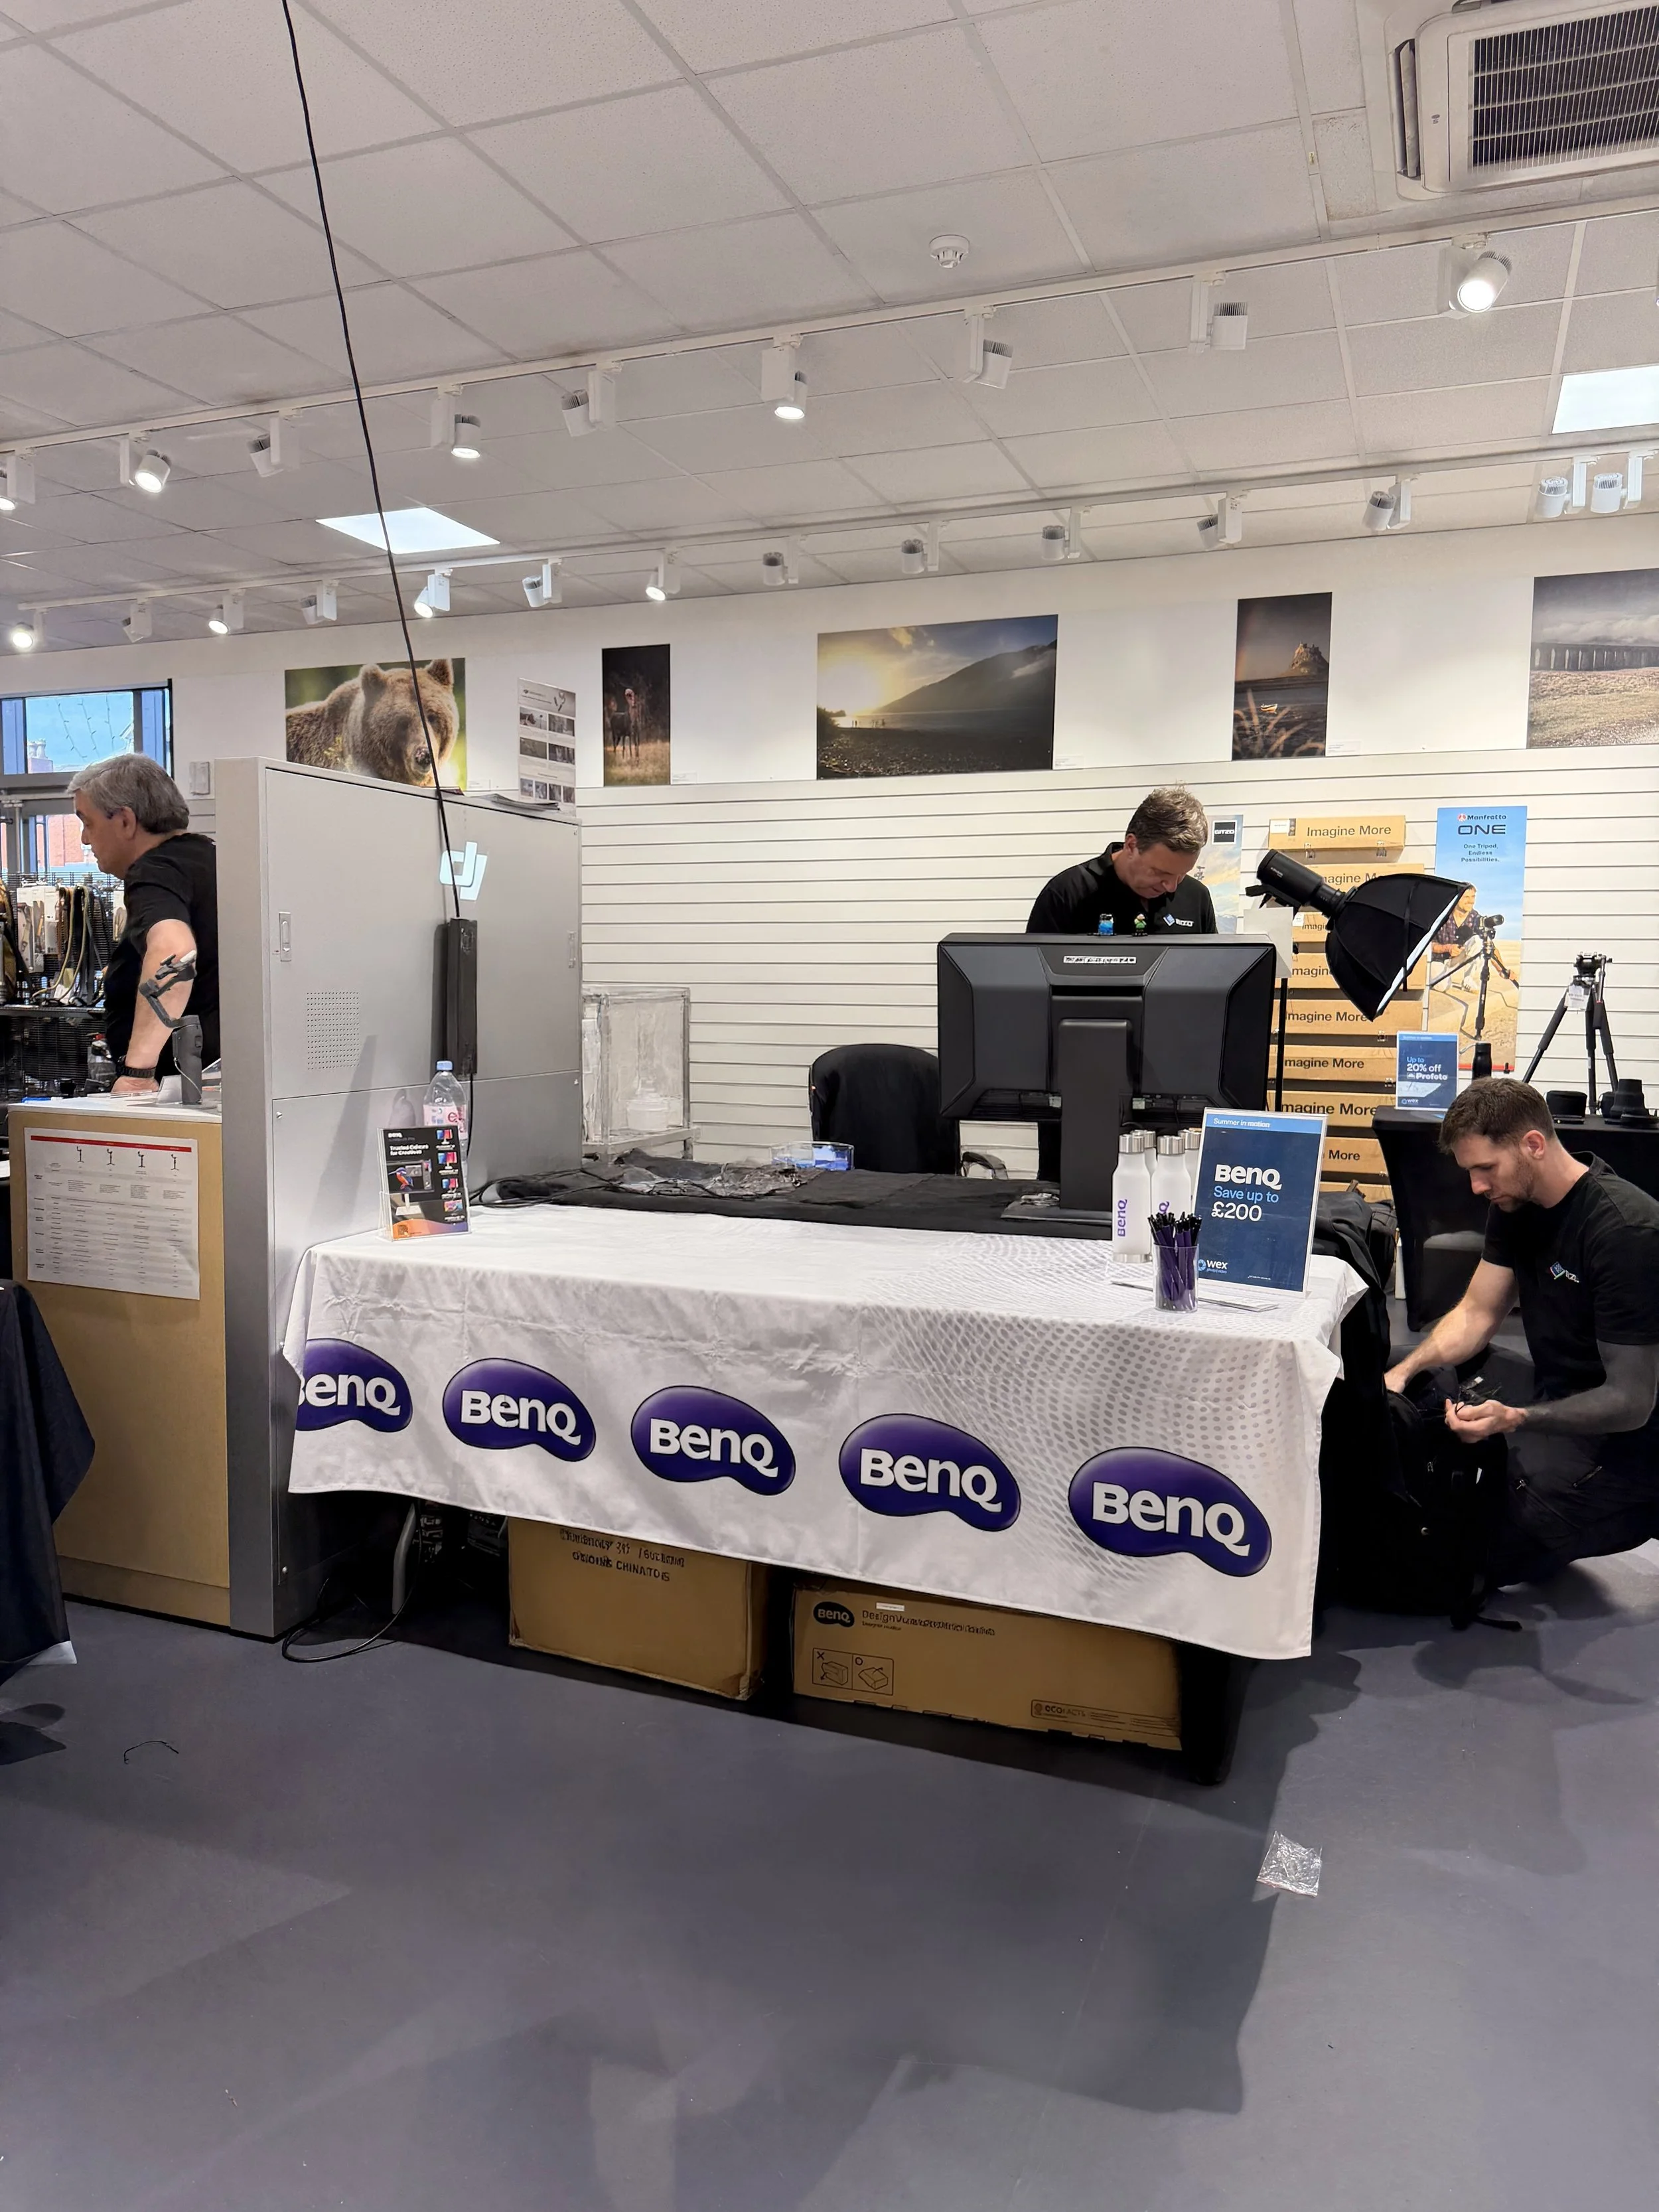
Clean Up using Apple Photos

The backdrop was clean, the logos were correctly positioned and the table had been rebuilt without an obvious join. It also reconstructed the wall and background pictures convincingly without duplicating random objects.

In this example, Apple Photos was the clear winner.

Test Three: An Almost Impossible Removal

The final photograph was the toughest test.

It showed me with Harry, a potter I photographed for my I Am Lyme project. Between us, we covered a large part of the frame, leaving the software with very little visible background to use as a reference.
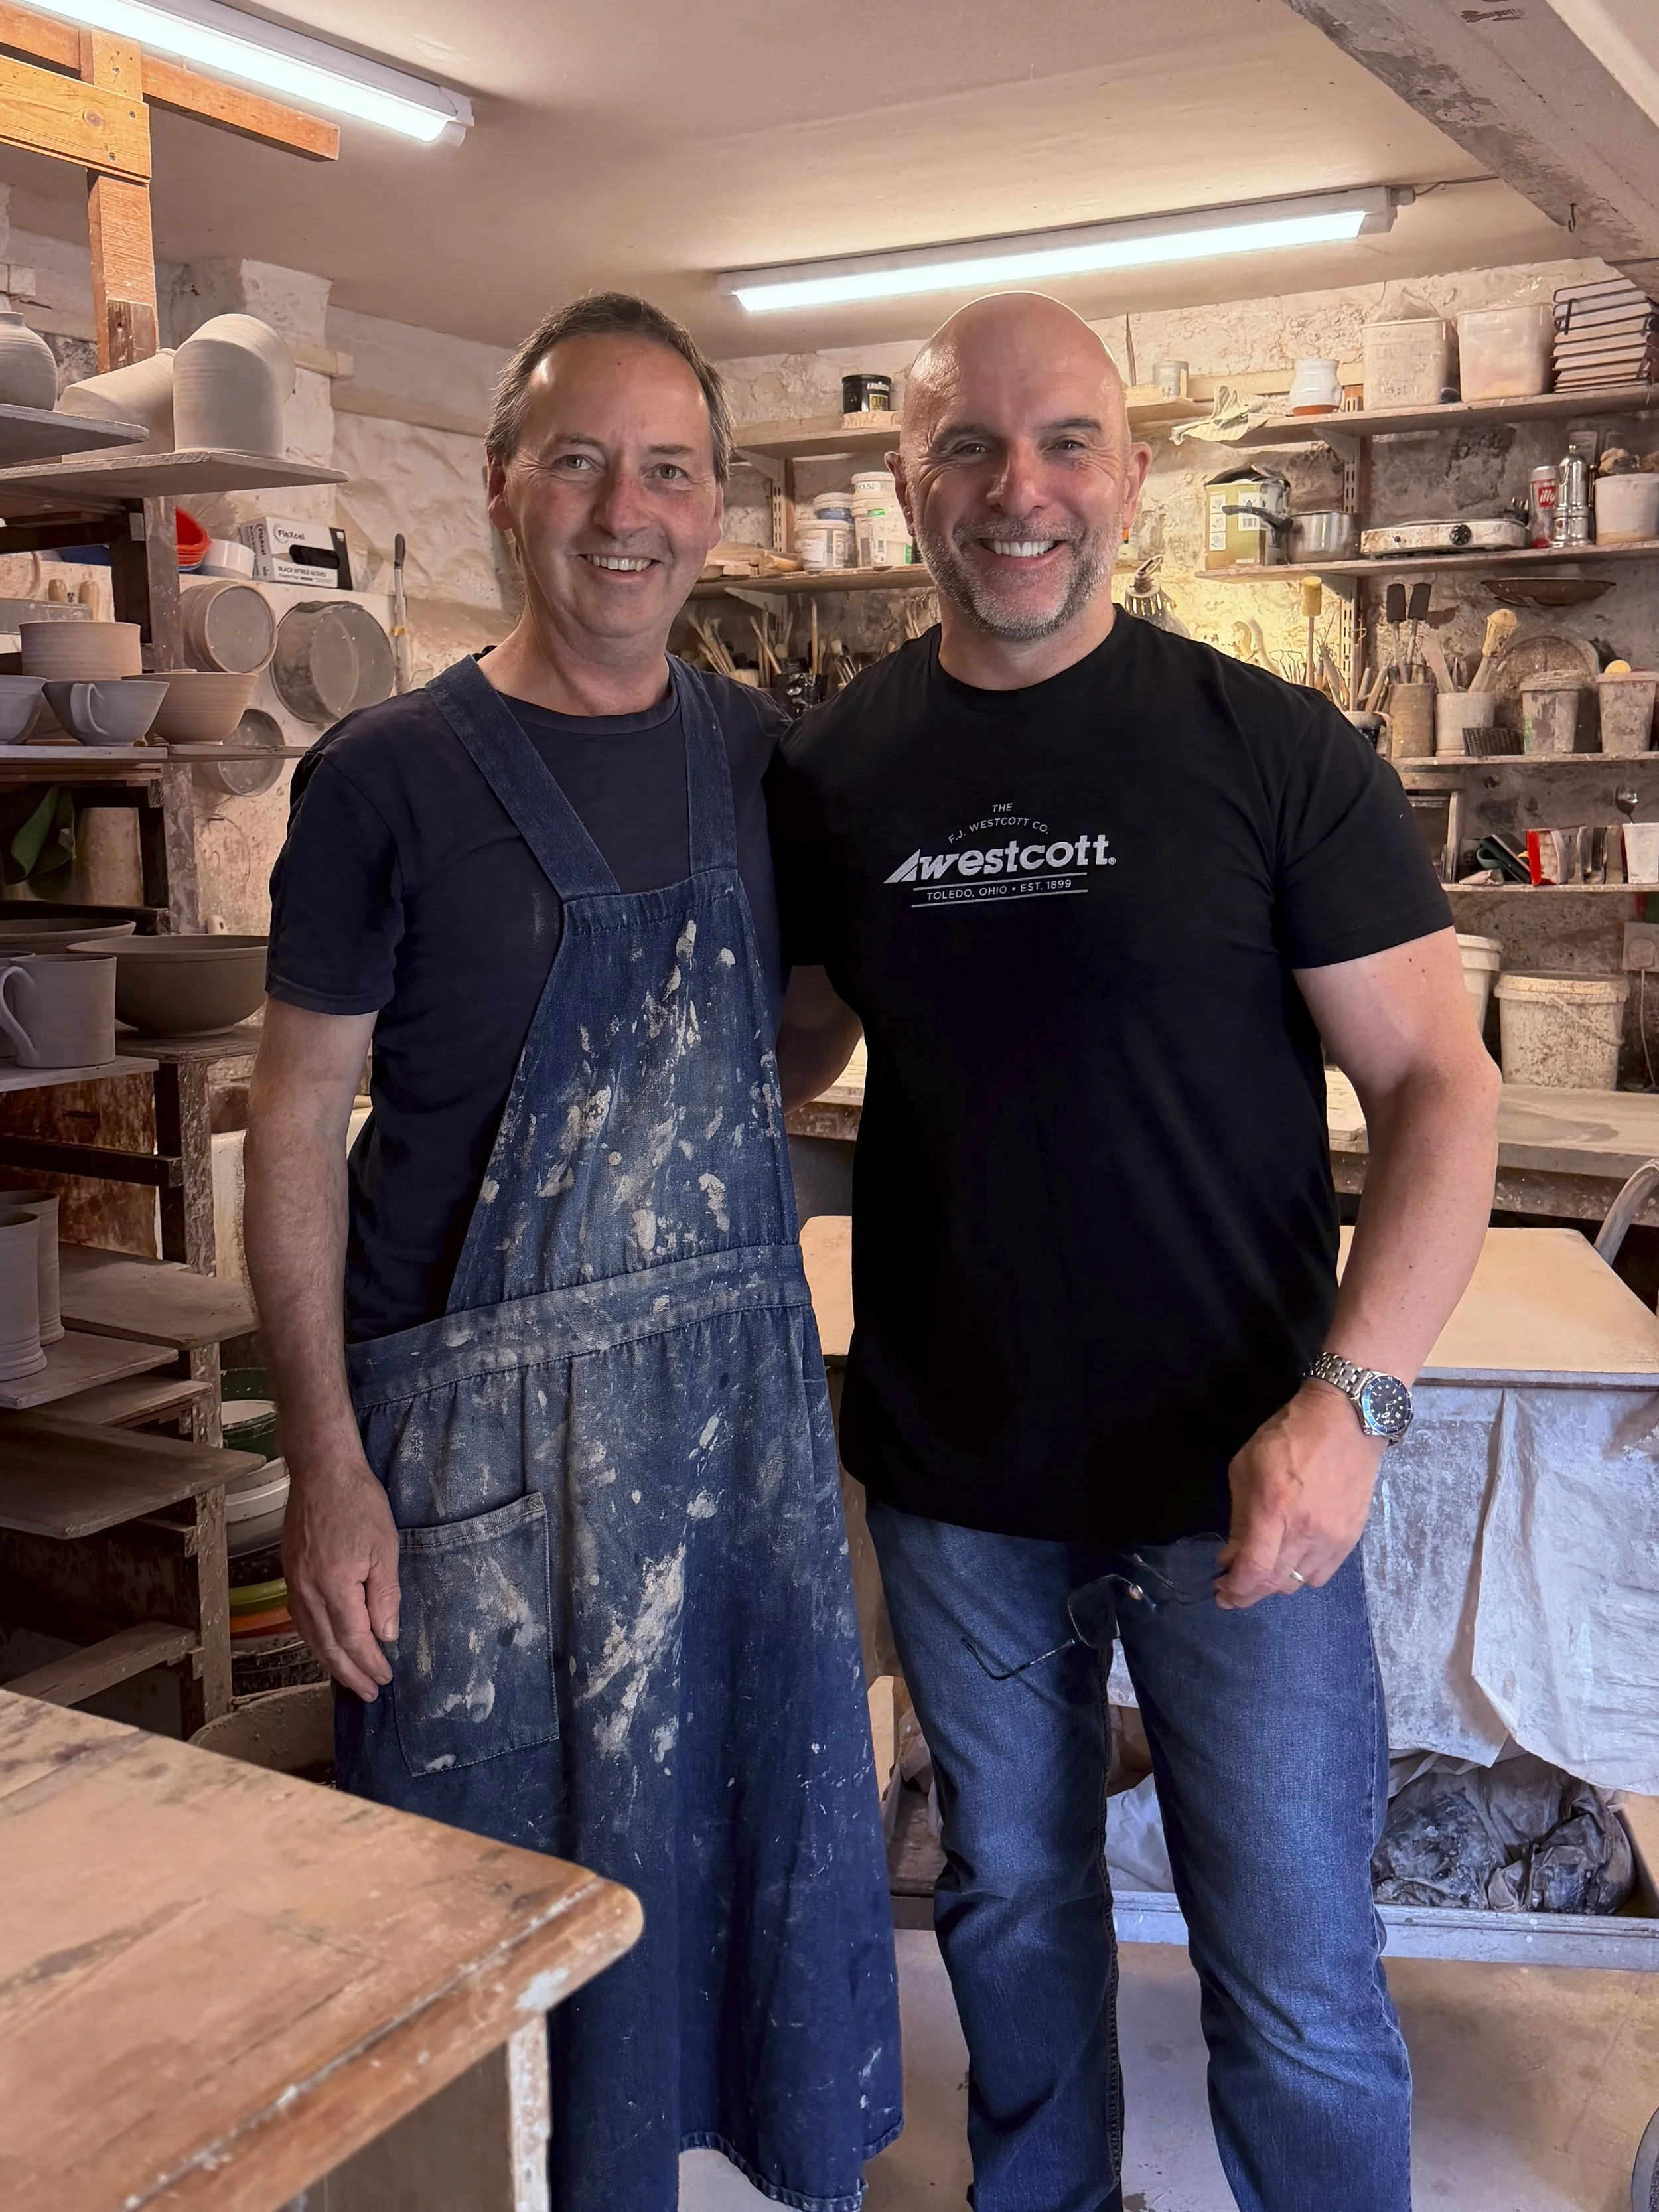
Original

Photoshop filled the space, but the result looked confused. It repeated objects, created strange shapes and produced an area that became less convincing the longer you examined it.

Apple Photos produced something completely different.
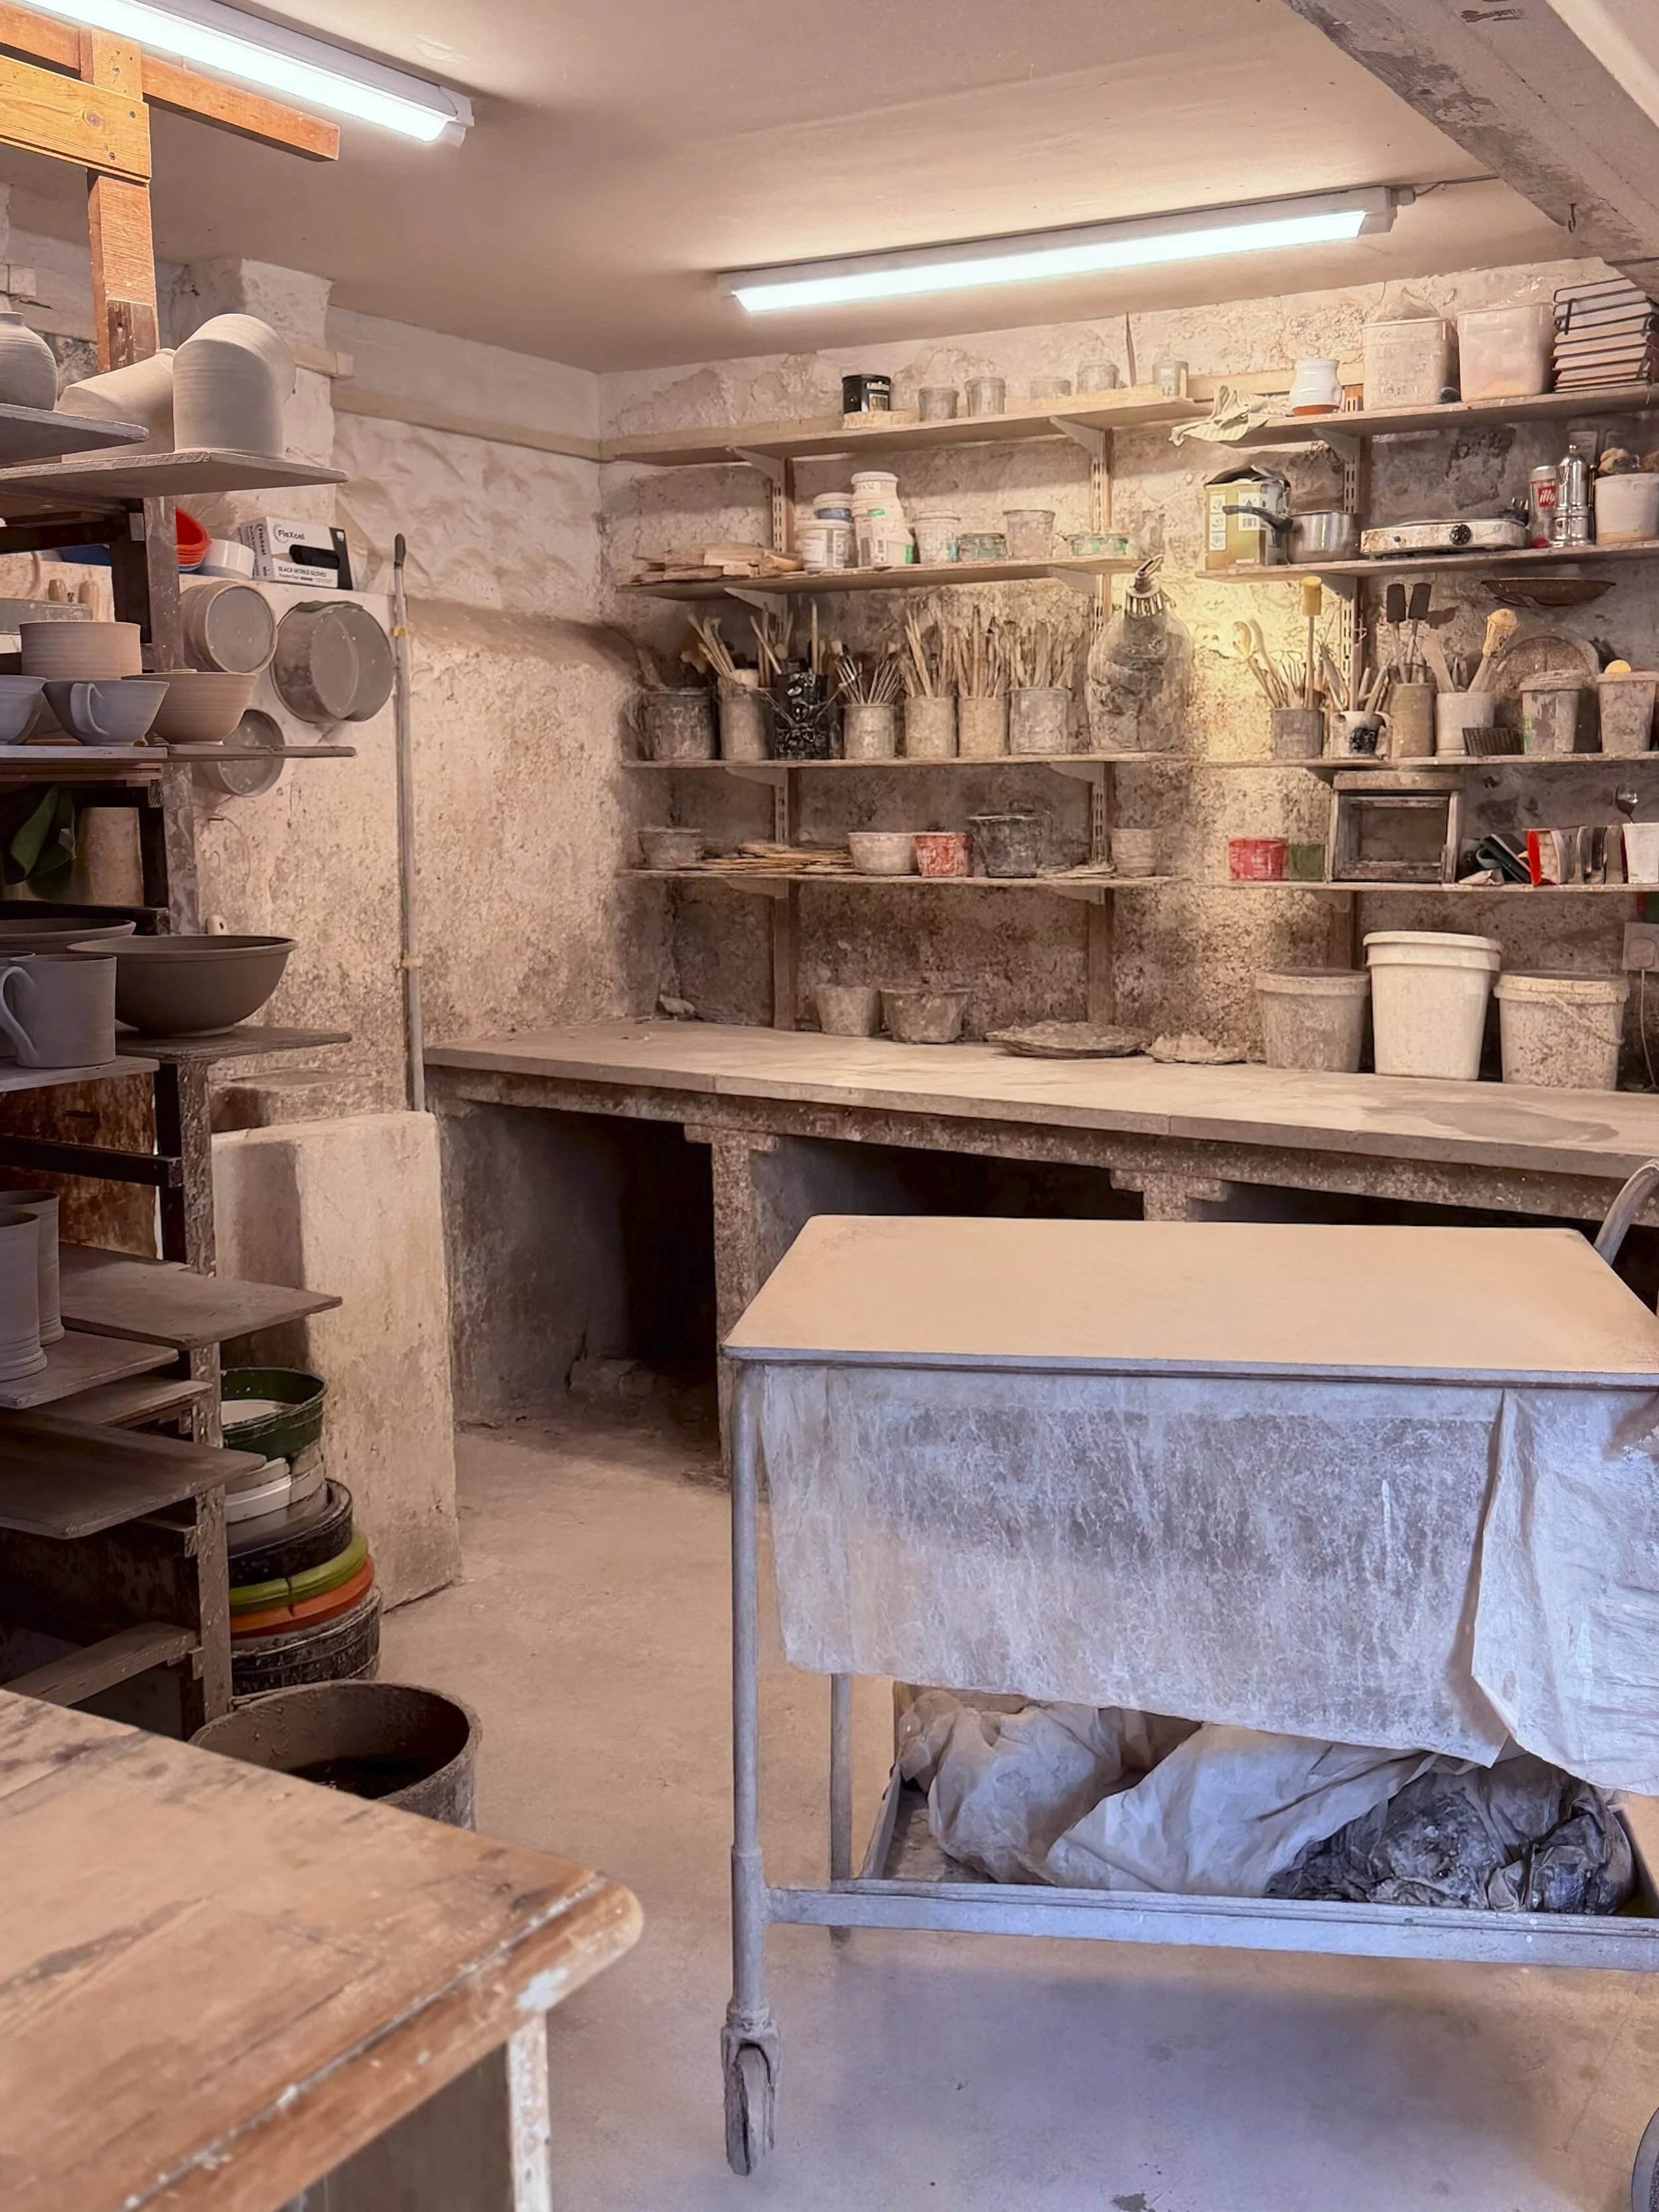
Clean Up using Apple Photos

It reconstructed the trolley behind us, including one of its legs and a wheel. It also created a believable continuation of the workshop wall, complete with pots, tools and other details that matched the surrounding environment.

Was every generated detail an accurate reconstruction of what was really there? Of course not. Neither application can see through people to reveal the original background.

What mattered was whether the generated result looked believable—and the Apple Photos version did.

Looking at the Results Side by Side

After completing all three tests, I transferred the Apple Photos versions to my computer and compared them directly with the Photoshop edits.

The first Photoshop result was acceptable, but the Apple version was cleaner.

The second comparison wasn’t particularly close. Apple Photos handled the branded backdrop, table and background objects far more convincingly.

The third result was the most surprising of all. Photoshop appeared to fill the space with repeated textures and objects, whereas Apple Photos created a much more coherent scene.

Across these three photographs, Apple Photos consistently produced the better result.

Does This Mean Apple Photos Is Better Than Photoshop?

Not as an overall photo editor.

Photoshop remains an incredibly powerful application with an enormous range of professional editing, retouching, compositing and creative tools. Apple Photos isn’t going to replace it in my workflow.

However, when it comes to these specific removal tasks, Apple Photos’ Clean Up tool was better than Photoshop’s Remove Tool—and in some cases, it was considerably better.

It was also incredibly easy to use. I simply traced around the subjects with my finger, tapped Clean Up and waited a few seconds.

Questions About Resolution and Cost

There are still a couple of areas I want to investigate further.

The first is resolution. An image can look convincing on a phone or computer screen, but printing it is a much more demanding test. I’d like to see how much genuine detail the Clean Up tool generates and how well those reconstructed areas hold up in a physical print.

The other consideration is cost. Apple has indicated that some server-based AI features may have usage limits, with expanded access potentially becoming available for a fee. How that develops—and what it might eventually cost—remains to be seen.

Final Thoughts

Three photographs can’t tell us how these tools will perform in every possible situation. Different images, backgrounds and lighting conditions will inevitably produce different results.

But in these tests, particularly the two most challenging removals, Apple Photos was clearly ahead.

The results were clean, convincing and produced in seconds with nothing more than a rough selection made using my finger.

I never expected to say this, but Adobe genuinely needs to step things up.

Watch the video to see the full editing process and all three comparisons, then let me know what you think. Were you as impressed by the Apple Photos results as I was?
Has Apple Made Us Question Every “Real” Photo?

When Apple announced the new iPhone 18 Pro and Pro Max, they also introduced something that, as a photographer, I'm definitely interested in. It's called Apple Reference Image, and the idea is to give us stronger evidence about where a photograph came from, as in whether it's real or not.

I can see some real benefits to that, particularly when somebody looks at a photograph and immediately dismisses it as AI, but there's one detail that raises a few questions; it's optional. You have to choose to use it.

So what happens when somebody doesn't? Have they got something to hide, did they forget to switch it on, or were they simply using a camera that doesn't offer it? That's the part I think we need to talk about alongside the technology itself, because how we interpret this could be just as important as what it does.

What Apple has actually announced

Apple says the iPhone 18 Pro's main camera captures signed sensor data in reference mode, and its Private Cloud Compute system then develops that into an unaltered reference image. You can view that reference alongside the main photograph in Photos and compare the two, and Apple has also announced support for developers to enable reference viewing in other apps.

There are launch restrictions too. Reference capture won't initially be available in the EU, and it won't be available at all in China.

The useful idea here is having something to go back to when you want to examine a finished picture, but a comparison isn't necessarily a complete record of every editing step. I wouldn't assume we'll get a list telling us which tool was used, in which application and in what order.

Where it could help

Imagine you've made a photograph of something unusual. Perhaps the light was extraordinary, or you happened to catch a moment that looks almost too good to be true. You share it and somebody says straight away that it's AI, and at that point "no it isn't, I was there" might not get you very far.

A trustworthy reference could give you something more useful to put in front of them, but it won't make everybody believe you. Some people have already made their minds up, whatever evidence you show them; for somebody who actually wants to examine the picture, though, additional evidence could help.

I can also see a potential benefit for picture editors and clients. If the question is whether something significant has been added or removed, being able to compare the finished picture with a trusted reference could make that conversation a lot clearer.

Editing isn't the same as dishonesty

This is the part that interests me most, because I spend a lot of my time teaching Photoshop and Lightroom. Editing a photograph doesn't, by itself, tell you whether somebody is being dishonest.

Take a portrait. I might adjust the white balance, lift the shadows, remove a temporary blemish, or go quite a bit further than that. Those are changes, of course they are, but what matters is what the photograph is for and what the changes actually do and what I'm telling you about it.

If I remove a person from a news photograph, that could change your understanding of what happened entirely. If I make a composite and tell you it's a composite, you're being given the information you need to understand the work. That distinction matters.

So I'd like to see tools like this encourage more useful conversations about editing. What changed, did it alter the meaning, and was the picture presented honestly? Those questions tell us far more than simply asking whether Photoshop was involved.

The trouble with voluntary

My first concern is that the people who want to show how their pictures were made have a reason to take part, whilst somebody who wants to conceal what they've done can simply choose not to. That doesn't make the feature pointless, but it does limit what we can conclude from it. We could end up with some pictures that have supporting evidence and many more where we still don't know, and the danger is how quickly "we don't know" turns into "it must be fake".

Imagine somebody captures a really important moment but hasn't enabled the feature. Perhaps they didn't know it existed, or didn't expect to photograph anything important that day; they saw something happening, picked up their phone and took a picture, which is hardly unusual behaviour. Should we trust their photograph less because they didn't think about authentication beforehand? I'd be very uncomfortable with that.

Then there are people using older phones, different cameras or equipment that simply doesn't support this system. Their photographs don't become less honest because somebody else bought a newer phone, and I wouldn't want us drifting towards a situation where you're expected to own certain kit just to have your work taken seriously.

The obvious response is to have it switched on for everybody, and that's a fair point, but I also understand wanting a choice. People use their cameras for all sorts of things, family pictures and visual notes and creative experiments and work in progress, and they may not want an extra reference workflow attached to everything they shoot.

Before deciding whether it ought to be on by default, I'd want to understand the practical experience. What happens when you've got no connection, how much extra storage is involved, and how long does the process take? Those are questions worth testing, and I'm not suggesting they're established problems. If something is easy to use and clearly useful, people have a reason to adopt it; if it adds confusion or friction, a lot of people won't bother.

What happens after you press the shutter

There's also the journey a photograph takes after it's been made. You might edit it, export it, send it in a message, upload it somewhere, or have somebody else download it and pass it on. What happens to the supporting evidence along the way? Can the person at the end find it, can they view it with the software they already have, and will they understand what they're looking at?

A feature can work perfectly for the photographer and still be of limited value to the viewer if the evidence is hard to get at. That's something I'd want to test properly, taking a photograph through a normal editing and sharing workflow and then seeing what the recipient can actually check.

I'd also want to see how clearly the interface separates missing evidence, a failed check and a successful check, because those are completely different situations. If they all get read as a simple real or fake verdict, we're going to create a lot of confusion.

A true photograph can still mislead

There's one final limitation that no amount of enthusiasm about authentication should make us forget; a camera can faithfully photograph a misleading situation. I can stage a scene, choose a viewpoint that leaves out something important, or put an inaccurate caption underneath.

Imagine I photograph a small group of people waiting outside a building. One caption says they're waiting for it to open, another says they're protesting against its closure. Same picture, completely different stories, and checking where the image came from doesn't by itself tell you which caption is accurate.

That's a recognised limitation of photo provenance more broadly; evidence about an image's history can't, on its own, establish whether the content is factual. We still need context, which means asking who published the picture, what they're claiming, and what other evidence supports it.

Where that leaves me

I'm definitely interested, and I can't wait to see how it works in practice. Giving photographers a stronger way to support their pictures could be really valuable, and so could making it easier to examine meaningful changes, but I think we need to be careful about what we conclude.

If a reference image is available, use it as evidence and understand what it does and doesn't establish. If it isn't, ask questions rather than jumping straight to an accusation.

For me, that's the biggest concern with the voluntary approach. The people who opt in may gain a useful way to support their work, whilst everybody else could find themselves under suspicion for no good reason.

Your Mac is Changing your Prints

You set the file up, soft proof it in Photoshop, load your favourite paper, hit print, and what comes out looks nothing like what you were looking at on screen. The colours are off, the skin tones have picked up a heavy magenta cast, and you're stood there wondering what on earth just happened.

Same printer, same paper, same profile, two completely different results.

Nine times out of ten it isn't your editing and it isn't your paper profile. It's your Mac, quietly making a decision on your behalf without ever telling you about it.

When you plug a printer into macOS, the system will very often set it up using AirPrint rather than the manufacturer's full driver. It does it silently, there's no warning, and it takes away your control over the settings that actually matter for a fine art print.

Why AirPrint gets in the way

AirPrint is fine for knocking out a boarding pass or an email, but for printing work you care about it causes real problems.

The big one is colour management. The option to turn off the printer's own colour handling disappears, so Photoshop and macOS both end up trying to manage the colour at the same time, and they don't agree.

Then there's the media types. Instead of picking the fine art paper you've actually loaded, you're left with basic options like plain paper or photo paper, which means the printer can't set the right head height or the correct ink limits for what's going through it.

Put those two together and you get the colour shifts, and it's the skin tones where you'll notice it first.

Checking and fixing it

However, there's a good reason it happens, and there's a simple way round it. This takes about a minute, and it'll save you a fair bit of ink and paper.

Start by going to your printer manufacturer's website, Canon, Epson or whoever it might be, and download the full driver software for your model, then install it.

Next, on your Mac, head to System Settings, then Printers and Scanners, click the info icon next to your printer and have a look at the driver details. If it mentions AirPrint anywhere, remove the printer.

Then add it back properly. Click Add Printer, select your device from the list, and this is the bit people miss, look at the Use dropdown at the bottom. Don't leave it on the default AirPrint option. Choose Select Software, pick your manufacturer's driver from the list, and click Add.

That's it.

Once the full driver is in place, all your print settings come back, the custom media types are there, and the colour management options are exactly where they should be, which is the bit that makes the whole difference.

There's a full walkthrough in the video above with the side by side print comparison, so you can see the setup on screen as you go.

🖥️ Big News for Mac users: Hardware Calibration has Finally Arrived ✅

For those of you that use Apple Displays, iMac, MacBook, or the Studio Display, this one's worth your attention ...

Calibrite has just announced that the Display Plus HL (the profiler I use) is now officially Apple approved; iIt's the first colorimeter that works directly inside Apple's own display calibration workflow, which means it can write adjustments straight to the display hardware itself rather than just layering a correction profile on top in macOS.

This is BIG news!

https://calibrite.com/apple-approved/

🚨 Why does that matter?

Up to now, proper hardware-level calibration on Apple displays was only possible with industrial spectroradiometers costing thousands; this brings that same level of precision to a device built for photographers and creatives instead.

A few key points:

It writes white point, luminance, and colour accuracy directly to the display; one calibration session updates every reference mode at once, covering both SDR and HDR, so you're not redoing it each time you switch.

The calibration is stored on the display itself (just like the BenQ monitors being Hardware Calibrated), so if you plug it into another Mac, your accuracy travels with it.

Supported hardware includes the Studio Display, Studio Display XDR, Pro Display XDR, and MacBook Pro models with M1 Pro or Max and later.

🚨 Note: You'll need macOS Tahoe 26.4 or newer for the hardware calibration to work.

Worth a look if you're on a Mac and care about colour, and especially if you print.

Cheers,
Glyn

Calibrating my iPad Pro for Photography

One thing I always do when taking portraits is shoot tethered and that always used to be with my camera connected to my MacBook Pro or laptop BUT that has now changed to being my iPad because its way more portable and convenient.

I use the CaptureOne app for the tethering which works so incredibly well .. literally just open the app, plug in your camera (you can also use it wirelessly) and you’re up and running. You can even use it to tether to your iPhone … if you have one.

The only problem i find is that the screen on the iPad out of the box is too contrasty … its set up so that it gives the richest colours and the deepest blacks for when using apps, watching movies, playing games, looking at pictures which is great but not ideal for when using it when tethering.

However I have the 6th generation 12.9” iPad Pro running iOS 17.3.1 and this has Reference mode and this we can use to kind of calibrate the screen to something more suitable for photography.

NOTE:
Reference mode is actually available on 12” iPad Pro 5th generation or later and requires iOS 16 or later.

Constant LED Light Portraits with Sony and iPhone

The more I use the LED Constant Light for Portraits, the more I fall in love with it.

I know I said it before in an earlier post but when you use it, the whole WYSIWYG (What You See Is What You Get) not only makes setting up so much easier and quicker but also every time I use it, the people I photograph say how much more relaxing it is not having a flash go off in their face.

Just over a week ago I was recording some content for the iPhone Photography Conference and thought it would be an interesting comparison just to see how close I could get a photograph I took with my main camera, my Sony A7RIV Mirrorless and my iPhone 15 Pro Max.

Of course I went into this knowing that the iPhone image wouldn’t equal or surpass the quality of my Sony, but just thought it would be interesting to see how far the quality has moved on and do this with a lit Portrait using the constant light … the Westcott L60-B Bi-Colour LED.

THE SET UP

For the lighting. I had originally planned to use just one light, the L60-B, however I couldn’t resist the warm light emitting from the heater that Ian had turned on in the studio. I loved the way it cast a warm glow onto the wood panelling so this was carefully raised off the ground and then became the main light and the L60-B was positioned on the opposite side of Ian further forward and higher up.

The L60-B was given a warmer temperature using the iPhone app which works incredibly well.

As soon as I opened the app it connected to the light and I was able to dial in the power settings, change the temperature and I could even make it perform lighting special effects like lightning, TV and a faulty bulb … but these are obviously for use when doing video.

CAMERA SET UP 

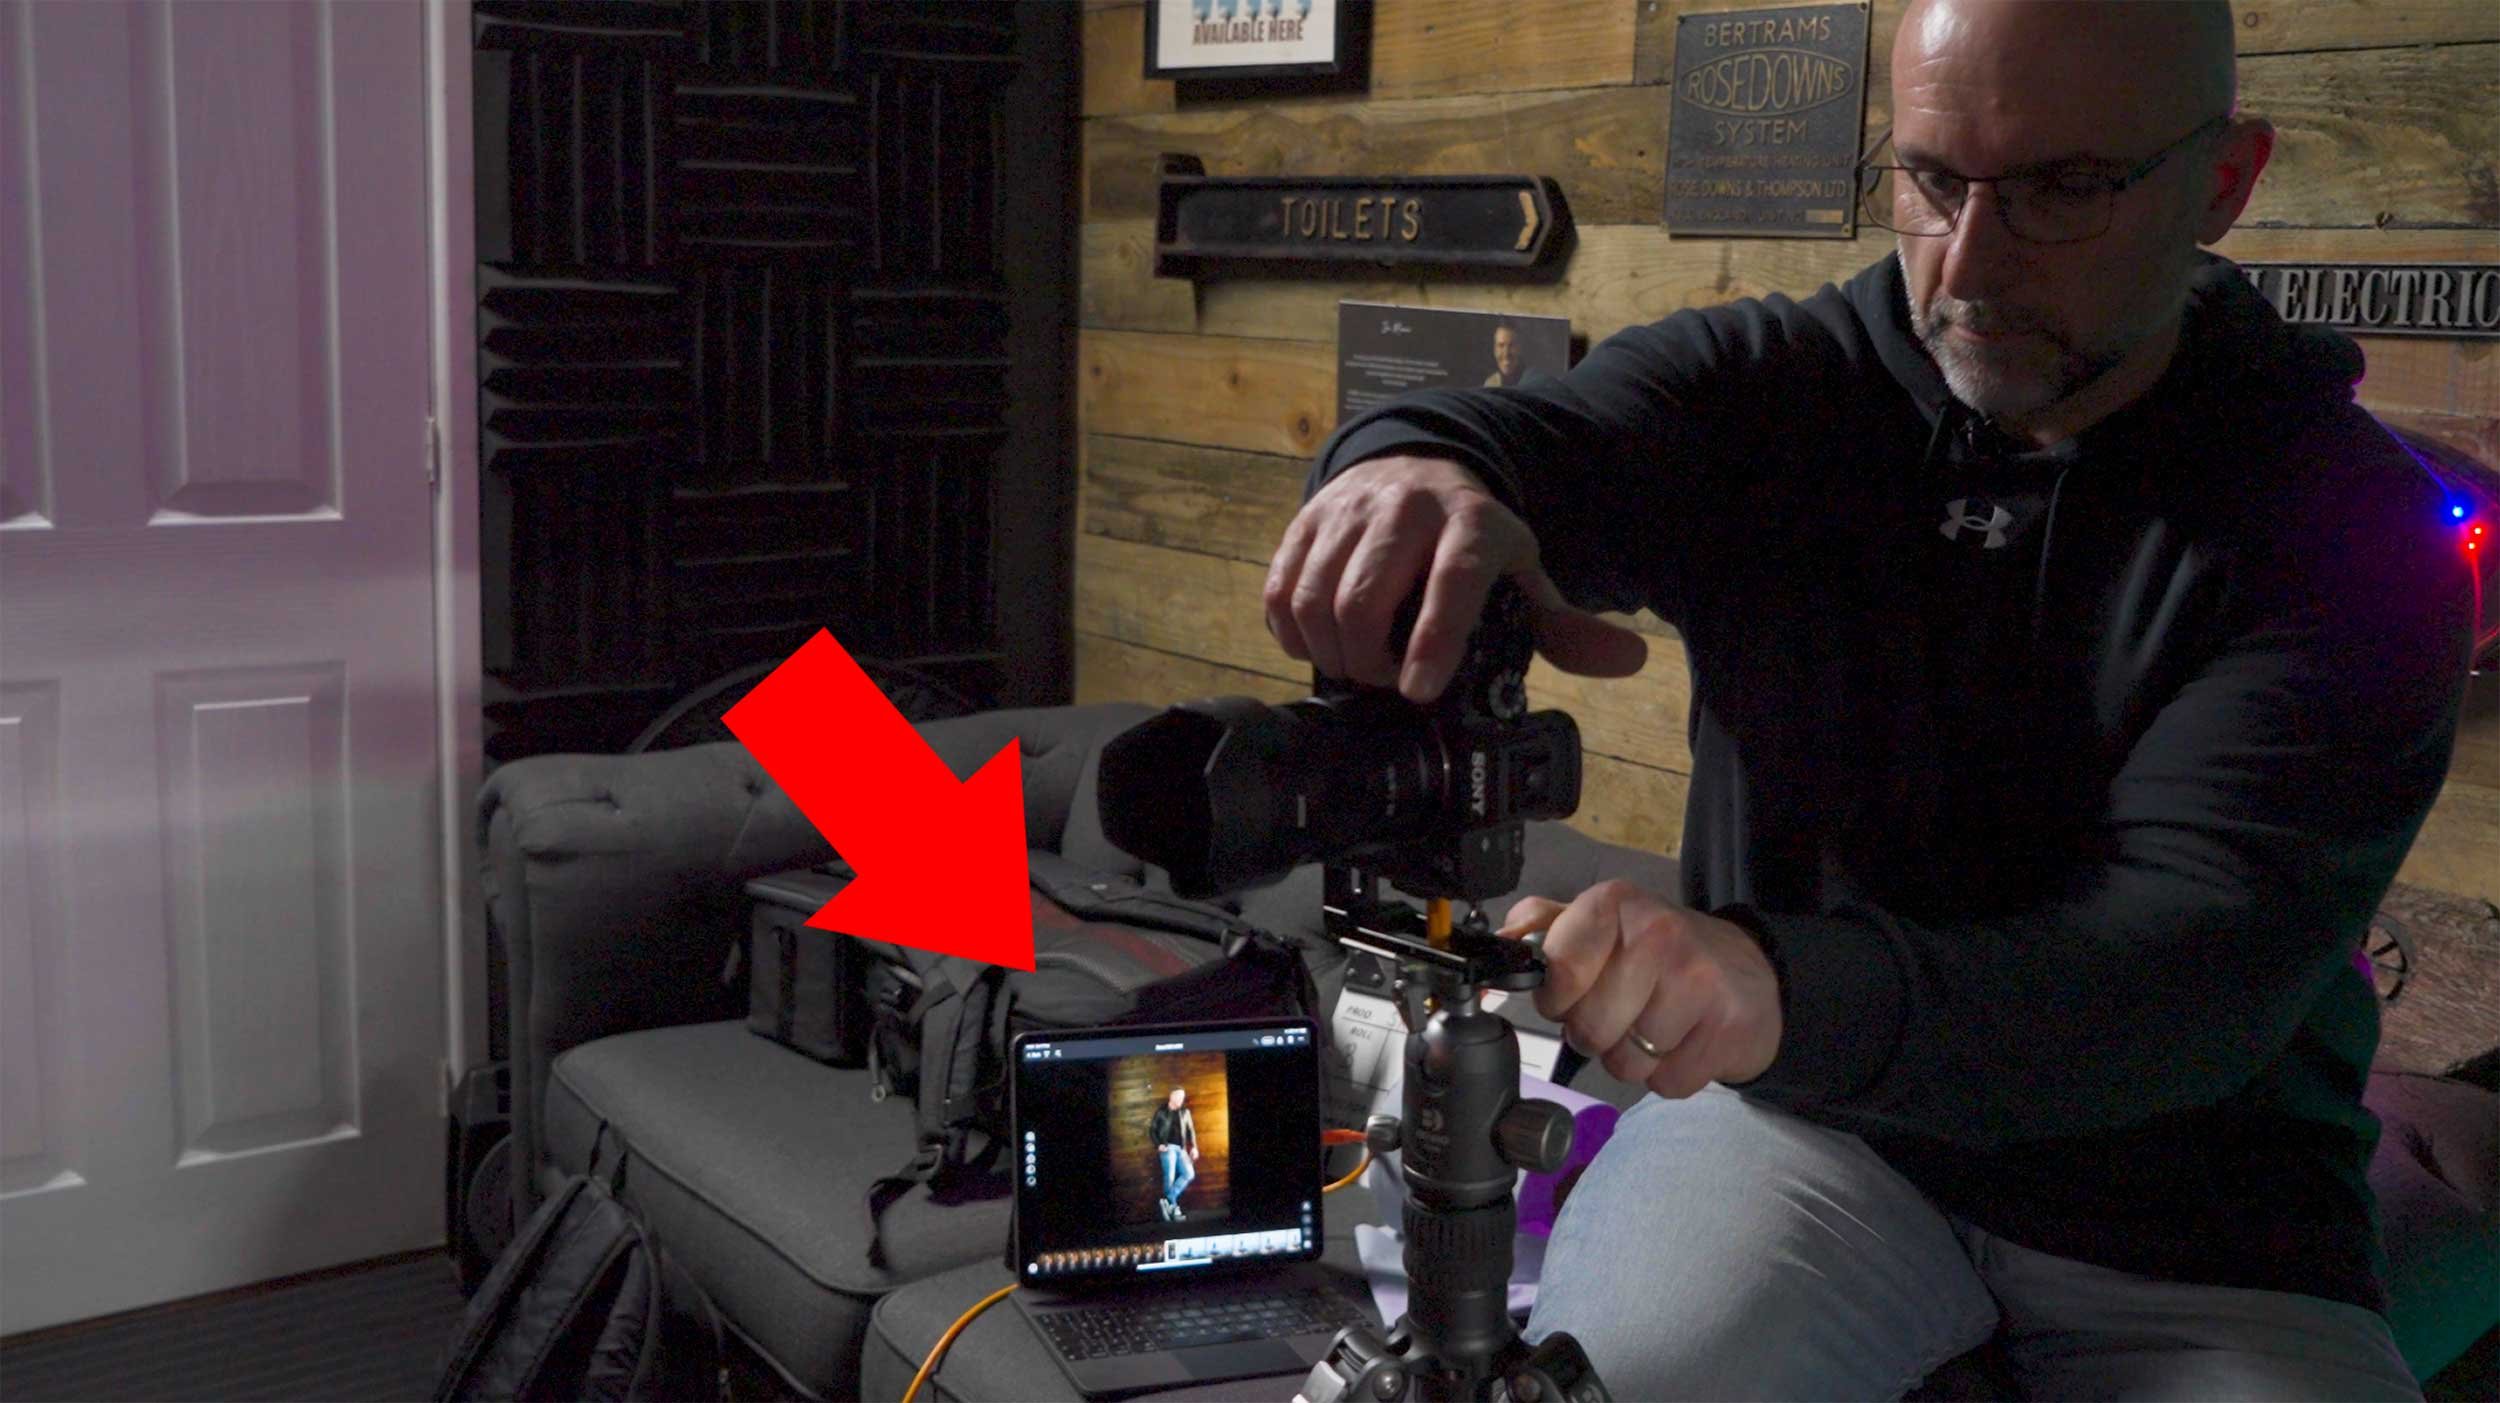
So with my Sony A7RIV on my tripod I used my 55mm Zeiss f/4.0 lens and tethered this into CaptureOne on my iPad, which works an absolute treat!

It’s incredibly easy to set up; you literally plug one end of a USB-C cable into the camera, the other end into the iPad, and with the app open i’st connected and ready to go.

I’m using this all the time now when tethering and what I also love about it is that you can stop and start the monthly subscription whenever you want. The subscription is only £4.49 / month so I tend to look at what I have planned and just restart it for that period, then cancel it again.

The only thing I don’t like which might (I hope) be just down to a setting I’ve missed turning on, but the photographs you take are only stored on the iPad. I only discovered this after the first shoot I did using it. I disconnected the camera and went to check the images on the camera and nothing was there. Only once my heart re-started and I looked on my iPad did I realise where they were 😳


CAMERA SETTINGS

The settings dialled into my camera were …

  • f/4.0

  • 1/60 sec

  • 2000 ISO … which for modern day cameras is nothing

using the iphone

Having taken the portrait with my Sony I then swapped over to my iPhone which was placed on the tripod using the ULANZI ST-27 Phone Mount.

I also attached the 2x Telephoto lens from ReeFlex to the 1x lens on my iPhone using one of their cases that has threads in each of the lens apertures.

The 1x lens is the equivalent of 24mm and is the only lens on the iPhone capable of shooting in ApplePro Raw at 48MP … the highest resolution and largest file my iPhone 15 Pro Max can produce.

With the 2x Telephoto lens attached this made the 1x lens the equivalent of 48mm and did this optically rather than digitally, and so doing everything possible to create the best possible file; not quite 55mm but the closest I could get oto it optically.

iPHONE PRO CAMER APP

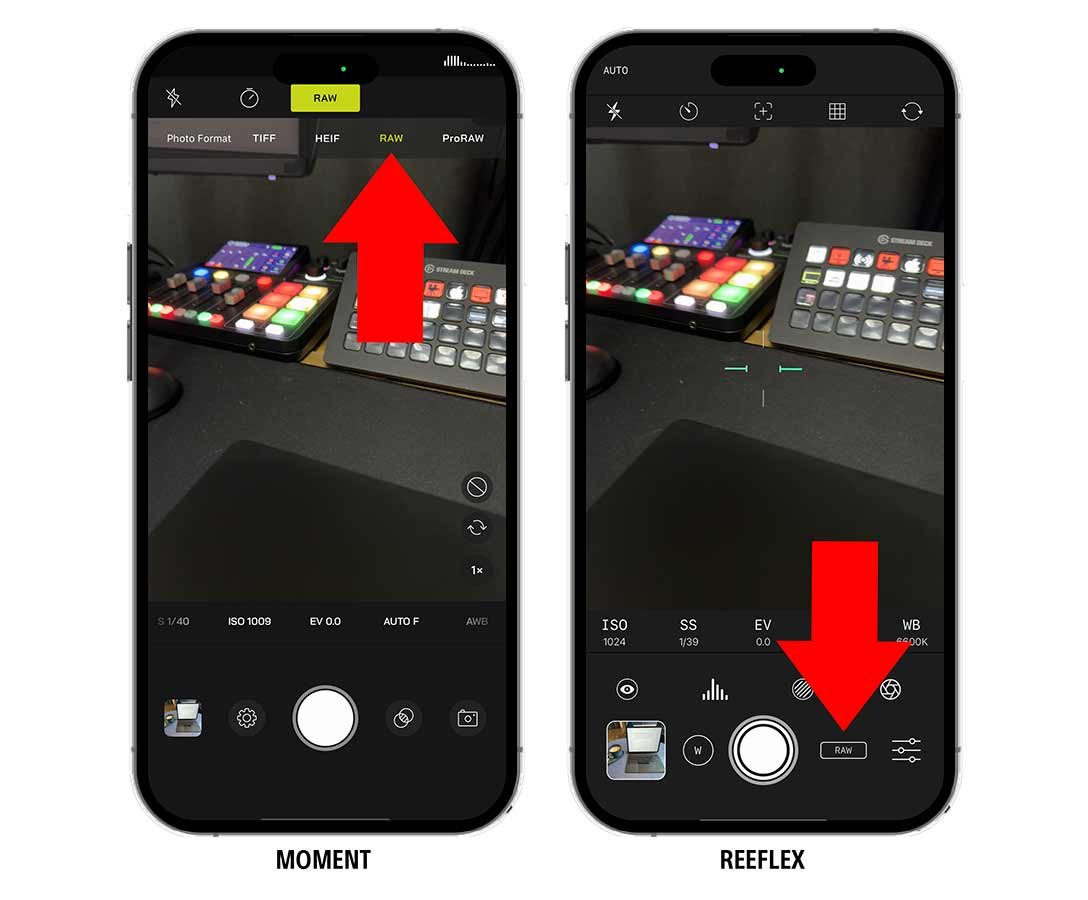
To take the photograph with my iPhone I used a Pro Camera App from ReeFlex and called ReeFlex.

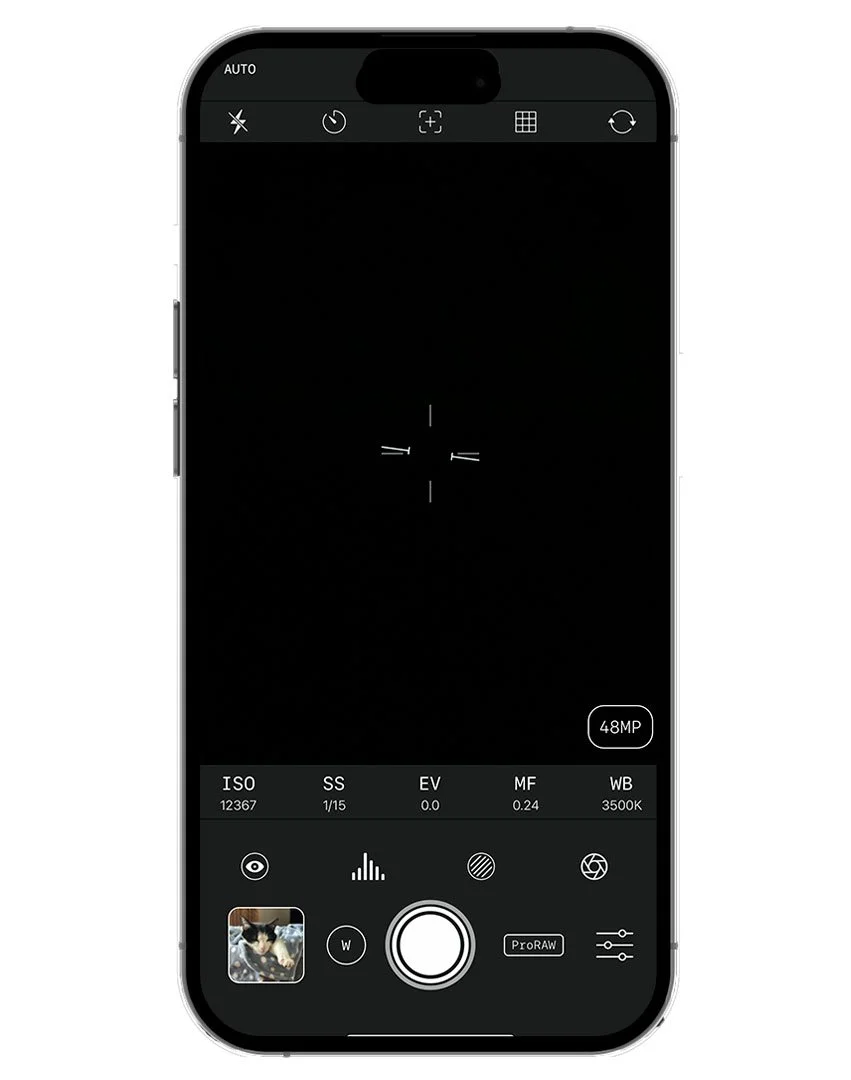
This app like most other pro camera apps gives you control over extra settings like Shutter Speed and ISO but it also makes it very clear to see not only what file format you are in but also the resolution.

ReeFlex Pro Camera App usinfg 1x lens in Apple ProRaw at 48MP

However here’s the catch …

If when you’re using the 1x lens in Apple ProRaw at 48MP you make changes to the shutter speed and / or ISO then the file size immediately drops from 48MP to 12MP.

ReeFlex Pro Camera App using 1x lens with Shutter Speed Adjusted

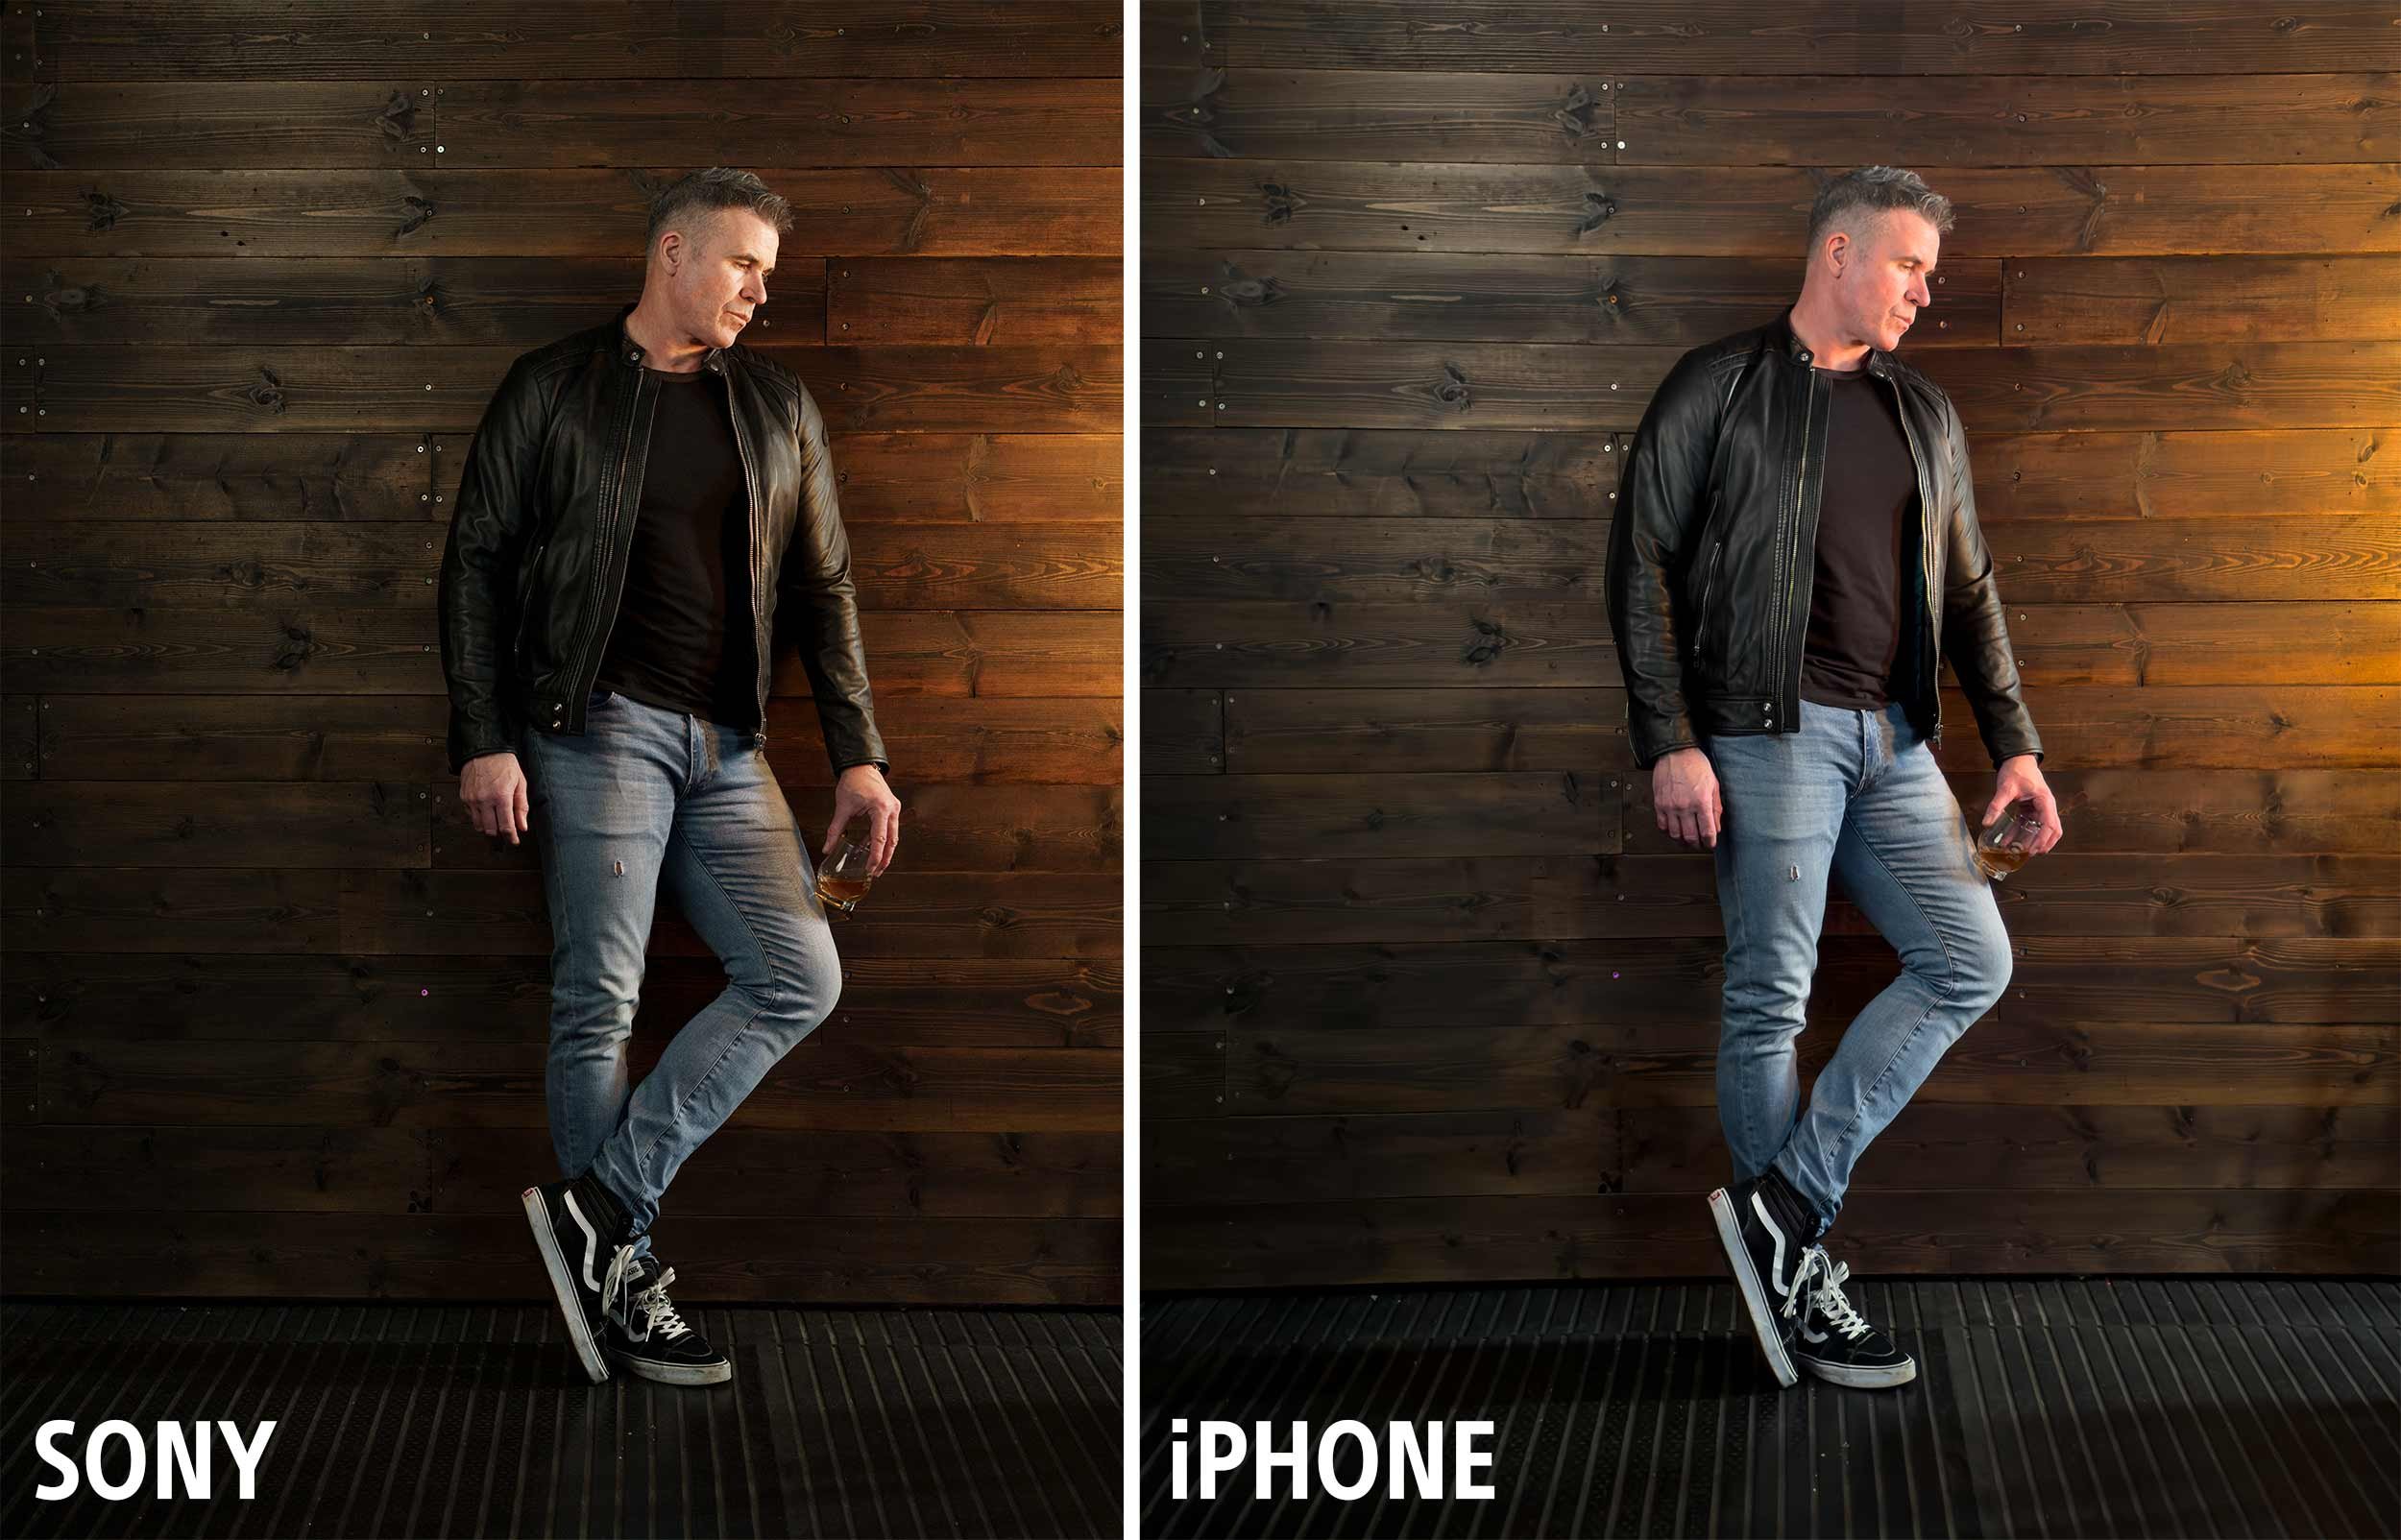
So because of this I opted to leave the iPhone in the AUTO settings which kept the 1x lens in Apple ProRaw at 48MP, and these are the out of camera and out of phone results, with the Sony image on the left and the iPhone image on the right …

Now at this 100% magnification the iPhone file, although different to the Sony file, certainly looks to be holding up.

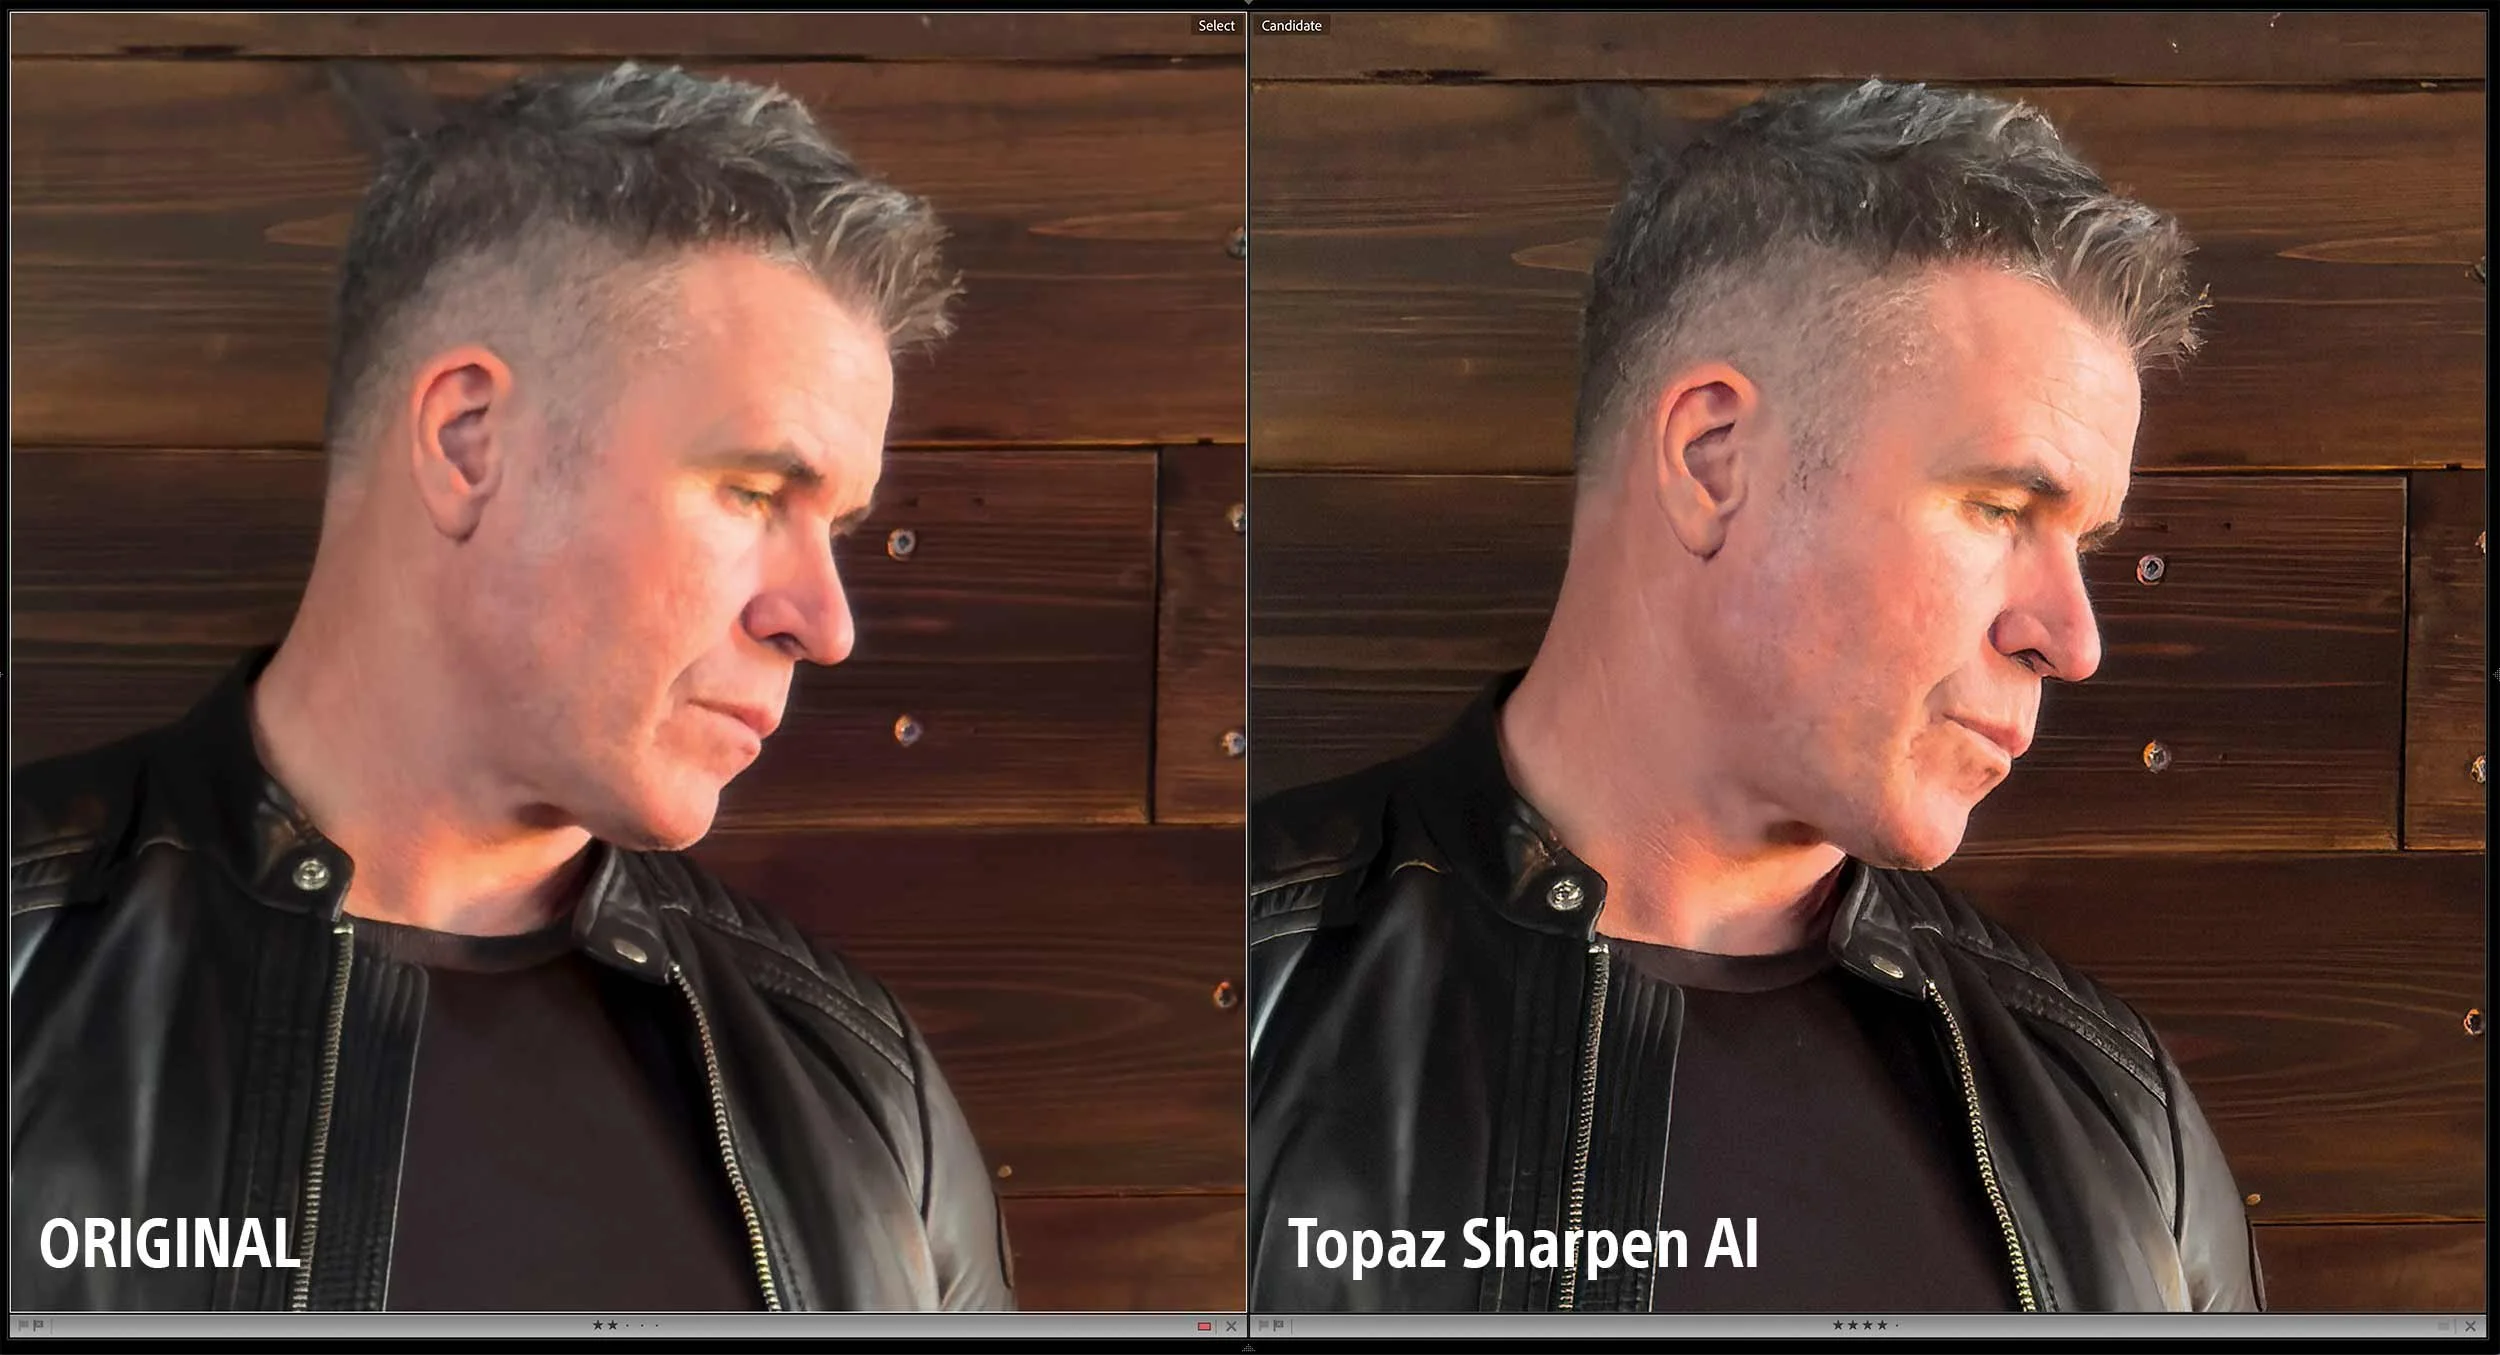
However, it’s when you zoom in on that iPhone file that things look VERY different …

Look how the file looks soft and slightly out of focus. Look how the file lacks texture and detail in Ian’s skin, his hair and the wood panelling.

Apple ProRaw

This softening appearance to the image is all because of shooting in the supposed highest resolution settings, AppleProRaw at 48MP and that’s because Apple ProRaw isn’t like a traditional Raw file as we know and understand them.

You see Apple ProRaw files do actually receive some processing such as Noise Reduction ( quite al lot ) and Smart HDR, so the file we end up with is also a blend of a number of images at different exposures taken and processed increibly quickly.

So not REALLY a Raw file as you would expect 🤷‍♂️

topaz sharpen ai

Running the file thorugh Topaz Sharpen AI does recover alot of that lost detail as you can see here …

However knowing what Apple ProRaw does to your files does arm you with a bit of knowledge so that you can make the decision to use it or not.

Depending on how serious you are about your iPhone photography you might want to consider shooting in 12MP Raw which Pro Camera apps like Moment and ReeFlex allow you to do …

Naturally we always want the highest resolution file possible but the noise reduction that Apple ProRaw does, might make you reconsider.

12MP Bayer raw files

Currently ALL Raw Long Exposure apps produce 12MP Bayer Raw files and that’s what all of my seascape images are and I’m more than happy with them.

Sure more resolution would be good but until that time, these 12MP Bayer Raw files are very acceptable …

So acceptable in fact that Digitalab even printed one of my iPhone seascapes at 72” on the longest side and it looked incredible …

final retouched portraits

Here though are the final retouched portraits with the Sony file on the left and the iPhone file on the right, and yeah the Sony file is definitely better and that’s to be expected, but looking at the iPhone file the future is going to be VERY interesting indeed!

wrapping up

So more testing to be done which will be interesting as new iOS updates come along and the iPhone 16 later this year.

In the mean time I’m going to carry on taking seascapes with my iPhone because I really enjoy doing them BUT I’ll also be taking them with my Sony too.

As for Portraits I’ll keep taking them with my iPhone but only as an extra bit of fun and experimentation when taking them with my Sony.

Catch you next time
Glyn


HOW I EDIT theseiPhone Photographs in Lightroom

This is a recorsing of a LIVE Stream that I hosted on YouTube and Facebook on Sunday 29th October 2023 …

Join me for this LIVE stream as I go through the editing step sin Lightroom of some iPhone Portrait and Seascape photographs taken during a recent North Wales Road Trip …

***NOTE: The LIVE Feed cut off moments before the end of the broadcast however all relevant content was covered and all mentioned links are in the video description

My ULTIMATE Desktop Set Up for Photography, Content and Zoom ( YouTube LIVE )

I'm often asked about the kit / hardware I use every day for photography , content and live streaming so in this video I'll go through the lot; EVERYTHING I use that makes editing (photography& video) and streaming so much easier.

You can see all of the kit I go through over on my GEAR page.

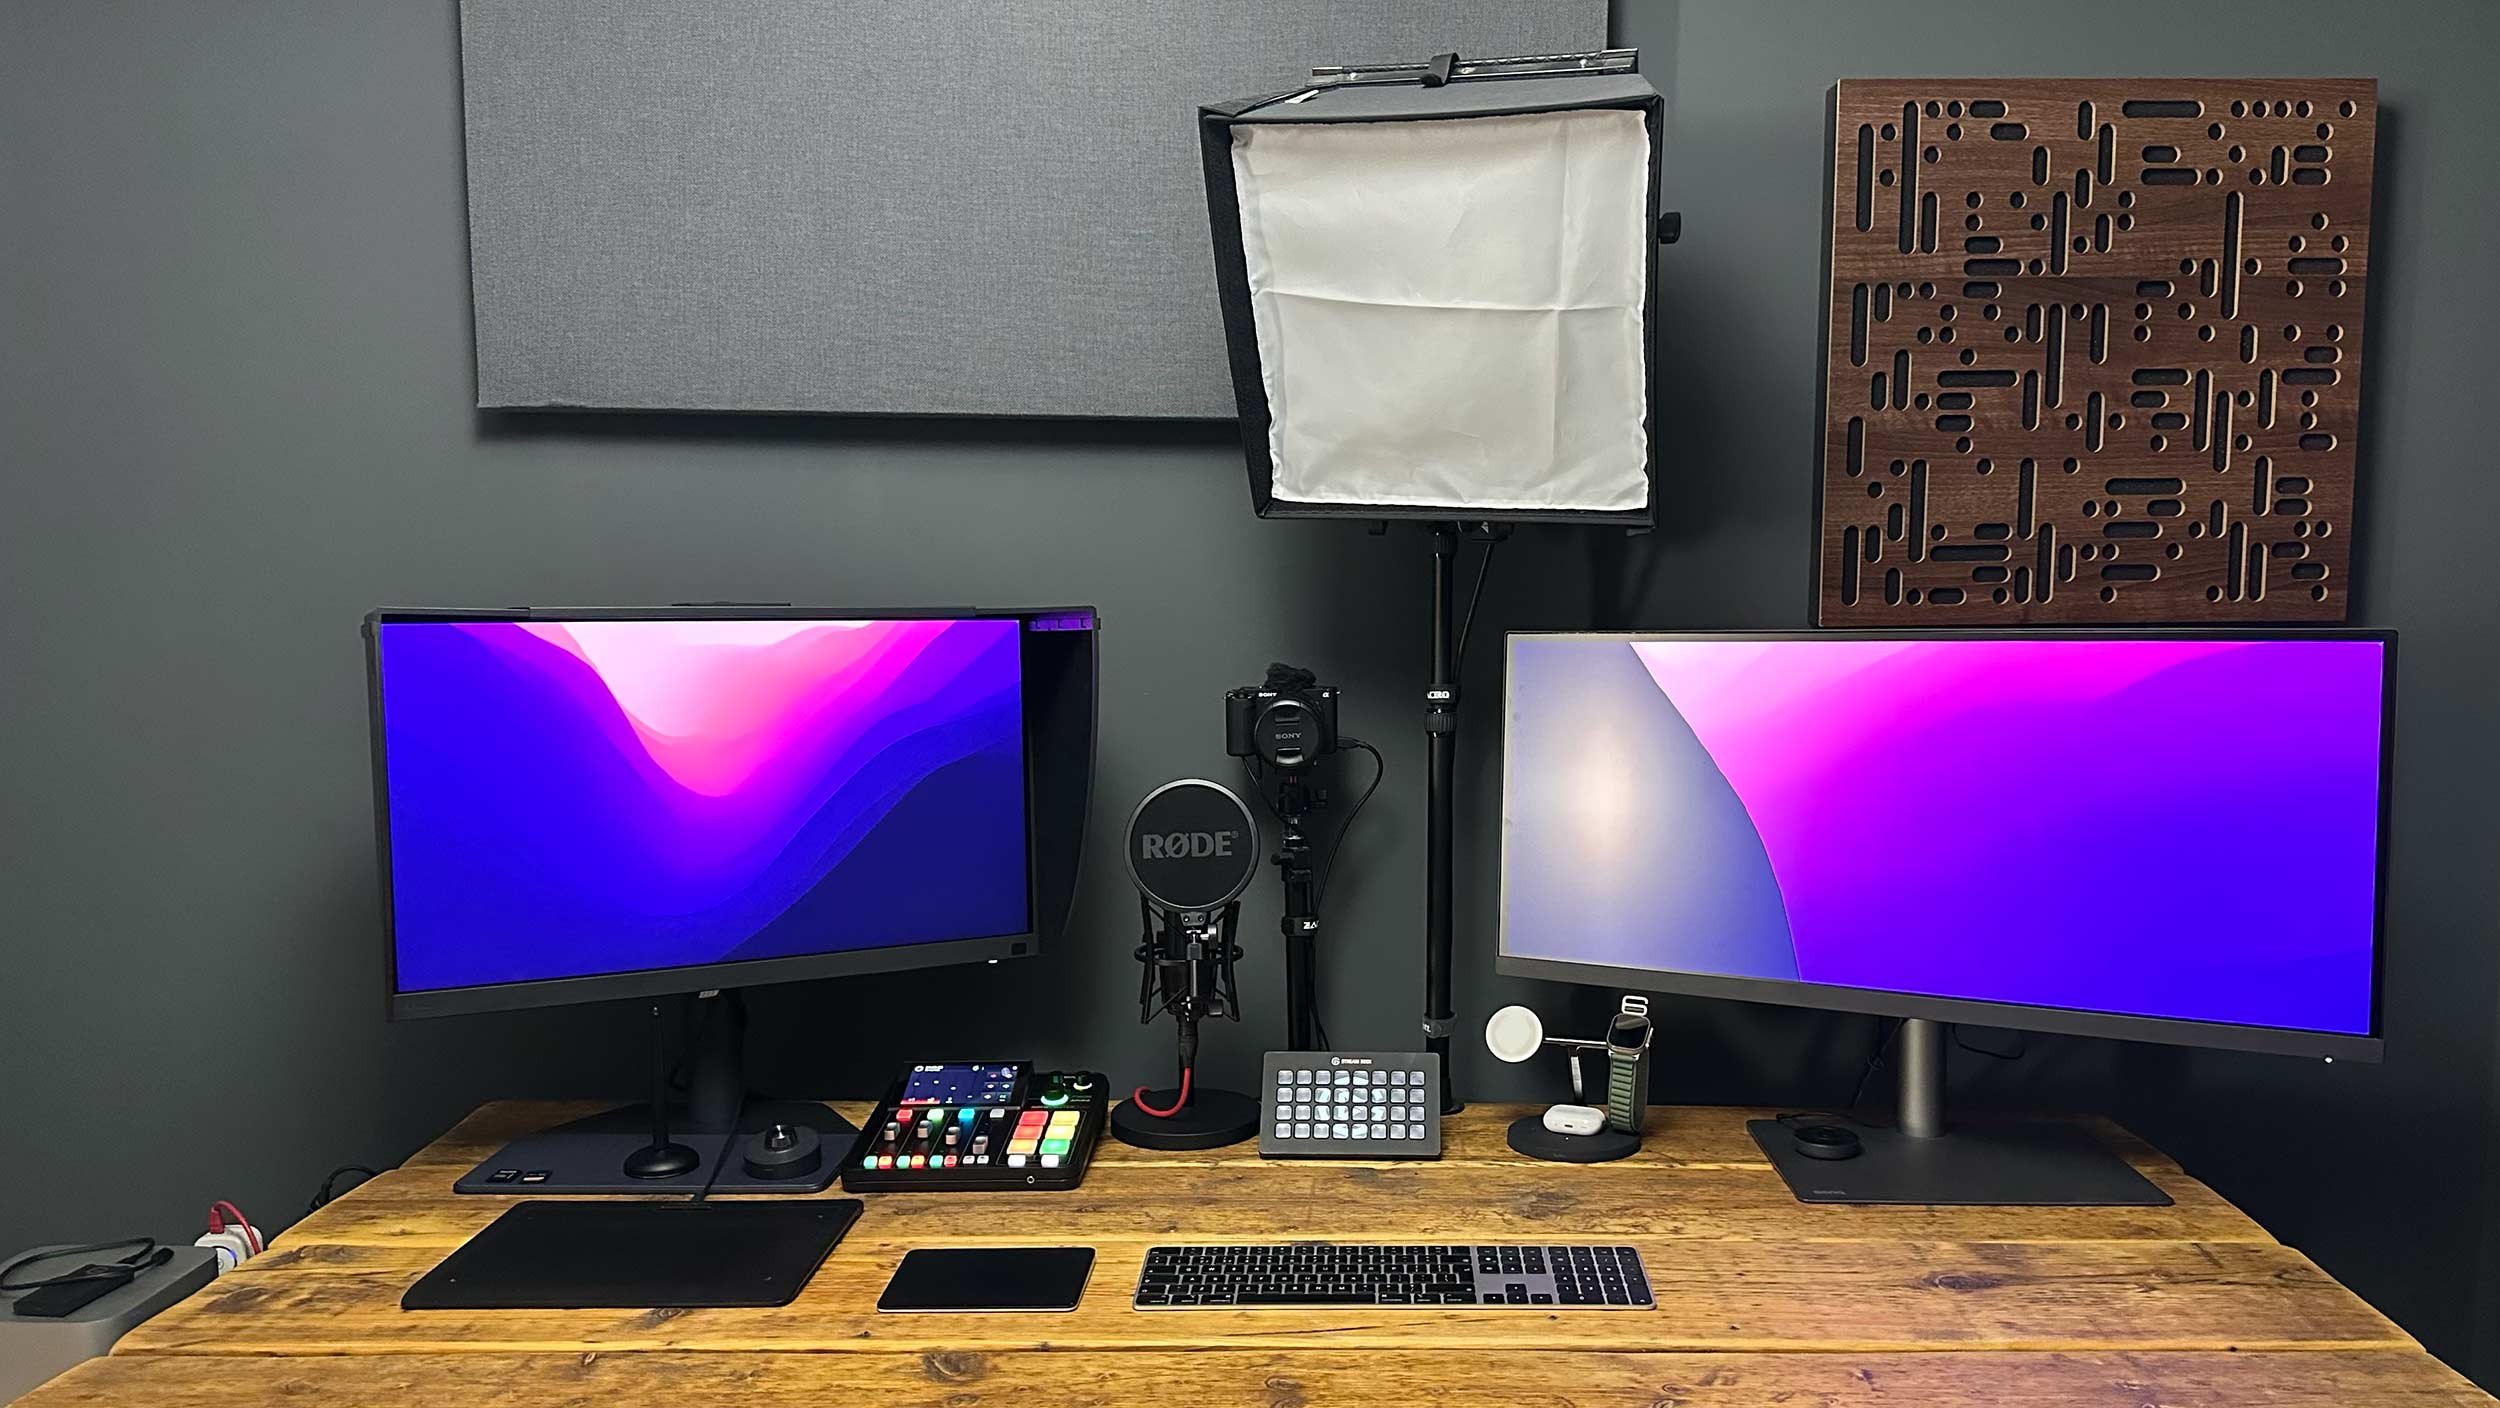
My NEW Desktop / Workspace Set Up for Photography , Content and LIVE Streaming

Moving house recently was a great excuse for a revamp of my workspace with also now having a new bespoke made desk from my friend Mark Baber.

I often get asked about what computer I use and what monitor / display, so with a few new additions including a 2nd display and new acoustic panels, this is what I’m working iwith day to day and never lets me down …

COMPUTER

Midway through last year my turbo charged iMac unexpectedly died on me. Nothing and no-one could bring it back to life. 

Thankfully this wasn’t an inconvenience as opposed to a disaster because nothing is stored on it other than the software I use … and all of that is easily installed again as it’s all held online. All my files (video, photo etc) are all stored on an external hard drive system and a number of cloud based services too.

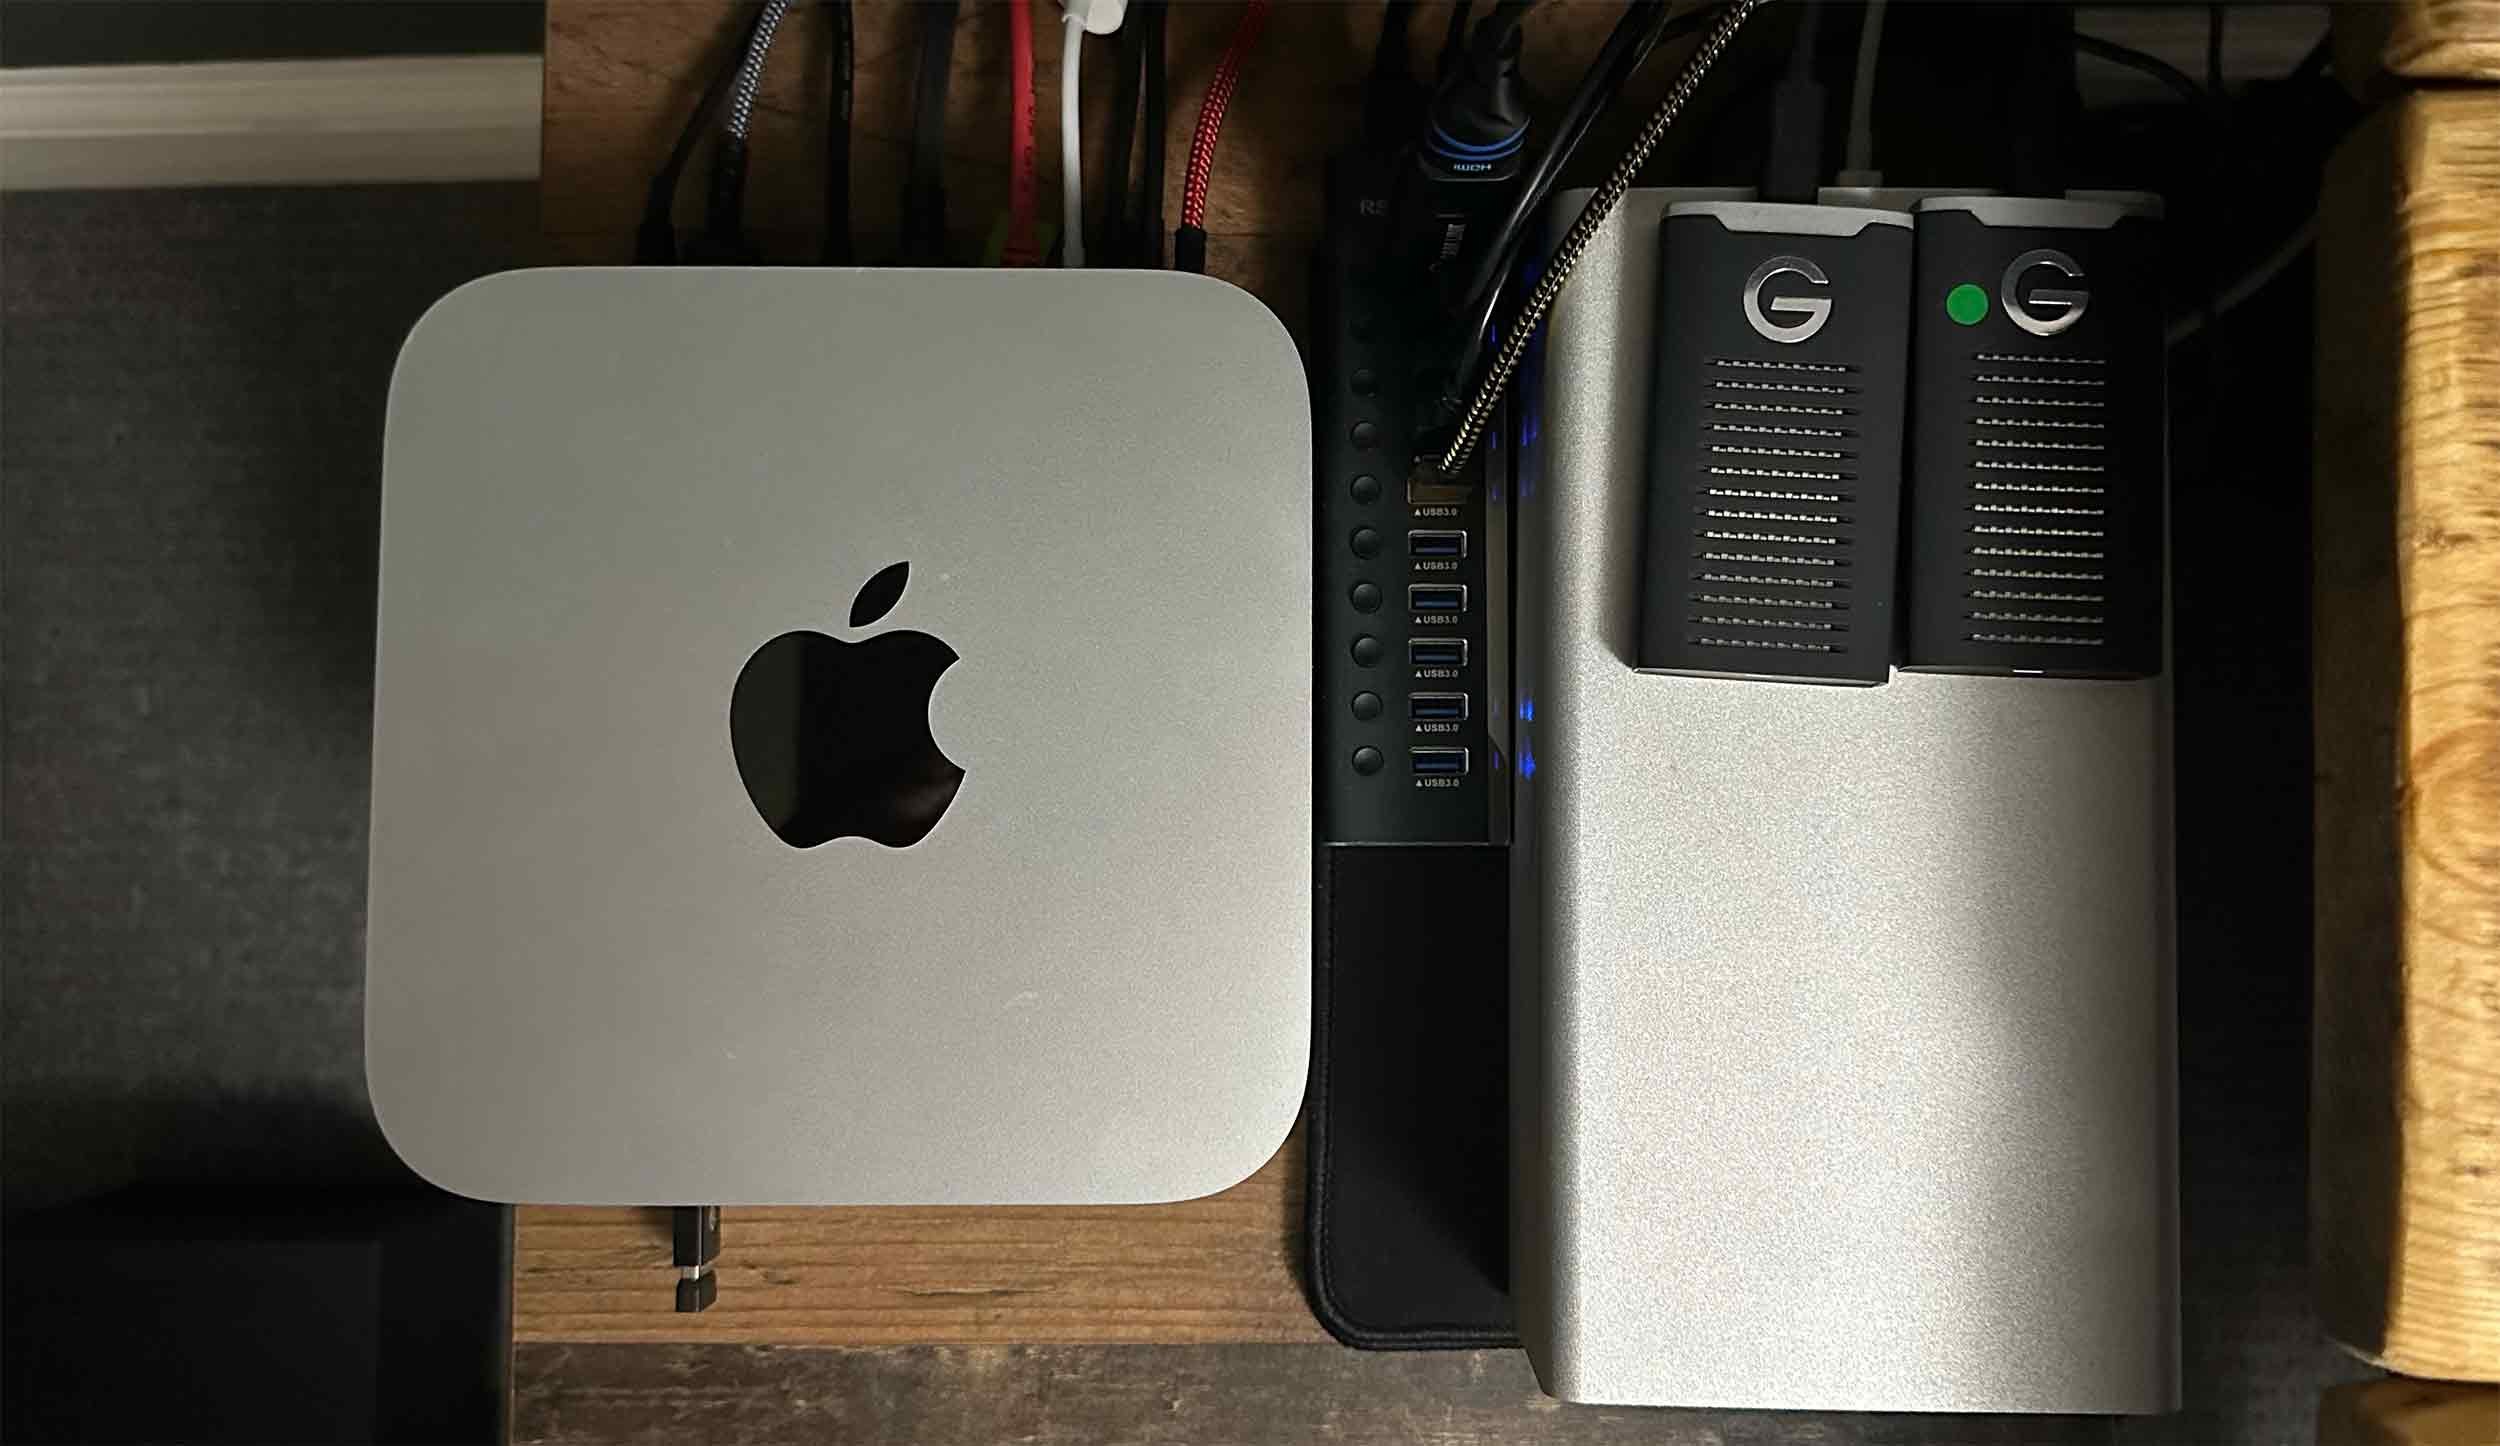
Before the iMac was no more, for some time I had been looking into the M1 Apple Studio and had couldn’t decide to go for either the Max or the Ultra … and then there was question of what upgrades to go for.

However due to the iMac’s demise being all of a sudden, I couldn’t wait for an upgrade … I needed something straight away so ended up going to a local Apple Store and picking up an ‘off the shelf’ spec M1 Mac Studio Ultra and I have to admit I’m so glad it worked out this way.


I do A LOT of video editing, photo editing and motion graphics and not once has the Apple M1 Studio missed a beat or left me waiting. It works a treat. It’s fast and it’s silent. Unlike some folks saying they experience a high pitch noise, I wouldn’t know mine was on if i didn’t look at the displays I have connected into it.

Displays

The NEW and my latest display is the SW 272U from BenQ.

27” display, 4K , 90W USB-C Photographer Monitor / Display. 99% Adobe RGB, Fine Coating Panel with TUB Anti Relfection (which works an absolute treat) , Wireless Hot Key Puk and a whole lot more.

This is my workhorse and what I use for ALL photography / image editing. Colours are absolutely spot on! The included shade works great along with the anti relfection screen meaning no matter what angle or lighting conditions, you still see the colours, contrast and details as they should be. The position of the SD Card slot makes it extremely easy and convenient to use, the wireless Hot Key Puk is being used more than any other puk I’ve had with previous model displays and the faux leather material on the base, although it might not seem like a bigge, makes a huge difference being able to store / rest items on it as they no longer slide off.

BenQ SW272U

My 2nd disdplay is the BenQ PD3420Q which is an ultra wide 34” 21:9 display.

So much I could say about this but just for starters it’s Mac Ready, 100% sRGB and 97% P3 Colour Space with IPS Technology and much more.

This thing is my ‘everything except photography’ workhorse. I use it for video editing, live streaming, the occasional bit of gaming, writing, browsing the net, watching Netflix … it’s an all-round creative display that also happens to look great too.

BenQ PD3420Q

Using this as a 2nd display couldn’t be simpler; I just connect a USB-C cable from my SW321C into it and that’s it…done!

•On the subject of displays, as an AQColor Ambassador I am able to help with the purchase price of a new display in the SW or PD range.

If you’d like to know more just drop me a message using the form on my CONTACT page or Direct Message me on social media (Fcebook , Instagram , Twitter )

*NOTE … If you’re thinking of investing in a BenQ Display, as an Ambassador I’m in the fortunate position to be able to help out withe the cost so if you’d like to know more, feel free to get in touch using my CONTACT page.


lighting

The main video light I use is from Westcott … the Flex Cine 1’ x 1’ which includes a flexible LED mat, dimmer, AC power adapter, grip head, yoke mount, Scrim Jim Cine frame, and hard diffusion panel. This entire 1-light setup packs neatly in the provided travel bag.


printer (PHOTOGRAPHY)

I absolutelty LOVE this printer … the Canon imagePROGRAF Pro 300

With my BenQ SW321C display correctly calibrated and using the ICC Profiles for the paper I use, every single print that comes off this thing is on the money be it colour or black and white. Simply stunning!


PRINTER (EVERYTHING ELSE)

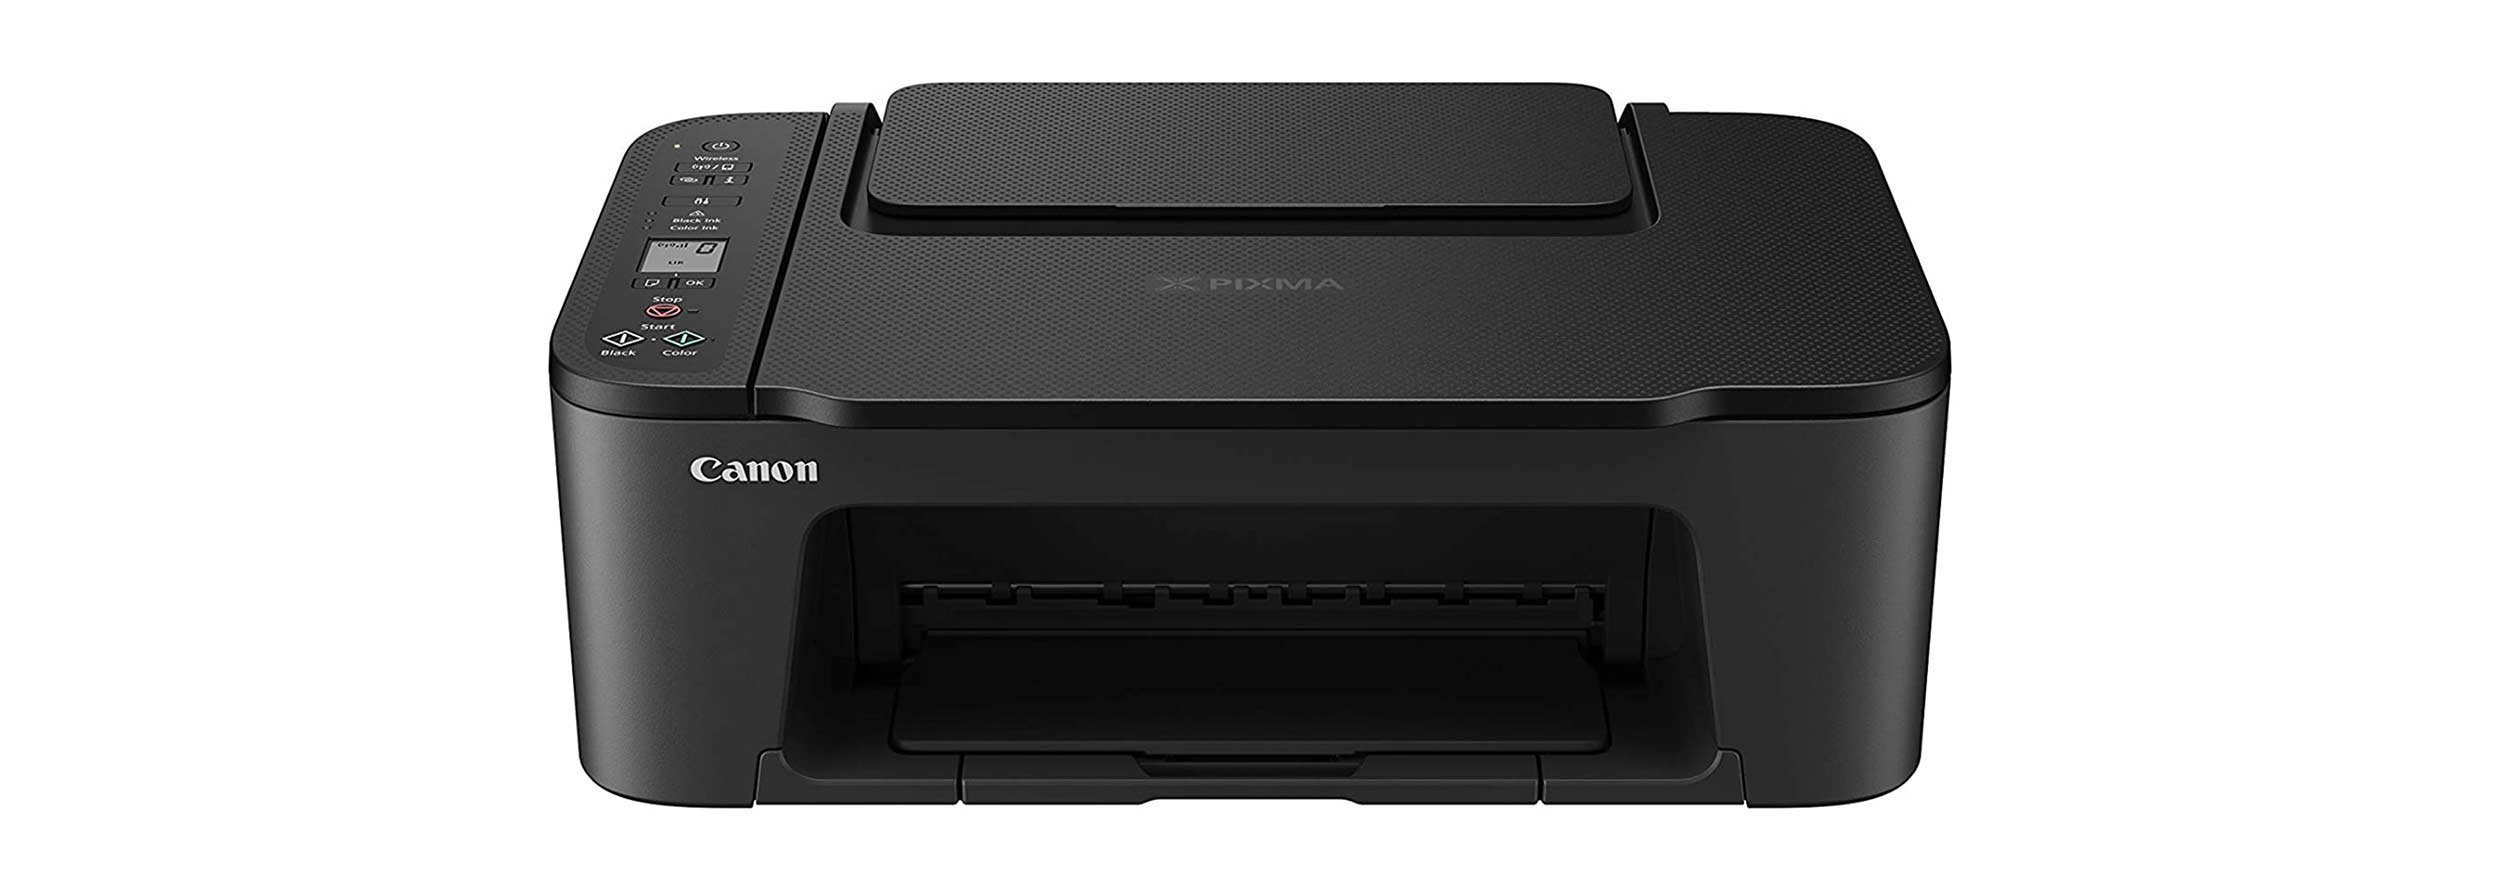
The printer I use for everything else is the Canon PIXMA TS3450. Small, light and just works! Very quick and easy to set up sand the printing speed and quality is great. Veey happy with it. Nothing more to say 😃


storage

How I store files and backup has changed so many times over the years but never has it been so streamlined as it is now.

I use one 8TB G Tech Unit and this is where all my files (photo / video) are stored and this is backed up each and every day to Backblaze, Dropbox and Amazon as is my main computer .. but other than software there’s very little I store on that.

I also use two Sandisk Professional G-Drive SSD (I TB each) … one that holds my Lightroom Catalog (which is also backed up each day) and the other is used as Time Machine.


UPS

Uninterruptable Power Supply … I wouldn’t / couldn’t work without this! Living as we did in the countryside the amount of power cuts and surges was astounding but this unit didn’t miss a beat and just kept everytihng running until the power came back on, which at one point was over 10 minutes. Any longer than that and the UPS is able to close down the computer safely.


APC by Schneider Electric Back-UPS BX - BX1400UI - Uninterruptible Power Supply

If you don’t have one, I HIGHLY recommend you consider investing in a unit.


CAMERA / Webcam

Damn, I LOVE this camera!

The Sony ZV-E1 is basically a shrunken down (and twice the price) Sony FX3!

Full Frame, 4K 120fps, insanely good in-body image stabilisation, fabulous image quality and Subject Recognition and A.I. Focus Tracking that is incredible!

I got this first and foremost for filming content whilst out and about, but this thing works so good as a webcam too. With it being a small form factor, unlike the FX3 it doesn’t have an internal fan, but this is no problem at all when using as a webcam if you use a ‘dummy battery becuase then it will just keep on going and going. ALWAYS gets a comment when I’m doing a LIVE broadcast!


Microphone

The RØDE NT1 (5th Generation) … Can’t go wrong with RØDE so after a few years of using a different brand, I was drawn back when this updated model was released.

Studio / Broadcast quality. Does what it says on the tin and no wonder the NT1 has become the industry standard over the years!


AUDIO INTERFACE

The RØDE RØDECaster Duo

Originally I used a simple audio interface for connecting the XLR cable from previous microphone, but this is on a whole different level.

As the description say this is an All-in-One production solution for Podcasting, Streaming, Music Production and Content Creation. It does so much but in a really simple, tactile way. With the inbuilt processing this has saved me a ton of editing time removing breaths, working on audio in Adobe Audtion to enhance voice and so much more. Also when LIVE Streaming being able to easily control all aspects of audio makes the whole process so much more manageable and enjoyable.


Headphones

If I’m editing, watching YouTube, Netflix etc and anything else other than LIVE video, I use the Sony MDR-7506.

Super comfortable and great sound.

When I’m doing LIVE video ( presenting / zoom etc ) then I use my Apple Aipods Pro 2nd Gen.


Streamdeck XL

This thing is invaluable! 32 keys that you can programme to perfrom any number of taks depending on the software you’re using but it really shines when doing LIVE presentations such as on YouTube.

Streamdeck XL from Elgato


Being able to pre programme buttons to turn cameras on and off, microphones on and off, play video, play trailes, show images, start and stop the broadcast and so on, makes it so much more manageable; it literally is like having a team of people working with you by just pressing a button.

Pen tablet

I used to use Wacom but now I use this Medium Pen Tablet from Xencelabs; reliable, well made, does what it says on the tin 😃

In fact, here’s a video I did for my YouTube Channel about it …


Other Stuff I wouldn’t be without

Apple M2 iPad Pro 12.9”

I use this every single day without fail. So increibly useful … superb for tethering too when using CaptureOne.

Belkin Boost Charge Pro 3-in-1 Wireless Charging Stand

Not only handy because it charges my iPhone, Apple Watch and Airpods, but because it’s a stand I can see the time on my watch and notifications come through on my phone as I’m working. Might not sound like much but having everything in one place and charging for me is just so useful.

So that’s the main kit I’m now using for all my photography, video, live streaming and general day to day.

For other kit that I use I’ve listed pretty much all of it over on my GEAR page.

Anyway, thought I’d give you an update seeing as things have changed a bit over the last few months.

Cheers,
Glyn