adobe

ðŸŠĶ Is Adobe Killing Lightroom with Topaz?

A few days ago I posted a video about the latest Lightroom update, version 9.2, and one of the big headlines was the new generative upscale feature powered by Topaz Gigapixel. A lot of people were excited about it, and honestly, so was I at first. But now that the dust has settled, I've had a chance to really sit with it, and I'll be straight with you: something feels off.

I've been going through your comments and doing a lot of thinking, and there are a few things here that I just can't get past.

Are We Really Going Backwards on Non-Destructive Editing?

The non-destructive workflow is one of the things that makes Lightroom so brilliant. We've reached a point where we can do masking, lighting adjustments, special effects, all without ever leaving the app or touching the original file. It's genuinely impressive how far it's come.

But this Topaz integration throws a spanner in the works. It basically puts a full stop on your edit and spits out a brand new file, which is a destructive process. And here's the thing, we've been here before. Remember when Super Resolution had the same problem? Adobe actually listened back then and sorted it so we weren't drowning in extra DNG files. So why are we going in the opposite direction now?

Innovation or Just Outsourcing?

Adobe is supposed to be leading the way in creative software. They already have Super Resolution, and it works well. So rather than pushing that further, say, allowing a proper 4x upscale, they've decided to hand it off to a third party instead.

That doesn't feel like innovation to me. It feels like taking the easy route. Especially when you consider the price increases we've seen recently. You'd expect that extra revenue to go towards building better, more seamless tools, not just bolting on someone else's technology and calling it a feature.
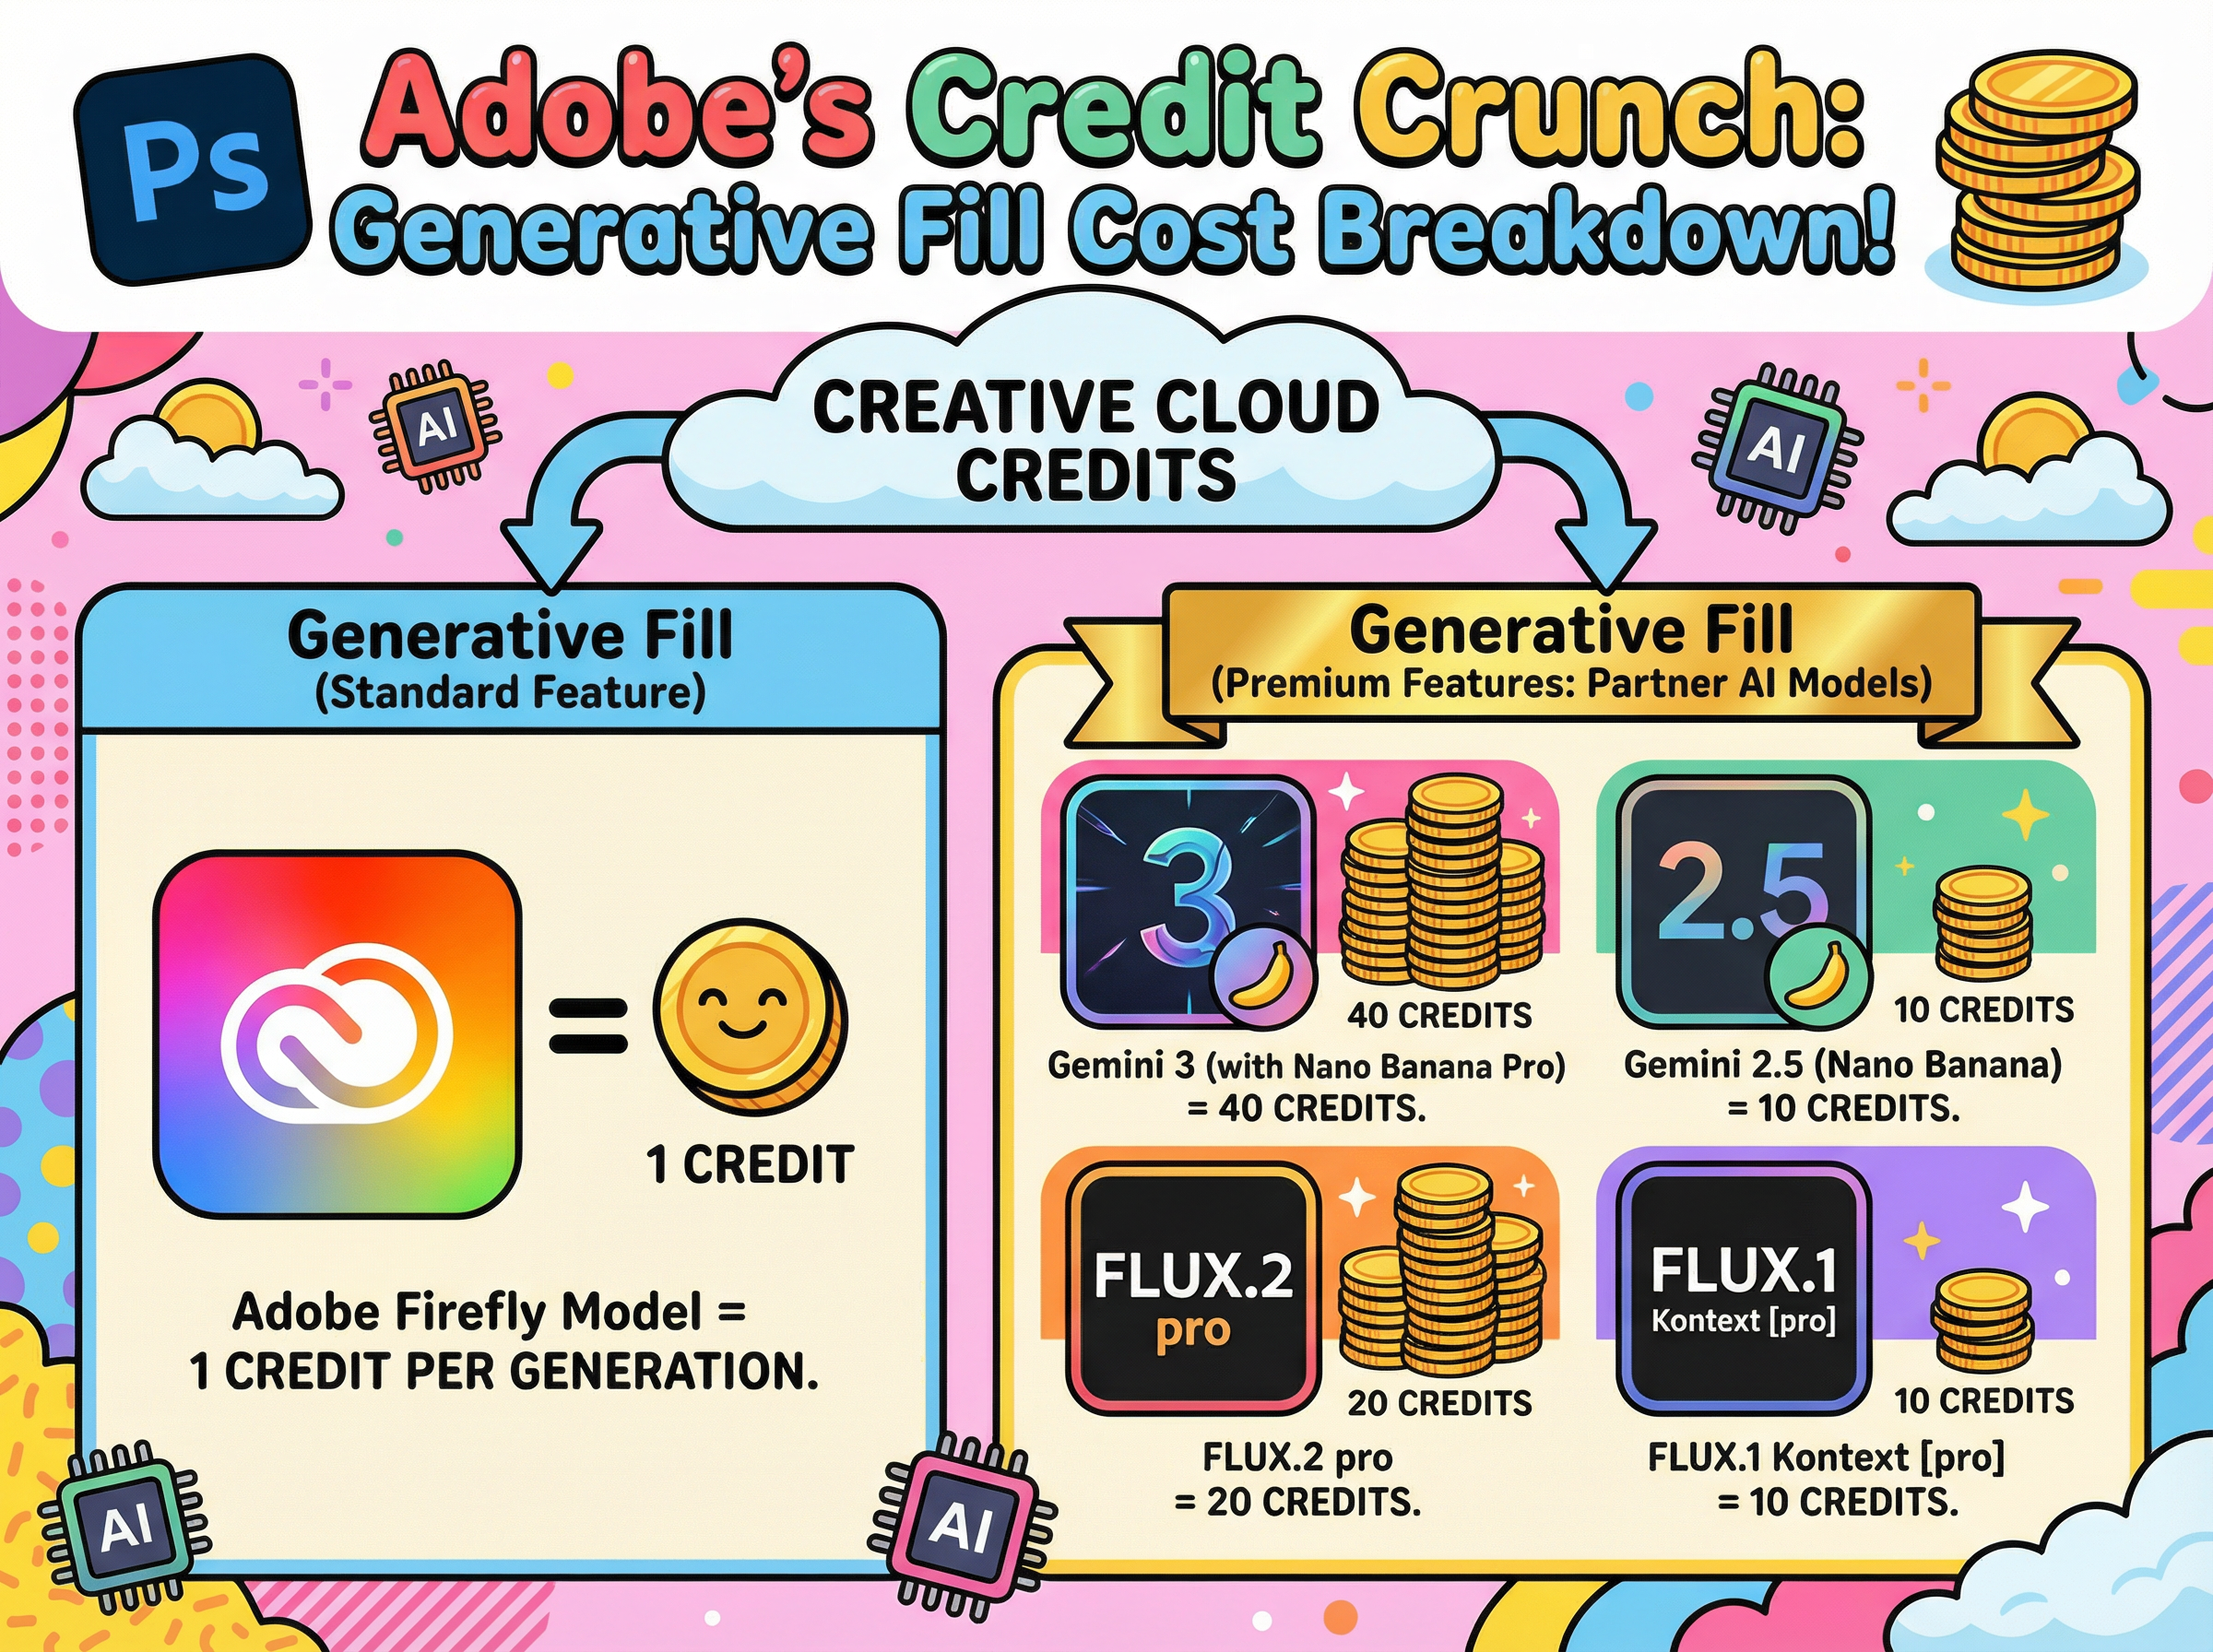
The Credits Problem

This is the bit that really gets me. The version of Topaz built into Lightroom is incredibly stripped back compared to the standalone app. There's no preview, barely any controls, and it costs you generative credits every single time you use it.

Compare that to the standalone Topaz app, where you get a proper preview, far more control, and unlimited upscales as part of your monthly subscription. In Lightroom, you're essentially guessing and spending credits to find out whether the result is even usable. It makes you wonder whether this is genuinely designed to improve your workflow or whether it's just another way to drive credit sales.

Let's Not Lose Sight of What Matters

I'm a big fan of AI and what it can do for our editing. It can save time, open up new possibilities, and make certain jobs a lot easier. But it should be a tool that supports your creativity, not a shortcut that sidesteps it.

Lightroom has always been a platform I've championed, and I still believe in what it can be. But moves like this make it harder to recommend with a straight face. I don't want to see it turn into a hub for third-party plugins that slowly bleed you dry with credit charges.

I've built my career on Adobe software and I'll always back it when it deserves it. But I also think it's important to say something when things don't feel right.

So Adobe, if you're paying attention: we know what you're capable of. Give us tools that respect the way we work, rather than features that complicate it. And in the meantime, if I run out of credits, I'll quite happily go back into Photoshop and rely on the traditional skills that have served me well for years. AI is a brilliant tool. But it's not the whole craft.

Generative Upscaling using Topaz Gigapixel now in Lightroom

Adobe Lightroom version 9.2, released on 20th February 2026, brings with it a significant new feature: generative upscaling powered by Gigapixel from Topaz Labs.

If you've ever needed to enlarge an image whilst maintaining sharpness and clarity, this update is going to be very welcome indeed.

Here's a comprehensive look at what it does, how to use it, and what you need to know before you get started.

What Is Generative Upscale with Gigapixel?

Generative upscale is an AI-powered image enlargement tool built directly into Lightroom, using technology from Topaz Labs' well-regarded Gigapixel application. It works by analysing your image and intelligently increasing its resolution, improving quality, sharpness, and clarity in the process. The key advantage over Lightroom's existing super resolution feature is both the degree of upscaling available and the range of file formats it supports.

How Does It Differ from Super Resolution?

Lightroom has offered super resolution for some time, but it comes with two notable limitations: it only upscales by 2x (200%), and it only works on RAW files. The new Gigapixel-powered generative upscale removes both of those restrictions. You can now upscale by either 2x or 4x, and crucially, it works on RAW files and other file formats too, making it far more versatile.

How to Access Generative Upscale

There are three ways to access the feature within Lightroom:

From the menu bar, go to Photo and select Generative Upscale. Alternatively, right-click on your image in the editing view and choose Generative Upscale from the context menu. You can also right-click on a thumbnail in the grid view to find the same option.

What Happens When You Upscale?

Once you select generative upscale, a dialogue box appears showing your upscaling options (2x or 4x), along with the resulting pixel dimensions and file size in megapixels. You'll also see how many generative credits the process will consume, and a real-time display of your current monthly generative credit balance, which is a very handy addition.

The processing itself takes place in the cloud, regardless of whether your images are stored locally or in Adobe's cloud. This means an active internet connection is required every time you use the feature. In testing, the process took around 30 seconds, though this will depend on your connection speed.

Once complete, the upscaled image is saved as a new DNG file alongside your original. This is an important point: no matter what file format you send for upscaling, the returned file will always be a DNG. The filename will reflect that Gigapixel was used and will indicate the upscaling factor applied (2x or 4x).

An Important Tip: Edit First, Then Upscale

This is perhaps the most important thing to be aware of when using generative upscale. When the upscaled DNG file is returned, all of your existing Lightroom edits, including masks and adjustments, are baked into it. The new file will not retain any editable Lightroom settings. For that reason, you should always complete your editing first before running the upscale. The good news is that your original edited file is preserved, so you will always have access to make further adjustments to it should you need to.

Generative Credits

Using generative upscale consumes generative credits from your monthly allowance. The cost is either 10 or 20 credits, depending on the size of the output, with a maximum of 20 credits per upscale. The dialogue box shows exactly how many credits will be used before you commit, and you can see your remaining balance at the same time.

The Stacking Option for Cloud Images

If you are working with images stored in Adobe's cloud, there is one additional option available: the ability to create a stack. Rather than the upscaled file appearing as a separate thumbnail alongside your original, it will be grouped together with it as a stack, keeping your library neat and organised. This option is not available for locally stored images.

Maximum Output Size

The maximum output size is an impressive 65,000 pixels on the longest edge, making this suitable for very large print work indeed.

Where Generative Upscale Is Most Useful

This feature is particularly well suited to a number of scenarios. It's excellent when you've made a significant crop to an image and want to recover detail and sharpness in the enlarged result. It can also be used to improve low-resolution scans, or to breathe new life into images from older cameras with lower megapixel counts.

Quick Summary of Key Points

  • Available in Lightroom version 9.2 and later

  • Powered by Topaz Labs' Gigapixel technology

  • Upscale options: 2x or 4x

  • Works on RAW files and other file formats (unlike super resolution)

  • All processing is done in the cloud; an internet connection is required

  • Returns a new DNG file regardless of the original format

  • Consumes 10 or 20 generative credits (maximum 20 per upscale)

  • Maximum output: 65,000 pixels on the longest edge

  • Edits are baked into the upscaled file, so always edit first

  • Stacking option available for cloud-stored images

  • Your original file is always preserved

For photographers looking to get the most from their images, whether recovering detail from a tight crop or improving older files, this is a genuinely useful addition to Lightroom's toolkit.

Reality vs Photoshop - Is Faking It Cheating? ðŸĪ·â€â™‚ïļ

Car photography always looks that little bit more dramatic when there's a wet road reflection underneath the vehicle. But what do you do when the road is bone dry? In this guide, I'll walk you through two ways to fake a puddle reflection in Photoshop -- one traditional, one powered by AI -- and then I'll leave you with a question worth thinking about.

Method One: The Manual Approach

Step 1: Select the Car

Start by grabbing the Object Selection tool from the toolbar. In the options bar at the top of the screen, make sure the mode is set to Cloud for the best possible result, then click Select Subject. Photoshop will do a surprisingly good job of selecting the car in just a moment or two.

Step 2: Copy the Car onto Its Own Layer

With your selection active, press Command + J (Mac) or Control + J (Windows) to copy the car up onto a new layer. If you toggle every other layer off, you should see just the isolated car sitting cleanly on a transparent background.

Step 3: Flip It Upside Down

Go to Edit > Transform > Flip Vertical. This flips the car layer to create the basis of your reflection. Now grab the Move tool, hold down Shift (to keep movement perfectly vertical) and drag the flipped car downwards until the tyres of both the original and the reflection are just touching.

If things look slightly off-angle, go to Edit > Free Transform, move your cursor just outside the bounding box until you see the rotation cursor, and give it a gentle nudge until it lines up properly.

Step 4: Add a Black Layer Mask

Rename this layer "Reflection" to keep things tidy. Then, holding down Option (Mac) or Alt (Windows), click the Layer Mask icon at the bottom of the Layers panel. This adds a black mask that hides the layer entirely -- which is exactly what you want for now.

Step 5: Draw the Puddle Shape

Select the Lasso tool and make sure you click directly on the layer mask thumbnail (you should see a white border appear around it, confirming it's active). Now draw a rough, freehand puddle shape beneath the car's tyres -- it doesn't need to be perfect, natural-looking and irregular is actually better here.

Step 6: Fill with White to Reveal the Reflection

Go to Edit > Fill, set the contents to White, and click OK. The reflection will now appear only within the puddle shape you drew.

Step 7: Soften the Edges

Zoom in and you'll notice the puddle edge looks very sharp and unnatural. To fix that, go to Filter > Blur > Gaussian Blur and apply just a small amount -- around 3 pixels is usually enough. This softens the boundary and helps the reflection blend into the ground convincingly.

Finally, you can reduce the opacity of the Reflection layer slightly to make the whole thing look a little more subtle and true to life.

Method Two: Using Adobe Firefly's Generative Fill

If you want a quicker and arguably more realistic result, Photoshop's AI tools can do a remarkable job here.

Step 1: Load the Puddle Selection

Hold Command (Mac) or Control (Windows) and click directly on the layer mask from your first reflection layer. This loads the puddle shape back as an active selection, saving you from having to draw it again.

Step 2: Select the Background Layer

Click on the main image layer, so that Generative Fill works on the background rather than the reflection layer.

Step 3: Run Generative Fill

In the contextual taskbar, click Generative Fill and type a prompt along the lines of: a reflection of car in puddle of water. For the AI model, select Firefly (specifically the Firefly Built and Expand model released in January 2026). If you're on a Creative Cloud Pro account, this won't cost you any credits -- whereas models like Flux or Nano Banana can use anywhere between 20 and 30 credits per generation.

Click Generate.

Step 4: Choose Your Favourite Variation

Firefly will produce three variations for you to compare. Have a look through them and pick the one that looks most convincing. You'll likely notice that the AI does something quite clever: it reflects the sky in the puddle on the far side of the car, just as real water would. Achieving that manually in Photoshop would take considerably more time and effort.

Which Method Should You Use?

For a quick, dirty result, the manual method works well and gives you full control. But for something that genuinely looks like a photograph taken on a wet road, the AI approach is hard to argue with -- particularly because of how naturally it handles the environmental reflections in the water.

A Question Worth Thinking About

Here's something to consider. When photographing that car, there were really two options: bring bottles of water to pour around the car and create a real puddle on the dry road, or add the reflection later in post-production, either manually or with AI.

Both approaches result in a reflection that wasn't originally there. The only difference is when in the process you add it.

So what do you think -- is there a meaningful ethical difference between physically creating something on location and digitally adding it afterwards? When it comes to reflections specifically, does it matter?

Let me know your thoughts in the comments below.

How Many Generative Fill Credits do you have left? ðŸĪ·â€â™‚ïļ

When I publish a new video on my YouTube Channel, one of the comments I often see is ...

"We should be able to see how many credits we have left when we use the AI in Photoshop"

So, this week I've recorded a short video showing exactly how you can ✅

Hope it's useful
Cheers
Glyn

✅ Photoshop JANUARY 2026 - Everything NEW ðŸ’Ĩ

Adobe dropped Photoshop 27.3.0 on the 27th January, and for once it's not just AI hype and features nobody asked for. This update brings some genuinely useful stuff that photographers and editors have been requesting for years.

Camera Raw tools finally join the party

The headline features are 2 (actually 3) new Adjustment Layers: Clarity & Dehaze and Grain.

If you've ever wanted to use Clarity or Dehaze without opening Camera Raw or converting to a Smart Object, your prayers have been answered. They now work exactly like Curves, Levels or any other adjustment layer. You can mask them, adjust opacity, change blend modes, and they stay fully editable in your PSD.

Clarity is brilliant for adding punch to textures and details in your midtones without blowing out highlights or crushing shadows. Dehaze cuts through atmospheric haze (or adds it if you reverse the slider), and having it as an adjustment layer means you can apply it selectively with a mask.

Grain gets the same treatment. Want to add film-style texture to knock the digital edge off a super-clean file? Chuck a Grain adjustment layer on top, dial it in, and you're done. It's particularly good for black and white work or vintage treatments.

The AI tools are growing up

On the generative side, things have improved quite a bit.​

Generative Fill and Generative Expand now output at up to 2K resolution, which means extended canvases and filled areas look far less mushy and hold detail much better. Adobe has also added model selection, so you can pick the Firefly version that best suits what you're doing.

The real game-changer is Reference Image support in Generative Fill. You can now feed Photoshop a reference photo and it'll try to match the lighting, colour and structure when generating new content. This is massive for compositing work or keeping a series of images consistent.

The Remove tool has also been quietly upgraded. It does a much cleaner job removing objects and people, with fewer obvious smears and repetitive patterns. In most cases you'll get a usable result without needing to follow up with Clone Stamp or Healing Brush.​

Why this one matters

This isn't a flashy update, but it's the kind that actually changes how you work.

Having Clarity, Dehaze and Grain as proper adjustment layers keeps everything inside Photoshop's layer stack where it belongs. No more jumping between Camera Raw, no more Smart Objects eating up file size, no more destructive edits.

The AI improvements make the generative tools feel less like tech demos and more like something you'd actually use in client work. Higher resolution output and better reference matching mean you can rely on them for real projects, not just Instagram experiments.

If you're on Creative Cloud, the update should already be available. The new adjustment layers live in the standard Adjustments panel alongside everything else. Well worth checking out, especially if you shoot landscapes, architecture or do any kind of composite work.​

Photoshop Acting Weird? Fix These 3 Simple Settings ✅

If Photoshop seems to be behaving odd when moving images around and zooming in, in this video I show how to easily fix it and get back control â€Ķ

🙅🏞‍♂ïļ How to NEVER forget your Photoshop edits again ✅

I have lost count of the times I have finished an edit, loved the result, and then completely forgotten how I actually got there.

In this video, I am showing you a simple trick using the Photoshop History Log and AI to create a perfect, step-by-step record of every single move you make.

No more guessing which filter you used or what that specific slider value was; it’s like having a digital assistant write your editing recipes for you while you work.

What I cover:

✅ How to turn on the hidden History Log in Photoshop.
✅ Exporting your editing steps as a simple text file.
✅ Using a clever AI prompt to turn that messy log into a clear workflow.
✅ Why this is a game-changer for your consistency and learning.

Come on Adobe 🙏ðŸŧ We NEED THIS FEATURE ⚠ïļ

I've put together this short video because I need to ask a favour from anyone who uses Photoshop Camera Raw or Lightroom. There's a fundamental feature that's been missing for years, and it seriously impacts how we edit our images and the results we achieve.

The Missing Piece in AI Masking

The issue centres on masking, specifically the AI-generated masks available in the masking panel. Being able to select a sky or subject with one click is genuinely incredible, but there's a massive gap in functionality. We have no way to soften, blur, or feather those AI masks after they've been created.

Instead, we're left with incredibly sharp, defined outlines that sometimes look like poorly executed cutouts. This makes blending our adjustments naturally into the rest of the image much harder than it needs to be.

Years HAVE PASSED

Adobe introduced the masking panel back in October 2021. It changed the way we work and represented a huge step forward. Yet here we are, years later, still without a simple slider to soften mask edges.

If you want to blend an adjustment now, you're often stuck trying to subtract with a large soft brush, using the intersect command with a gradient, or employing other crude workarounds to hide the transition. It feels like excessive work for what should be a standard function.

The Competition Gets It Right

What makes this even more frustrating is seeing other software solve this problem elegantly. The new Boris FX Optics 2026 release includes AI masking controls where a single slider softens and blurs the mask outline, and it works incredibly well. Luminar has been offering this functionality for quite a while too.

These tools understand that a mask is only as good as its edges. When the competition provides ways to feather and refine AI selections, the absence of this feature in Adobe's ecosystem feels glaringly obvious.

Adobe's Strengths and Opportunities

Don't get me wrong. I appreciate that Adobe constantly pushes boundaries. We've witnessed tremendous growth over recent years, with developments from third-party AI platforms like Google's Gemini, emerging models, and innovations from Black Forest Labs with Flux and Topaz Labs. It's an exciting time to be a creator.

But I wish Adobe would take a moment to polish what we already have. Adding flashy new features is great, but refining the core workflows we use every single day would be a massive leap forward for all of us.

How You Can Help

Rather than simply complaining about this issue, I've created a feature request post in the Adobe forums. It's been merged with an existing thread on the same topic, which actually helps consolidate our voices into one place.

Here's what I need you to do: click the link below to visit the post and give it an upvote by clicking or tapping the counter number in the upper left. If we can get enough visibility on this, Adobe might finally recognise how much the community wants and needs this feature.

( LINK )

I believe refining existing tools is just as important as inventing new ones. Thank you for taking the time to vote. It really does make a difference when we speak up together.

What Are Those Mystery * and # Symbols in Photoshop??? ðŸĪ”

If you spend any amount of time in Adobe Photoshop, you become very familiar with the document tab at the top of your workspace. It tells you the filename and the current zoom level.

But sometimes, little cryptic symbols appear next to that information. Have you ever looked up and wondered, "Why is there a random hashtag next to my image name?" or "What does that little star mean?"

Nothing is broken. These symbols are just Photoshop's way of giving you a quick status update on your file and its colour management, without you needing to dig through menus.

What These Symbols Tell You

The symbols represent:

  • The save state of your document

  • Whether it has a colour profile attached

  • Whether the document's profile differs from your working space

Here is a quick guide to decoding those little tab hieroglyphics.

1. The Asterisk After the Filename ("Save Me!" Star)

What it looks like: â€Ķ (RGB/8) *

What it means: An asterisk hanging right off the end of your actual filename means you have unsaved changes.

When it appears: Photoshop is hypersensitive here. The star will appear if you:

  • Move a layer one pixel

  • Brush a single dot onto a mask

  • Simply toggle a layer's visibility

  • Do pretty much anything

It's a gentle reminder that the version on screen is different from the version saved on your hard drive. If the computer crashed right now, you would lose that work.

The fix: Press Cmd+S (Mac) or Ctrl+S (Windows). The moment you successfully save the file, that little star will disappear because Photoshop now considers the document "clean" again.

2. The Asterisk ("Profile Difference" Star)

What it looks like: â€Ķ (RGB/8*)

What it means: This is a different symbol in a different spot. If the star is tucked inside the parentheses next to the bit depth (the 8 or 16), it's no longer talking about unsaved work but about colour management.

In current Photoshop versions, an asterisk here generally means the file's colour profile situation does not match your working RGB setup. For example, you're working in sRGB as your default, but the image you opened is tagged with Adobe RGB (1998). In other words, the document is "speaking" a slightly different colour language than your default workspace.

Should you worry?

  • Usually, no. As long as you keep the embedded profile and your Colour Settings are sensible, Photoshop can still display the colours accurately even if the document profile and working space are different.

  • It's worth paying attention, though, if you're planning to combine several images into one document. You'll want a consistent profile for predictable colour when you paste, convert or export.

3. The Hash Symbol # ("Untagged" Image)

What it looks like: â€Ķ (RGB/8#)

What it means: If you see the hash/pound/hashtag symbol inside the parentheses, it means the image is Untagged RGB. There's no embedded colour profile at all, so Photoshop has no explicit instructions telling it how those RGB numbers are supposed to be interpreted.

Why this happens: This is very common with:

  • Screenshots

  • Many web images

  • Older files where metadata was stripped out

When Photoshop opens an untagged image, it has to assume a profile based on your Colour Settings (typically your RGB working space, often sRGB by default), which may or may not match how the file was originally created.

Should you worry?

  • If colour accuracy is critical (printing, branding, matching other assets), yes, you should pay attention to that #. Different assumptions about the profile can easily lead to differences in appearance between systems.

  • You can fix this by going to Edit > Assign Profile and choosing the correct profile. For many web-style images, assigning sRGB is a sensible starting point, but be aware that assigning the wrong profile will change how the image looks, so use it when you have a good idea of the original intent.

Summary Cheat Sheet

(RGB/8) *

  • This document has unsaved changes

  • Save the file and the star will disappear

(RGB/8*)

  • There's a colour-profile difference or related colour-management status

  • Typically means the document's profile is not the same as your current working RGB space

(RGB/8#)

  • The image is Untagged RGB, with no embedded colour profile

  • Photoshop has to assume a profile based on your settings

Choosing the Right AI Model in Photoshop: A Credit-Smart Guide

If you've opened Photoshop recently, you've likely noticed that Generative Fill has received a significant upgrade. The platform now offers multiple AI models to choose from, each with distinct capabilities. However, there's an important consideration: these models vary considerably in their generative credit costs.

Understanding the Credit Structure

Adobe's proprietary Firefly model requires only 1 credit per generation, making it the most economical option. The newer partner models from Google (Gemini) and Black Forest Labs (FLUX), however, are classified as premium features and consume credits at a substantially higher rate. Depending on the model selected, you can expect to use between 10 and 40 credits per generation.

For users looking to maximize their monthly credit allocation, selecting the appropriate model for each task becomes an essential consideration.

Firefly: Your Go-To Workhorse (1 Credit)

Firefly serves as the default option and remains the most practical choice for everyday tasks. At just 1 credit per generation, it offers excellent efficiency for routine editing work. Whether you need to remove unwanted objects, extend backgrounds, or clean up imperfections, Firefly handles these tasks effectively.

Additionally, it benefits from full Creative Cloud integration, Adobe's commercial-use guarantees, and Content Credentials support. For standard production workflows, it's difficult to find a more cost-effective solution.

The Premium Players

The partner models represent a significant increase in cost, but they also deliver enhanced capabilities. Adobe operates these models on external infrastructure, which accounts for their higher credit requirements. These models excel at handling complex prompts, challenging lighting scenarios, and situations requiring exceptional realism or fine detail.

The credit costs break down as follows:

  • Gemini 2.5 (Nano Banana): 10 credits

  • FLUX.1 Kontext [pro]: 10 credits

  • FLUX.2 Pro: 20 credits

  • Gemini 3 (Nano Banana Pro): 40 credits

All of these models draw from the same credit pool as Firefly, but they deplete it considerably faster.

When to Use What

Gemini 2.5 (Nano Banana) occupies a middle position in the model hierarchy. It performs well when Firefly struggles with precise prompt interpretation, particularly for complex, multi-part instructions. This model also excels at maintaining consistent subject appearance across multiple variations.

FLUX.1 Kontext [pro] specialises in contextual integration. It analyses existing scenes to match perspective, lighting, and colour accurately. When adding new elements to complex photographs, this model provides the most seamless integration, making additions appear native to the original image.

FLUX.2 Pro elevates realism significantly. It generates outputs at higher resolution (approximately 2K-class) and demonstrates particular strength with textures. Areas that typically present challenges, such as skin, hair, and hands, appear notably more natural. For portrait and lifestyle photography requiring professional polish, the 20-credit investment may be justified.

Gemini 3 (Nano Banana Pro) represents the premium tier at 40 credits per generation. This "4K-class" option addresses one of Firefly's primary limitations: text rendering. When projects require legible signage, product labels, or user interface elements, Nano Banana Pro delivers the necessary clarity.

A Practical Approach to Model Selection

Default to Firefly (1 credit) for standard edits, cleanup tasks, and basic extensions

  1. Upgrade to Gemini 2.5 (10 credits) when improved prompt interpretation or likeness consistency is required

  2. Select FLUX.1 Kontext (10 credits) when lighting and perspective matching are priorities

  3. Deploy FLUX.2 Pro (20 credits) when realism and texture quality are essential

  4. Reserve Gemini 3 (40 credits) for situations requiring exceptional text clarity and fine detail

The guiding principle is straightforward: begin with the most economical option and upgrade only when project requirements justify the additional cost.