
In this video I show you how a very simple use of a brush in Photoshop with some basic settings can be used to realistically blend images together to create a completely new background and composite a subject into a new scene …
No Limits Creativity and Visual Storytelling with Kirk Nelson aka The Pixel Pro
Watch the recording of this LIVE Broadcast from when I chatted with Photographer and Photoshop Artist Kirk Nelson aka The Pixel Pro and discovered how we creates his Fantasy Art Composites and creates Special Effects in his Images …
links mentioned in the video:
Kirk’s Website: the pixelpro.com
50% OFF Courses, Overlays ans Bruashes in Kirk’s Store using code: friendsofglyn
Kirk’s Store: thepixelpro.com/shop
Kirk’s link for a FREE PASS at the Photoshop Creativity Virtual Summit:
https://bit.ly/pixelpro-creative
Eric Pare ( Light Painting ): https://www.youtube.com/@Ericpare
Eric Pare Store: https://lightpainting.store/


AI versus Old-School Photoshop – Which One Wins?
Artificial Intelligence is revolutionizing Photoshop, but is it always the best option?
In this video, I show how technology we've had in Photoshop for a number of years can produce a much better result when expanding an image ... and the results might surprise you!
🔍 Watch to find out:
✅ Alterative tools/techniques to Generative Expand
✅ How to get BEST results using Content Aware Scale
⏰ Chapters:
00:00 - Introduction
02:03 - Generative Expand
04:30 - Content Aware FIll
06:58 - Content Aware Scale
09:50 - Even BETTER Results
Warrior Photo Shoot Behind the Scenes
Recently I was back with friends in the studio to take a portrait for what was to be a new image in my ongoing Warrior series …

So in this post I thought I’d share some of the Behind the Scenes including the inspiration, sourcing the clothing and props, lighting and background …
inspiration
The inspiration for this image came purely by fluke when posting on social media and seeing the below motivational digital art poster having been shared …
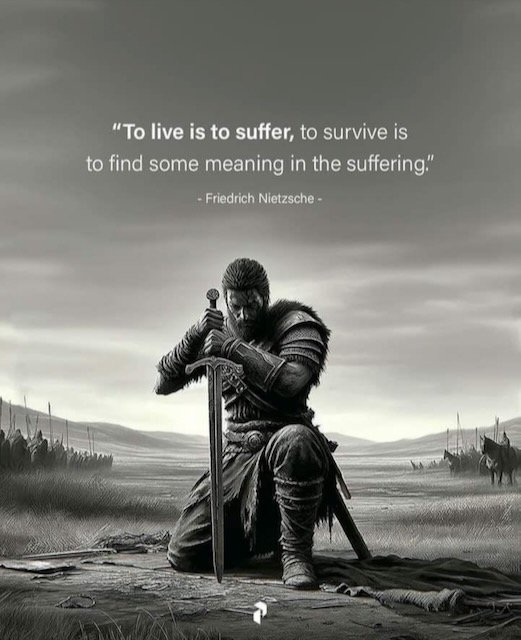
Whenever I see images online that I like and inspire me I always take a screen shot and save them in a Private “Inspiration” Album in my iPhoto Library for reference later on just incase I plan on a photo shoot.
clothing and props
For clothing, a few days beforehand we headed to Maroigold Costumes in Cardiff who provide clothing to the TV and Film Industry. I’ve used clothing and props from here several times in the past; more recently for the Viking pictures of my friend Simon ‘Foxy’ Fowler and before then when I took portraits of my friend Anthony and Make Up Artist Sarah in 1940’s attire … to mention just a couple.


With our friend Gerwyn set to be the model for this Warrior photo shoot, we all ( Ian, Anthony, Gerwyn and myself ) met up at Marigold, and in a short space of time managed to find eveything that was needed …

As for the props ( the sword ) this was intentionally not sourced as I wanted to combine the Photo Shoot and Retouching with the use of AI ( more about that in a moment ) but with everything sorted it was then studio time …
photo shoot in the studio
Lighting for this was kept clean and simple with one light high up behind Gerwyn to provide light on top of his head and shoulders and an additional light in front and slightly off camera axis to create a little bit of shape to the light ( highlights and shadows ) rather than being square on to him lighting him evenly.
Also on the floor in front of Gerwyn i placed a silver reflector to bounce a little fill light into the shadow areas to reveal a little more detail.

As I was using constant ( LED ) light for this shoot, setting up was really simple because of the WYSIWYG ( What You See Is What You Get ).

To know that the reflector was positoned correctly to bounce light into Gerwyn’s face, he just needed to look at it and if he was seeing a bright spot on the reflector we were good to go.
kit used
Camera: Sony A7RIV
Lens: Sony 24-105mm G f/4
Lighting: 2 x Westcott L60-B LED Constant Lights
Modifiers: 2 x Westcott Rapid Box Switch Medium Octa
Reflector: Westcott 2-in-1 Silver / White Reflector

I was also tethering into CaptureOne on my iPad Pro 12.9” which I had set into ‘Calibrated’ mode to give me a more accurate look at the files captured with regards to light levels and colour.
If you don’t know how to calibrate your iPad, check out this short video that I put together …
CAMERA settings
Focal Length: 70mm
Shutter Speed: 1/40 sec
Aperture: f/5.6
ISO: 3200
The L60-B LED directly behind Gerwyn on the boom arm was at 80% Power ; the L60-B LED directly in front of Gerwyn on the boom arm was at 50% Power.
results
Here’s a look at what was captured during the photo shoot; all very simple with just a few tweaks to the angle of wooden ‘stand-in’ sword and Gerwyn’s positioning …

the background
For the background I was recommended a location called Triscombe Stone near Bridgewater in Somerset, UK so in the week since the shoot I dropped the postcode in my SatNav and headed off …

When photographing the background I set the tripod to the exact same height that it was when I photographed Gerwyn in the studio. This was made very easy to remember because it just meant opening out the 3 legs but not extending them …

I set the same focal length on the lens and focused on the ground at a point that was approximately the same distance from the camera as Gerwyn was during the studio shoot.
The aperture when photographing the backgrounds wasn’t the same as in the studio; I went for f/9 - f/11 so that there was much more depth of field unlike the original f/5.6 … which is what Gerwyn was photographed at in the studio.
building the background
The background in the final image is made from 2 images that I combined together in Photoshop. The final merged background was then made wider using the Content Aware Scale function. Generative Expand and Content Aware Fill were not used because for this image they didn’t produce a desirable result.

Using adobe’s AI to create the sword
I used the Selection Brush Tool in Photoshop to select the stand-in wooden sword with a little bit extra added so that when the sword was generated, by typing a simple “Medievil Sword” prompt into the Contextual Task Bar, it gave extra space for additional elements to be added such as the dome shaped decorative element on the handle …


The final composite image
Anyway I hope that’s useful / interesting to you, but also to let you know … all of the retouching steps creating the composite I’m going through in one of the classes I’m presenting at FREE the upcoming Photoshop Creativty Virtual Summit …

If you Register for a FREE PASS you’ll have access to this class for 48 hours from when it goes LIVE during the Summit Week. Also if you grab a VIP Pass you get to keep ALL of the content from all of the instructors PLUS I’ll be creating an additional video taking you through all of the Behind the Scenes showing the studio set up, lighting etc when capturing the photographs of Gerwyn.

With friends ( L to R ) … Ian Munro, Gerwyn Williams, Yours Truly and Anthony Crothers

Of course I couldn’t resist doing a print …
This one from my Canon Pro 300 using Black & White Mode onto Portrait White 285 Fine Art Paper from Permajet …

As always if you do have any questions, please make use of the comments section below and I’ll reply to you there.
Thanks for looking in,
Glyn
I received an Award from Save a Life Cymru and NHS Wales
“This certificate is awarded for the instrumental action taken to save the life of another, who required urgent assistance after suffering a cardiac arrest”

The ‘journey’ started in South Wales on Wednesday 9th October 2024 at 5pm in the Car Park of the Three Cliffs Café overlooking a stunning coastline and what was to be one final coffee before the drive home after a great couple of days photography ; the ‘journey’ ended yesterday, Friday 21st February 2025 at the Wales Air Ambulance Base in Llanelli.
Honoured to receive this Award from NHS Wales and Save a Life Cymru but even more so, Incredibly Grateful and Relieved that it was presented to me by my dear friend Anthony

In a world where it can seem there is so much negativity, it is incredibly moving to see so many people whom you’ve never met before, people who don’t know you, pull together and show genuine love, concern and commitment to do whatever they can to help … and at the most serious and critical of times.

When so many would turn the other way and, for whatever reason, choose not to get involved, it is truly a wonderful act of humanity that there are those ordinary people who will do the extraordinary and step forward

By its very nature, the unexpected will happen when you least expect it. It might involve a stranger but it might involve a friend, a loved one and it could be YOU that fate calls on to step forward in some way.

No matter how scary, no matter how uncomfortable, no matter how much that little voice inside your head is telling you to not get involved … TAKE THAT STEP.

On October 9th last year … humanity well and truly stepped forward and I will be eternally grateful to one person in particular who despite his fears stepped beside me to help and was there for the duration doing what I was telling him and needed him to do.
There were others too that went above and beyond when they didn’t have to, but chose to, and to meet them again yesterday was wonderful and a day I WILL NEVER FORGET.
LOVE CONQUERS ALL … I’ve witnessed it. I’ve experienced it !!!

Anthony’s wife Elaine has also set up a JustGiving Page to help raise funds for the Wales Air Ambulance Charitable Trust where she explains a little more of what happened; you can check that out using this LINK

Latest Gear, News and Events with The Photography Insider - Mark Baber
Watch the recording of this LIVE Broadcast as I chat with Mark Baber aka “The Photography Insider” (London Camera Exchange Events Manager) and discuss the latest Gear, News and Events from within the Photography Industry …


😲 Most People MISS This! Perfect Compositing & Lighting in Photoshop
Did you know that Adobe’s Generative Fill AI isn’t just about adding objects—it’s smart enough to match the lighting and shadows in your photos perfectly? 🤯
In this video, I show you how Generative Fill uses AI to seamlessly blend new elements such as hair into your image while maintaining realistic light, shadows, and perspective.
⏰ Chapters:
00:00 - Introduction
00:40 - Adding Hair / Matching Lighting
03:50 - Viking Composite
05:10 - Viking Hair Selection New Workflow
The KEY to SUCCESSFUL PORTRAIT PHOTOGRAPHY with James Hole
Watch the recording of this LIVE Broadcast as I chat with UK based Commercial and Advertising Portrait Photographer James Hole and learn how he works with a team of professionals, plans a photo shoot and manages and communicates those in front of his camera to ensure that the experience of being photographed is an enjoyable one, the 'talent' feels relaxed and informed and ultimately the very best possible results are achieved.
links mentioned in the video:
James Hole Website: ( LINK )
James Hole on Instagram: @holephoto
Viewfinder Preview iPhone App: ( LINK )


ShiftCam ProGrip: The Best iPhone Photography & Video Grip?
Is the ShiftCam ProGrip the ultimate accessory for iPhone photography and videography? In this video I give you hands-on honest look both positive and negative of this iPhone Traditional Camera Style Grip; its ergonomic design, wireless charging, and enhanced grip to see if it truly transforms your iPhone into a pro camera setup. Whether you're a content creator, mobile filmmaker, or just love taking photos, this grip might be a game-changer!
🔹 What You’ll Learn in This Video:
✔️ Hands-on review of the ShiftCam ProGrip
✔️ Key features & benefits for iPhone photography & videography
✔️ How it enhances stability, ergonomics, and battery life
✔️ Is it worth the price?
📌 Check out the ShiftCam ProGrip and other Mobile Accessories I use here: ( LINK )
Improved SUBJECT and SKY SELECTIONS with the INTERSECT MASKING TOOL in Lightroom and Camera Raw
Fully understand the EDITING POWER of the Intersect Masking Tool in Lightroom and Camera and see how to achieve much improved selections of Subjects and Sky.
You’ll learn:
✅ How to fully understand the Intersect command and use it effectively
✅ Better Subject & Sky Selections for improved accuracy
✅ Advanced local adjustments for pro-level results
✅ Tips & tricks to refine your edits for a natural and seamless look
⏰ Chapters:
00:00 - Introduction
00:59 - Cropping
01:16 - Remove Tool
01:39 - Dark and Moody Preset
02:22 - Adaptive Sky Preset
02:47 - Color Mixer
03:27 - Inproved Select Subject
05:31 - Improved Sky Selection
06:45 - Intersect for Adjusting Brightness
09:25 - Making the Alloy Wheels POP!
10:22 - Global Colour Adjustments
12:39 - Refinijng the Adpative Sky Mask
13:10 - Before / After